HP Officejet 4620 User Guide - Page 107
Dial Tone Detection, The Fax Line Condition test failed, Solution, Fax Line Condition Test - e all in one printer reviews
 |
View all HP Officejet 4620 manuals
Add to My Manuals
Save this manual to your list of manuals |
Page 107 highlights
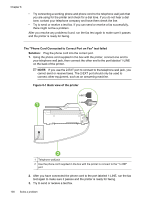
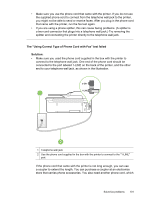
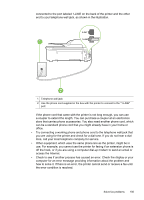
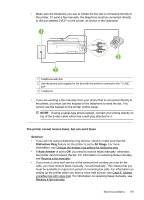
After you resolve any problems found, run the fax test again to make sure it passes and the printer is ready for faxing. If the Dial Tone Detection test continues to fail, contact your telephone company and have them check the phone line. The "Fax Line Condition" test failed Solution: • Make sure you connect the printer to an analog phone line or you cannot send or receive faxes. To check if your phone line is digital, connect a regular analog phone to the line and listen for a dial tone. If you do not hear a normal sounding dial tone, it might be a phone line set up for digital phones. Connect the printer to an analog phone line and try sending or receiving a fax. • Check the connection between the telephone wall jack and the printer to make sure the phone cord is secure. • Make sure you have correctly connected the printer to the telephone wall jack. Using the phone cord supplied in the box with the printer, connect one end to your telephone wall jack, then connect the other end to the port labeled 1-LINE on the back of the printer. • Other equipment that uses the same phone line as the printer might be causing the test to fail. To find out if other equipment is causing a problem, disconnect everything from the phone line, and then run the test again. ◦ If the Fax Line Condition Test passes without the other equipment, then one or more pieces of the equipment is causing problems; try adding them back one at a time and rerunning the test each time, until you identify which piece of equipment is causing the problem. ◦ If the Fax Line Condition Test fails without the other equipment, connect the printer to a working phone line and continue reviewing the troubleshooting information in this section. • If you are using a phone splitter, this can cause faxing problems. (A splitter is a two-cord connector that plugs into a telephone wall jack.) Try removing the splitter and connecting the printer directly to the telephone wall jack. • Make sure you use the phone cord that came with the printer. If you do not use the supplied phone cord to connect from the telephone wall jack to the printer, you might not be able to send or receive faxes. After you plug in the phone cord that came with the printer, run the fax test again. After you resolve any problems found, run the fax test again to make sure it passes and the printer is ready for faxing. If the Fax Line Condition test continues to fail and you experience problems faxing, contact your telephone company and have them check the phone line. The display always shows Phone Off Hook Solution: You are using the wrong type of phone cord. Make sure you are using the phone cord that came with the printer to connect the printer to your phone line. If the phone cord that came with the printer is not long enough, you can use a coupler to extend the length. You can purchase a coupler at an electronics store Solve fax problems 103
-
 1
1 -
2
-
3
-
4
-
5
-
6
-
7
-
8
-
9
-
10
-
11
-
12
-
13
-
14
-
15
-
16
-
17
-
18
-
19
-
20
-
21
-
22
-
23
-
24
-
25
-
26
-
27
-
28
-
29
-
30
-
31
-
32
-
33
-
34
-
35
-
36
-
37
-
38
-
39
-
40
-
41
-
42
-
43
-
44
-
45
-
46
-
47
-
48
-
49
-
50
-
51
-
52
-
53
-
54
-
55
-
56
-
57
-
58
-
59
-
60
-
61
-
62
-
63
-
64
-
65
-
66
-
67
-
68
-
69
-
70
-
71
-
72
-
73
-
74
-
75
-
76
-
77
-
78
-
79
-
80
-
81
-
82
-
83
-
84
-
85
-
86
-
87
-
88
-
89
-
90
-
91
-
92
-
93
-
94
-
95
-
96
-
97
-
98
-
99
-
100
-
101
-
 102
102 -
 103
103 -
 104
104 -
 105
105 -
 106
106 -
 107
107 -
 108
108 -
 109
109 -
 110
110 -
 111
111 -
 112
112 -
113
-
114
-
115
-
116
-
117
-
118
-
119
-
120
-
121
-
122
-
123
-
124
-
125
-
126
-
127
-
128
-
129
-
130
-
131
-
132
-
133
-
134
-
135
-
136
-
137
-
138
-
139
-
140
-
141
-
142
-
143
-
144
-
145
-
146
-
147
-
148
-
149
-
150
-
151
-
152
-
153
-
154
-
155
-
156
-
157
-
158
-
159
-
160
-
161
-
162
-
163
-
164
-
165
-
166
-
167
-
168
-
169
-
170
-
171
-
172
-
173
-
174
-
175
-
176
-
177
-
178
-
179
-
180
-
181
-
182
-
183
-
184
-
185
-
186
-
187
-
188
-
189
-
190
-
191
-
192
-
193
-
194
-
195
-
196
-
197
-
198
-
199
-
200
-
201
-
202
-
203
-
204
-
205
-
206
-
207
-
208
-
209
-
210
-
211
-
212
-
213
-
214
-
215
-
216
-
217
-
218
-
219
-
220
-
221
-
222
-
223
-
224
-
225
-
226
-
227
-
228
 |
 |