HP Officejet 6600 User Guide - Page 129
Understand the Printer Status Report, Configuration - reset
 |
View all HP Officejet 6600 manuals
Add to My Manuals
Save this manual to your list of manuals |
Page 129 highlights
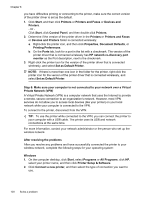
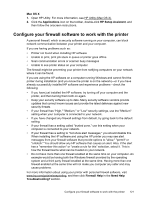
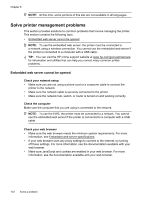
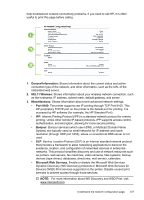
◦ Make sure the printer is installed on the same subnet as the computers that use the printer. ◦ If the installation program cannot discover the printer, print the network configuration page and enter the IP address manually in the installation program. For more information, see Understand the network configuration page. • If you are using a computer running Windows, make sure that the network ports created in the printer driver match the printer IP address: ◦ Print the printer's network configuration page. For more information, see Understand the network configuration page. ◦ Click Start, and then click Printers or Printers and Faxes or Devices and Printers. - Or Click Start, click Control Panel, and then double-click Printers. ◦ Right-click the printer icon, click Properties, and then click the Ports tab. ◦ Select the TCP/IP port for the printer, and then click Configure Port. ◦ Compare the IP address listed in the dialog box and make sure it matches the IP address listed on the network configuration page. If the IP addresses are different, change the IP address in the dialog box to match the address on the network configuration page. ◦ Click OK twice to save the settings and close the dialog boxes. To reset the printer's network settings 1. Touch (right arrow), touch Setup, and then touch Network. Touch Restore Network Defaults, and then touch Yes. A message appears stating that the network defaults have been restored. 2. Touch (right arrow), touch Setup, touch Reports, and then touch Print Network Configuration Page to print the network configuration page and verify that the network settings have been reset. Understand the Printer Status Report Use the printer status report to view current printer information and ink cartridge status. Also use the printer status report to help you troubleshoot problems with the printer. The printer status report also contains a log of recent events. Understand the Printer Status Report 125
-
 1
1 -
2
-
3
-
4
-
5
-
6
-
7
-
8
-
9
-
10
-
11
-
12
-
13
-
14
-
15
-
16
-
17
-
18
-
19
-
20
-
21
-
22
-
23
-
24
-
25
-
26
-
27
-
28
-
29
-
30
-
31
-
32
-
33
-
34
-
35
-
36
-
37
-
38
-
39
-
40
-
41
-
42
-
43
-
44
-
45
-
46
-
47
-
48
-
49
-
50
-
51
-
52
-
53
-
54
-
55
-
56
-
57
-
58
-
59
-
60
-
61
-
62
-
63
-
64
-
65
-
66
-
67
-
68
-
69
-
70
-
71
-
72
-
73
-
74
-
75
-
76
-
77
-
78
-
79
-
80
-
81
-
82
-
83
-
84
-
85
-
86
-
87
-
88
-
89
-
90
-
91
-
92
-
93
-
94
-
95
-
96
-
97
-
98
-
99
-
100
-
101
-
102
-
103
-
104
-
105
-
106
-
107
-
108
-
109
-
110
-
111
-
112
-
113
-
114
-
115
-
116
-
117
-
118
-
119
-
120
-
121
-
122
-
123
-
 124
124 -
 125
125 -
 126
126 -
 127
127 -
 128
128 -
 129
129 -
 130
130 -
 131
131 -
 132
132 -
 133
133 -
 134
134 -
135
-
136
-
137
-
138
-
139
-
140
-
141
-
142
-
143
-
144
-
145
-
146
-
147
-
148
-
149
-
150
-
151
-
152
-
153
-
154
-
155
-
156
-
157
-
158
-
159
-
160
-
161
-
162
-
163
-
164
-
165
-
166
-
167
-
168
-
169
-
170
-
171
-
172
-
173
-
174
-
175
-
176
-
177
-
178
-
179
-
180
-
181
-
182
-
183
-
184
-
185
-
186
-
187
-
188
-
189
-
190
-
191
-
192
-
193
-
194
-
195
-
196
-
197
-
198
-
199
-
200
-
201
-
202
-
203
-
204
-
205
-
206
-
207
-
208
-
209
-
210
-
211
-
212
-
213
-
214
-
215
-
216
-
217
-
218
-
219
-
220
 |
 |