HP Officejet 7000 User Guide - Page 58
If you see no defects, Troubleshooting tips and resources - paper not feeding
 |
View all HP Officejet 7000 manuals
Add to My Manuals
Save this manual to your list of manuals |
Page 58 highlights
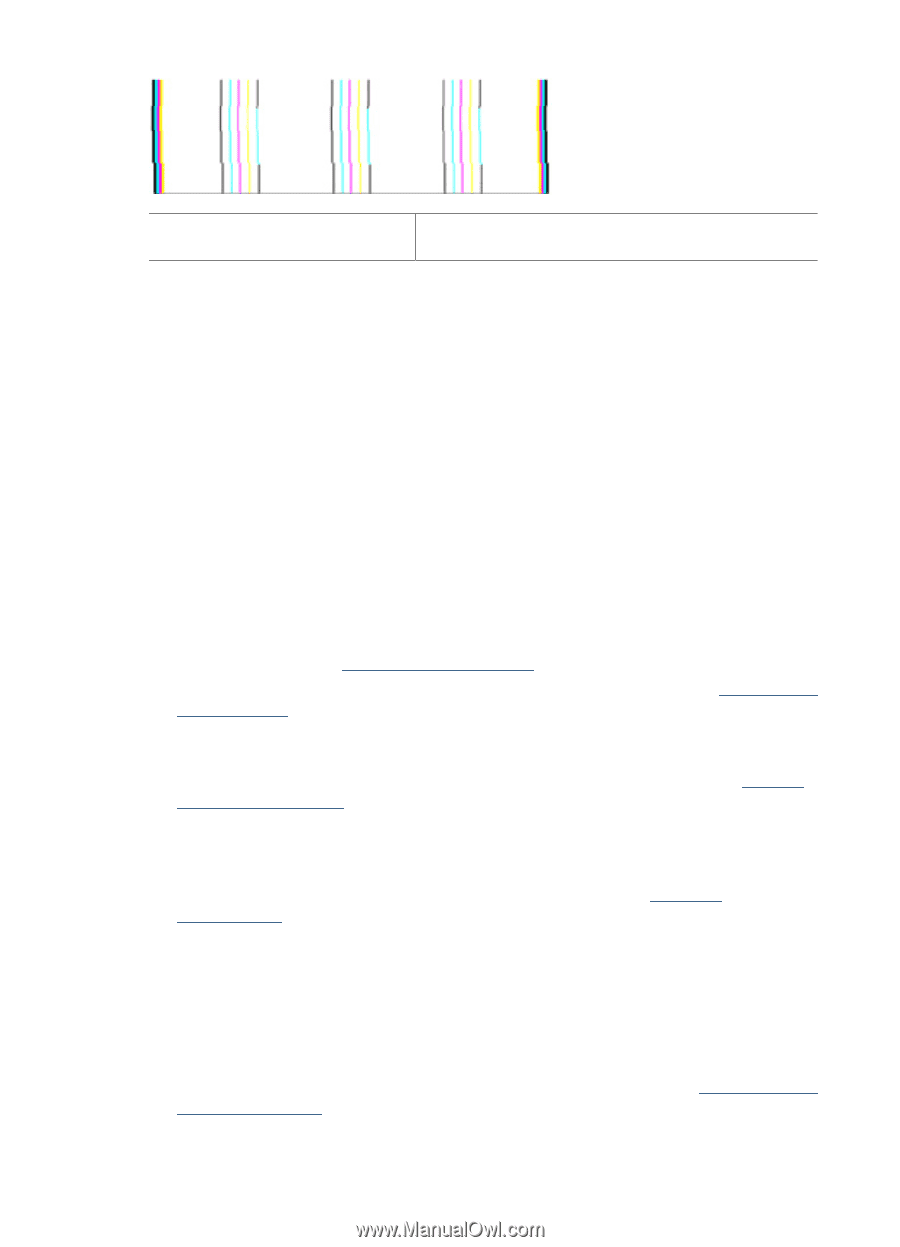
Chapter 4 Examples of a bad alignment pattern The lines are jagged - align the printer. If that does not work, contact HP. If you see no defects If you do not see any defects on the print quality report, then the printing system is working correctly. There is no reason to replace supplies or have the product serviced, because they are functioning properly. If you still have a print quality problem, here are some other things you can check: • Check the paper. • Check the print settings. • Make sure your image has sufficient resolution. • If the problem seems confined to a band near the edge of your printout, use the software you installed with the product or another software application to rotate the image 180 degrees. The problem might not appear on the other end of the print. Troubleshooting tips and resources Use the following tips and resources to resolve printing problems. • For a paper jam, see Clear a jam in the device. • For paper-feed problems, such as the paper skew and paper pick, see Solve paper- feed problems. • Power light is on and not blinking. When the device is turned on for the first time, it takes approximately 12 minutes to initialize. • Make sure the device is in the ready state. If lights are on or blinking, see Control- panel lights reference. • No error messages appear on the computer screen. • Power cord and other cables are working, and are firmly connected to the device. Make sure the device is connected firmly to a functioning alternating current (AC) power outlet, and is turned on. For voltage requirements, see Electrical specifications. • Media is loaded correctly in the tray and is not jammed in the device. • Printhead and ink cartridges are properly installed in their correct color-coded slots. Press down firmly on each one to ensure proper contact. • All latches and covers are closed. • The rear access panel is locked into place. • All packing tapes and materials are removed. • The device can print a printer status page. For more information, see Understand the printer status page. 54 Maintain and troubleshoot
-
 1
1 -
2
-
3
-
4
-
5
-
6
-
7
-
8
-
9
-
10
-
11
-
12
-
13
-
14
-
15
-
16
-
17
-
18
-
19
-
20
-
21
-
22
-
23
-
24
-
25
-
26
-
27
-
28
-
29
-
30
-
31
-
32
-
33
-
34
-
35
-
36
-
37
-
38
-
39
-
40
-
41
-
42
-
43
-
44
-
45
-
46
-
47
-
48
-
49
-
50
-
51
-
52
-
 53
53 -
 54
54 -
 55
55 -
 56
56 -
 57
57 -
 58
58 -
 59
59 -
 60
60 -
 61
61 -
 62
62 -
 63
63 -
64
-
65
-
66
-
67
-
68
-
69
-
70
-
71
-
72
-
73
-
74
-
75
-
76
-
77
-
78
-
79
-
80
-
81
-
82
-
83
-
84
-
85
-
86
-
87
-
88
-
89
-
90
-
91
-
92
-
93
-
94
-
95
-
96
-
97
-
98
-
99
-
100
-
101
-
102
-
103
-
104
-
105
-
106
-
107
-
108
-
109
-
110
-
111
-
112
-
113
-
114
-
115
-
116
-
117
-
118
-
119
-
120
-
121
-
122
-
123
-
124
-
125
-
126
-
127
-
128
-
129
-
130
-
131
-
132
-
133
-
134
-
135
-
136
-
137
-
138
-
139
-
140
-
141
-
142
-
143
-
144
-
145
-
146
-
147
-
148
 |
 |