HP Officejet 7000 User Guide - Page 85
Ink streaks on the back of the paper, Paper is not picked up from the input tray, Cause
 |
View all HP Officejet 7000 manuals
Add to My Manuals
Save this manual to your list of manuals |
Page 85 highlights
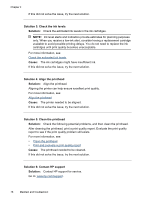
If you removed the rear door to clear a paper jam, replace it. Gently push the door forward until it snaps into place. Cause: The rear door was not securely installed. Ink streaks on the back of the paper Try the following solutions if there is smeared ink on the back of your printout. • Solution 1: Print on a page of plain paper • Solution 2: Wait while the ink dries Solution 1: Print on a page of plain paper Solution: Print one or several pages of plain paper to soak up any excess ink in the product. To remove excess ink using plain paper 1. Load several sheets of plain paper in the input tray. 2. Wait five minutes. 3. Print a document with little or no text. 4. Check the back of the paper for ink. If there is still ink on the back of the paper, try printing on another page of plain paper. Cause: Ink accumulated inside the product, where the back of the paper rests during printing. If this did not solve the issue, try the next solution. Solution 2: Wait while the ink dries Solution: Wait at least thirty minutes for the ink inside the product to dry, then try the print job again. Cause: The excess ink in the product needed to dry out. Paper is not picked up from the input tray Try the following solutions to resolve the issue. Solutions are listed in order, with the most likely solution first. If the first solution does not solve the problem, continue trying the remaining solutions until the issue is resolved. • Solution 1: Restart the product • Solution 2: Make sure the paper is loaded correctly • Solution 3: Check the print settings • Solution 4: Clean the rollers • Solution 5: Check for a paper jam • Solution 6: Service the product Print quality troubleshooting 81
-
 1
1 -
2
-
3
-
4
-
5
-
6
-
7
-
8
-
9
-
10
-
11
-
12
-
13
-
14
-
15
-
16
-
17
-
18
-
19
-
20
-
21
-
22
-
23
-
24
-
25
-
26
-
27
-
28
-
29
-
30
-
31
-
32
-
33
-
34
-
35
-
36
-
37
-
38
-
39
-
40
-
41
-
42
-
43
-
44
-
45
-
46
-
47
-
48
-
49
-
50
-
51
-
52
-
53
-
54
-
55
-
56
-
57
-
58
-
59
-
60
-
61
-
62
-
63
-
64
-
65
-
66
-
67
-
68
-
69
-
70
-
71
-
72
-
73
-
74
-
75
-
76
-
77
-
78
-
79
-
 80
80 -
 81
81 -
 82
82 -
 83
83 -
 84
84 -
 85
85 -
 86
86 -
 87
87 -
 88
88 -
 89
89 -
 90
90 -
91
-
92
-
93
-
94
-
95
-
96
-
97
-
98
-
99
-
100
-
101
-
102
-
103
-
104
-
105
-
106
-
107
-
108
-
109
-
110
-
111
-
112
-
113
-
114
-
115
-
116
-
117
-
118
-
119
-
120
-
121
-
122
-
123
-
124
-
125
-
126
-
127
-
128
-
129
-
130
-
131
-
132
-
133
-
134
-
135
-
136
-
137
-
138
-
139
-
140
-
141
-
142
-
143
-
144
-
145
-
146
-
147
-
148
 |
 |
