HP Officejet 7000 User Guide - Page 96
Make sure the ink cartridges are properly installed, CAUTION
 |
View all HP Officejet 7000 manuals
Add to My Manuals
Save this manual to your list of manuals |
Page 96 highlights
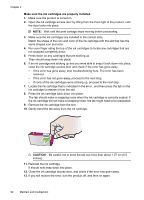
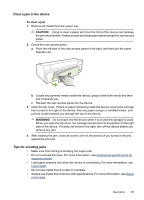
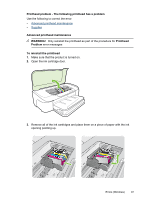
Chapter 4 Make sure the ink cartridges are properly installed 1. Make sure the product is turned on. 2. Open the ink cartridge access door by lifting from the front right of the product, until the door locks into place. NOTE: Wait until the print carriage stops moving before proceeding. 3. Make sure the ink cartridges are installed in the correct slots. Match the shape of the icon and color of the ink cartridge with the slot that has the same shaped icon and color. 4. Run your finger along the top of the ink cartridges to locate any cartridges that are not snapped completely down. 5. Press down on any cartridges that are sticking up. They should snap down into place. 6. If an ink cartridge was sticking up and you were able to snap it back down into place, close the ink cartridge access door and check if the error has gone away. • If the error has gone away, stop troubleshooting here. The error has been resolved. • If the error has not gone away, proceed to the next step. • If none of the ink cartridges were sticking up, proceed to the next step. 7. Locate the ink cartridge that is indicated in the error , and then press the tab on the ink cartridge to release it from the slot. 8. Press the ink cartridge back down into place. The tab should make a snapping noise when the ink cartridge is correctly seated. If the ink cartridge did not make a snapping noise, the tab might need to be readjusted. 9. Remove the ink cartridge from the slot. 10. Gently bend the tab away from the ink cartridge. CAUTION: Be careful not to bend the tab out more than about 1.27 cm (0.5 inches). 11. Reinstall the ink cartridge. It should now snap down into place. 12. Close the ink cartridge access door, and check if the error has gone away. 13. If you still receive the error, turn the product off, and then on again. 92 Maintain and troubleshoot
-
 1
1 -
2
-
3
-
4
-
5
-
6
-
7
-
8
-
9
-
10
-
11
-
12
-
13
-
14
-
15
-
16
-
17
-
18
-
19
-
20
-
21
-
22
-
23
-
24
-
25
-
26
-
27
-
28
-
29
-
30
-
31
-
32
-
33
-
34
-
35
-
36
-
37
-
38
-
39
-
40
-
41
-
42
-
43
-
44
-
45
-
46
-
47
-
48
-
49
-
50
-
51
-
52
-
53
-
54
-
55
-
56
-
57
-
58
-
59
-
60
-
61
-
62
-
63
-
64
-
65
-
66
-
67
-
68
-
69
-
70
-
71
-
72
-
73
-
74
-
75
-
76
-
77
-
78
-
79
-
80
-
81
-
82
-
83
-
84
-
85
-
86
-
87
-
88
-
89
-
90
-
 91
91 -
 92
92 -
 93
93 -
 94
94 -
 95
95 -
 96
96 -
 97
97 -
 98
98 -
 99
99 -
 100
100 -
 101
101 -
102
-
103
-
104
-
105
-
106
-
107
-
108
-
109
-
110
-
111
-
112
-
113
-
114
-
115
-
116
-
117
-
118
-
119
-
120
-
121
-
122
-
123
-
124
-
125
-
126
-
127
-
128
-
129
-
130
-
131
-
132
-
133
-
134
-
135
-
136
-
137
-
138
-
139
-
140
-
141
-
142
-
143
-
144
-
145
-
146
-
147
-
148
 |
 |