HP Officejet 7500A User Guide - Page 142
The Phone Cord Connected to Correct Port on Fax test failed, Solution
 |
View all HP Officejet 7500A manuals
Add to My Manuals
Save this manual to your list of manuals |
Page 142 highlights
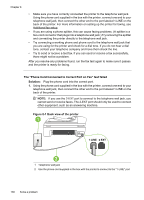
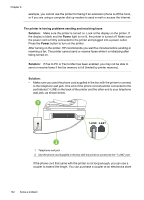
Chapter 8 • Make sure you have correctly connected the printer to the telephone wall jack. Using the phone cord supplied in the box with the printer, connect one end to your telephone wall jack, then connect the other end to the port labeled 1-LINE on the back of the printer. For more information on setting up the printer for faxing, see Additional fax setup. • If you are using a phone splitter, this can cause faxing problems. (A splitter is a two-cord connector that plugs into a telephone wall jack.) Try removing the splitter and connecting the printer directly to the telephone wall jack. • Try connecting a working phone and phone cord to the telephone wall jack that you are using for the printer and check for a dial tone. If you do not hear a dial tone, contact your telephone company and have them check the line. • Try to send or receive a test fax. If you can send or receive a fax successfully, there might not be a problem. After you resolve any problems found, run the fax test again to make sure it passes and the printer is ready for faxing. The "Phone Cord Connected to Correct Port on Fax" test failed Solution: Plug the phone cord into the correct port. 1. Using the phone cord supplied in the box with the printer, connect one end to your telephone wall jack, then connect the other end to the port labeled 1-LINE on the back of the printer. NOTE: If you use the 2-EXT port to connect to the telephone wall jack, you cannot send or receive faxes. The 2-EXT port should only be used to connect other equipment, such as an answering machine. Figure 8-1 Back view of the printer 1 2 1 Telephone wall jack 2 Use the phone cord supplied in the box with the printer to connect to the "1-LINE" port 138 Solve a problem
-
 1
1 -
2
-
3
-
4
-
5
-
6
-
7
-
8
-
9
-
10
-
11
-
12
-
13
-
14
-
15
-
16
-
17
-
18
-
19
-
20
-
21
-
22
-
23
-
24
-
25
-
26
-
27
-
28
-
29
-
30
-
31
-
32
-
33
-
34
-
35
-
36
-
37
-
38
-
39
-
40
-
41
-
42
-
43
-
44
-
45
-
46
-
47
-
48
-
49
-
50
-
51
-
52
-
53
-
54
-
55
-
56
-
57
-
58
-
59
-
60
-
61
-
62
-
63
-
64
-
65
-
66
-
67
-
68
-
69
-
70
-
71
-
72
-
73
-
74
-
75
-
76
-
77
-
78
-
79
-
80
-
81
-
82
-
83
-
84
-
85
-
86
-
87
-
88
-
89
-
90
-
91
-
92
-
93
-
94
-
95
-
96
-
97
-
98
-
99
-
100
-
101
-
102
-
103
-
104
-
105
-
106
-
107
-
108
-
109
-
110
-
111
-
112
-
113
-
114
-
115
-
116
-
117
-
118
-
119
-
120
-
121
-
122
-
123
-
124
-
125
-
126
-
127
-
128
-
129
-
130
-
131
-
132
-
133
-
134
-
135
-
136
-
 137
137 -
 138
138 -
 139
139 -
 140
140 -
 141
141 -
 142
142 -
 143
143 -
 144
144 -
 145
145 -
 146
146 -
 147
147 -
148
-
149
-
150
-
151
-
152
-
153
-
154
-
155
-
156
-
157
-
158
-
159
-
160
-
161
-
162
-
163
-
164
-
165
-
166
-
167
-
168
-
169
-
170
-
171
-
172
-
173
-
174
-
175
-
176
-
177
-
178
-
179
-
180
-
181
-
182
-
183
-
184
-
185
-
186
-
187
-
188
-
189
-
190
-
191
-
192
-
193
-
194
-
195
-
196
-
197
-
198
-
199
-
200
-
201
-
202
-
203
-
204
-
205
-
206
-
207
-
208
-
209
-
210
-
211
-
212
-
213
-
214
-
215
-
216
-
217
-
218
-
219
-
220
-
221
-
222
-
223
-
224
-
225
-
226
-
227
-
228
-
229
-
230
-
231
-
232
-
233
-
234
-
235
-
236
-
237
-
238
-
239
-
240
-
241
-
242
-
243
-
244
-
245
-
246
-
247
-
248
-
249
-
250
-
251
-
252
 |
 |
