HP Officejet 7500A User Guide - Page 224
DSL/ADSL modem
 |
View all HP Officejet 7500A manuals
Add to My Manuals
Save this manual to your list of manuals |
Page 224 highlights
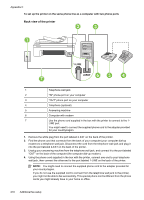
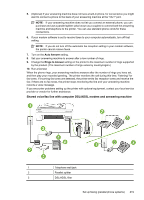
Appendix C (continued) 4 5 6 7 8 Phone cord provided with the printer connected to the 1-LINE port on the back of the printer You might need to connect the supplied phone cord to the adapter provided for your country/region. DSL/ADSL modem Computer Answering machine Telephone (optional) NOTE: You must purchase a parallel splitter. A parallel splitter has one RJ-11 port on the front and two RJ-11 ports on the back. Do not use a 2-line phone splitter, a serial splitter, or a parallel splitter which has two RJ-11 ports on the front and a plug on the back. To set up the printer with a computer DSL/ADSL modem 1. Obtain a DSL/ADSL filter from your DSL/ADSL provider. NOTE: Phones in other parts of the home/office sharing the same phone number with DSL/ ADSL service must be connected to additional DSL/ADSL filters; otherwise, noise occurs when making voice calls. 2. Using the phone cord supplied in the box with the printer, connect one end to the DSL/ADSL filter, then connect the other end to the port labeled 1-LINE on the back of the printer. NOTE: You might need to connect the supplied phone cord to the adapter provided for your country/region. If you do not use the supplied cord to connect from the DSL/ADSL filter to the printer, you might not be able to fax successfully. This special phone cord is different from the phone cords you might already have in your home or office. 3. Connect the DSL/ADSL filter to the splitter. 4. Unplug the answering machine from the telephone wall jack, and connect it to the port labeled 2-EXT on the back of the printer. NOTE: If you do not connect your answering machine directly to the printer, fax tones from a sending fax machine might be recorded on your answering machine, and you might not receive faxes with the printer. 5. Connect the DSL modem to the parallel splitter. 6. Connect the parallel splitter to the wall jack. 7. Set your answering machine to answer after a low number of rings. 8. Change your Rings to Answer setting on the printer to the maximum number of rings supported by the printer. NOTE: The maximum number of rings varies by country/region. 9. Run a fax test. When the phone rings, your answering machine answers after the number of rings you have set, and then play your recorded greeting. The printer monitors the call during this time, "listening" for 220 Additional fax setup
-
 1
1 -
2
-
3
-
4
-
5
-
6
-
7
-
8
-
9
-
10
-
11
-
12
-
13
-
14
-
15
-
16
-
17
-
18
-
19
-
20
-
21
-
22
-
23
-
24
-
25
-
26
-
27
-
28
-
29
-
30
-
31
-
32
-
33
-
34
-
35
-
36
-
37
-
38
-
39
-
40
-
41
-
42
-
43
-
44
-
45
-
46
-
47
-
48
-
49
-
50
-
51
-
52
-
53
-
54
-
55
-
56
-
57
-
58
-
59
-
60
-
61
-
62
-
63
-
64
-
65
-
66
-
67
-
68
-
69
-
70
-
71
-
72
-
73
-
74
-
75
-
76
-
77
-
78
-
79
-
80
-
81
-
82
-
83
-
84
-
85
-
86
-
87
-
88
-
89
-
90
-
91
-
92
-
93
-
94
-
95
-
96
-
97
-
98
-
99
-
100
-
101
-
102
-
103
-
104
-
105
-
106
-
107
-
108
-
109
-
110
-
111
-
112
-
113
-
114
-
115
-
116
-
117
-
118
-
119
-
120
-
121
-
122
-
123
-
124
-
125
-
126
-
127
-
128
-
129
-
130
-
131
-
132
-
133
-
134
-
135
-
136
-
137
-
138
-
139
-
140
-
141
-
142
-
143
-
144
-
145
-
146
-
147
-
148
-
149
-
150
-
151
-
152
-
153
-
154
-
155
-
156
-
157
-
158
-
159
-
160
-
161
-
162
-
163
-
164
-
165
-
166
-
167
-
168
-
169
-
170
-
171
-
172
-
173
-
174
-
175
-
176
-
177
-
178
-
179
-
180
-
181
-
182
-
183
-
184
-
185
-
186
-
187
-
188
-
189
-
190
-
191
-
192
-
193
-
194
-
195
-
196
-
197
-
198
-
199
-
200
-
201
-
202
-
203
-
204
-
205
-
206
-
207
-
208
-
209
-
210
-
211
-
212
-
213
-
214
-
215
-
216
-
217
-
218
-
 219
219 -
 220
220 -
 221
221 -
 222
222 -
 223
223 -
 224
224 -
 225
225 -
 226
226 -
 227
227 -
 228
228 -
 229
229 -
230
-
231
-
232
-
233
-
234
-
235
-
236
-
237
-
238
-
239
-
240
-
241
-
242
-
243
-
244
-
245
-
246
-
247
-
248
-
249
-
250
-
251
-
252
 |
 |