HP Officejet J3600 User Guide
HP Officejet J3600 - All-in-One Printer Manual
 |
View all HP Officejet J3600 manuals
Add to My Manuals
Save this manual to your list of manuals |
HP Officejet J3600 manual content summary:
- HP Officejet J3600 | User Guide - Page 1
HP Officejet J3500/J3600 User Guide - HP Officejet J3600 | User Guide - Page 2
- HP Officejet J3600 | User Guide - Page 3
HP Officejet J3500/J3600 All-in-One series User Guide - HP Officejet J3600 | User Guide - Page 4
with a qualified electrician. 3. Observe all warnings and instructions marked on the product. 4. Unplug this product from troubleshoot. 9. There are no user-serviceable parts inside. Refer servicing to qualified service paper guides can be operated by users with limited strength and reach. Support For - HP Officejet J3600 | User Guide - Page 5
document feeder (ADF 20 Select print media...21 Tips for selecting and using print media 21 Understand specifications for supported media 22 Understand supported sizes 22 Understand supported media types and weights 23 Set minimum margins...24 Load media...24 Load full-size paper...24 Load 10 - HP Officejet J3600 | User Guide - Page 6
Print on special and custom-sized media 29 Print on special or custom-sized media (Windows 30 Print on special or custom-sized media (Mac OS 30 Set up speed-dial entries...31 Set up fax numbers as speed-dial entries or groups 31 Set up speed-dial entries 31 Set up a speed-dial group 31 Print - HP Officejet J3600 | User Guide - Page 7
53 Change the Lighter / Darker setting 54 Set new default settings 55 Send a fax in Error Correction Mode 55 Receive a fax...55 Receive a fax manually...56 Set up backup fax reception 56 Reprint received faxes from memory 57 Poll to receive a fax...58 Forward faxes to another number 58 Set - HP Officejet J3600 | User Guide - Page 8
a PBX phone system or an ISDN line 78 Case D: Fax with a distinctive ring service on the same line 79 Case E: Shared voice/fax line 80 Case F: Shared voice reinstall the software 99 8 Maintain and troubleshoot Work with print cartridges...103 Supported print cartridges 103 Handle the print - HP Officejet J3600 | User Guide - Page 9
dots are missing from text or graphics 122 Solve paper-feed problems...123 Media is not supported for the printer or tray 123 Media is not picked up defects are apparent 129 Solve fax problems...129 The fax test failed...130 Troubleshoot installation issues 141 Hardware installation suggestions - HP Officejet J3600 | User Guide - Page 10
149 Obtain HP telephone support 149 Before you call...149 Support process...149 HP support by phone...150 Phone support period 150 Telephone support numbers 150 Placing a call...151 After the phone support period 152 Additional warranty options 152 HP Quick Exchange Service (Japan 152 Call HP - HP Officejet J3600 | User Guide - Page 11
Contents Declaration of conformity...169 Environmental product stewardship program 170 Paper use...170 Plastics...170 Material safety data sheets 170 Recycling program...170 HP inkjet supplies recycling program 170 Disposal of waste equipment by users in private households in the European Union - HP Officejet J3600 | User Guide - Page 12
8 - HP Officejet J3600 | User Guide - Page 13
product information and further troubleshooting resources that are not included in this guide from the following resources: Resource Setup poster Fax Getting Started Guide Readme file and release notes Toolbox (Microsoft® Windows®) HP Printer Utility (Mac OS) (Mac OS supported by HP Officejet J3600 - HP Officejet J3600 | User Guide - Page 14
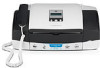
about using the software. Location For more information, see Obtain HP telephone support. For more information, see Use the HP photo and imaging software. view 1 Document feeder tray 2 Control panel display 3 Paper guides 4 Control panel 5 Print cartridge door 6 Input tray 7 Tray extender 8 - HP Officejet J3600 | User Guide - Page 15
(continued) 10 Document catcher extender 11 Handset Printing supplies area 1 Print cartridge door 2 Print cartridges NOTE: The HP Officejet J3500 supports a black print cartridge only. Back view 1 Power connection 2 Rear universal serial bus (USB) port 3 Fax ports (1-LINE and 2-EXT) 4 Rear door 5 - HP Officejet J3600 | User Guide - Page 16
: Switches among the Answer Mode settings. Depending on the setting, the device automatically answers incoming phone calls, requires you to receive the fax manually, or "listens" for fax tones. Flash: Cancels a fax and brings up a dial tone. Also used to answer a call waiting. Setup: Presents the - HP Officejet J3600 | User Guide - Page 17
One computer connected with a USB cable to the rear USB 2.0 high-speed port on the device. All features are supported. Follow the setup poster guide for detailed instructions. Up to five computers. The host computer must be turned on at all times, or the other computers cannot print to - HP Officejet J3600 | User Guide - Page 18
Chapter 1 14 Get started - HP Officejet J3600 | User Guide - Page 19
2 Use the device This section contains the following topics: • Use control panel menus • Control-panel message types • Change device settings • Use the HP Solution Center (Windows) • Use the HP photo and imaging software • Text and symbols • Load originals • Select print media • Load media • Print - HP Officejet J3600 | User Guide - Page 20
turn off the device, and then turn it on again. In most situations, this action solves the problem. If the message persists, your device might need service. For more information, see Support and warranty. Critical error messages Critical error messages inform you of a device failure. Some of these - HP Officejet J3600 | User Guide - Page 21
device in the Devices drop-down menu. 3. On the Information and Settings menu, click an item that you want to change. NOTE: Mac OS is supported by HP Officejet J3600 only. Use the HP Solution Center (Windows) On a Windows computer, the HP Solution Center is the entry point for the HP - HP Officejet J3600 | User Guide - Page 22
serves as the launching pad for the HP photo and imaging software and services. To open the HP Photosmart Software on a Windows computer 1. Do in the Dock. The HP Photosmart Studio window appears. NOTE: Mac OS is supported by HP Officejet J3600 only. 2. In the HP Photosmart Studio task bar, click - HP Officejet J3600 | User Guide - Page 23
remainder of the number. A pause is useful if you need to gain access to an outside line before dialing the fax number. NOTE: If you want to enter a symbol in your fax number, such as a dash, you need to enter the symbol by using the keypad. Type numbers and text on the control-panel keypad You can - HP Officejet J3600 | User Guide - Page 24
Chapter 2 Available symbols for dialing fax numbers To enter a symbol, such as *, press Symbols repeatedly to scroll through the list of symbols. The following table provides the symbols that you can use in a fax or phone number sequence, fax header information, and speed-dial entries. Available - HP Officejet J3600 | User Guide - Page 25
the diagram engraved in the document feeder tray. 2. Slide the width guides inward until they stop at the left and right edges of the media information, see Understand specifications for supported media. • To prevent jams, poor print quality, and other printing problems, avoid the following media: - HP Officejet J3600 | User Guide - Page 26
aside to dry. Allowing wet media to stack up may cause smearing. Custom-sized media • Use only custom-sized media that is supported by the device. • If your application supports custom-sized media, set the media size in the application before printing the document. If not, set the size in the print - HP Officejet J3600 | User Guide - Page 27
152 mm up to 216 x 356 mm (4 x 6 inches up to 8.5 x 14 inches) Understand supported media types and weights NOTE: The HP Officejet J3600 supports all media listed in the table below. The HP Officejet J3500 supports plain paper and legal paper only. Type Paper weight Input tray* Plain paper Legal - HP Officejet J3600 | User Guide - Page 28
Chapter 2 Set minimum margins NOTE: The HP Officejet J3500 does not support envelopes and cards. Top (leading edge) Bottom (trailing edge) Left and Right margins U.S. (Letter, Legal, the device. To load full-size paper 1. Slide the paper-width guide to its outermost position. 24 Use the device - HP Officejet J3600 | User Guide - Page 29
2. Flip the tray extender up toward you. NOTE: When you use legal-size paper, leave the tray extender closed. 3. Tap a stack of paper on a flat surface to align the edges, and then check the paper for the following: • Make sure it is free of rips, dust, wrinkles, and curled or bent edges. • Make - HP Officejet J3600 | User Guide - Page 30
idle and silent when you load paper into the input tray. If it is servicing the print cartridges or otherwise engaged in a task, the paper stop inside the diagram engraved in the base of the input tray. 5. Slide the paper-width guide inward until it stops at the edge of the paper. Do not overload - HP Officejet J3600 | User Guide - Page 31
the input tray and is no higher than the top of the paper-width guide. Load index cards (HP Officejet J3600 only) You can load index cards into Slide the stack of cards forward until it stops. 3. Slide the paper-width guide inward against the stack of cards until it stops. Do not overload the input - HP Officejet J3600 | User Guide - Page 32
diagram engraved in the base of the input tray. 3. Slide the paper-width guide inward against the stack of envelopes until it stops. Do not overload the the input tray and is not higher than the top of the paper-width guide. Load other types of paper (HP Officejet J3600 only) The following papers - HP Officejet J3600 | User Guide - Page 33
in the original package until you are ready to use them. 2. Locate the blue stripe on the nonprinting side of the transfer paper and then manually feed one sheet at a time into the input tray with the blue stripe facing up. HP Greeting Cards, HP Photo Greeting Cards, or HP Textured - HP Officejet J3600 | User Guide - Page 34
Chapter 2 Print on special or custom-sized media (Windows) To print on special or custom-sized media 1. Load the appropriate media. For more information, see Load media. 2. With a document open, click Print on the File menu, and then click Setup, Properties, or Preferences. 3. Click the Paper/ - HP Officejet J3600 | User Guide - Page 35
view a list of speed-dial entries. Set up speed-dial entries • HP Photosmart Software (Windows): Open the HP Photosmart Software and follow the instructions in the onscreen Help. • HP Device Manager (Mac OS): Launch HP Device Manager, click Information and Settings, and then select Fax Speed Dial - HP Officejet J3600 | User Guide - Page 36
to each group (with up to 50 characters for each fax number). • HP Photosmart Software (Windows): Open the HP Photosmart Software and follow the instructions in the onscreen Help. • HP Device Manager (Mac OS): Launch HP Device Manager, click Information and Settings, and then select Fax Speed Dial - HP Officejet J3600 | User Guide - Page 37
3 Print This section contains the following topics: • Change print settings • Print on both sides (duplexing) • Cancel a print job Change print settings You can change print settings (such as paper size or type) from an application or the printer driver. Changes made from an application take - HP Officejet J3600 | User Guide - Page 38
print driver, you can print on both sides of a sheet of media by manually turning the media over and feeding it into the device again. In Mac OS the pages over, and then printing the even-numbered pages. Mac OS is only supported by the HP Officejet J3600. • Guidelines for printing on both sides of a - HP Officejet J3600 | User Guide - Page 39
7. Choose a booklet layout from the Booklet Layout drop-down list, if you want. 8. Change any other settings, and then click OK. 9. Print your document. To print on both sides of a page (Mac OS) 1. Load the appropriate media. For more information, see Guidelines for printing on both sides of a page - HP Officejet J3600 | User Guide - Page 40
Chapter 3 36 Print - HP Officejet J3600 | User Guide - Page 41
functions can be performed from the software. See the software help for more information. Make copies from the control panel NOTE: The HP Officejet J3500 supports black and white copies on plain paper only. You can make quality copies from the control panel. To make a copy from the control panel - HP Officejet J3600 | User Guide - Page 42
print by using the Number of Copies option. NOTE: The HP Officejet J3500 supports black and white copies on plain paper only. To set the number of match what is loaded in your input tray. NOTE: The HP Officejet J3500 supports black and white copies on plain paper only. To set the paper size from - HP Officejet J3600 | User Guide - Page 43
the graphics might be lower quality. The Fast setting uses less ink and extends the life of your print cartridges. NOTE: The HP Officejet J3500 supports black and white copies on plain paper only. To change the copy quality from the control panel 1. Make sure you have paper loaded in the - HP Officejet J3600 | User Guide - Page 44
or cropping the edges, the device might leave an uneven amount of white space around the edges of the paper. NOTE: The HP Officejet J3500 supports black and white copies on plain paper only. To resize a document from the control panel 1. Make sure you have paper loaded in the input tray - HP Officejet J3600 | User Guide - Page 45
NOTE: The HP Officejet J3500 supports black and white copies on plain paper only. To copy a Lighter / Darker option to adjust the contrast of the copies you make. NOTE: The HP Officejet J3500 supports black and white copies on plain paper only. To adjust the copy contrast from the control panel 1. - HP Officejet J3600 | User Guide - Page 46
, colored objects or lines contain black sections • Horizontal grainy or white bands appear in light- to medium-gray areas NOTE: The HP Officejet J3500 supports black and white copies on plain paper only. To copy an overexposed photo from the control panel 1. Make sure you have paper loaded in the - HP Officejet J3600 | User Guide - Page 47
computer, open the HP photo and imaging software. For more information, see Use the HP photo and imaging software. 2. See the onscreen Help for further instructions. Scan 43 - HP Officejet J3600 | User Guide - Page 48
START SCAN. Scan from a TWAIN-compliant or a WIA-compliant program The device is TWAIN-complaint and WIA-compliant and works with programs that support TWAIN-compliant and WIA-compliant scanning devices. While you are in a TWAINcompliant or WIA-compliant program, you can gain access to the scanning - HP Officejet J3600 | User Guide - Page 49
Help for the HP photo and imaging software for information about how to create a link to the word-processing program. The OCR software does not support scanning colored text. Colored text is always converted to black-and-white text before being sent to OCR. Thus, all text in the final document - HP Officejet J3600 | User Guide - Page 50
Chapter 5 46 Scan - HP Officejet J3600 | User Guide - Page 51
from an attached phone. This allows you to speak with the recipient before sending the fax. • Send a basic fax • Send a fax manually from a phone • Send a fax using monitor dialing • Send a fax from memory • Schedule a fax to send later • Send a fax to multiple recipients • Send a color original - HP Officejet J3600 | User Guide - Page 52
the fax machine when you hear the fax tones from the receiving fax machine. NOTE: The HP Officejet J3500 supports black-and-white faxes only. To send a fax manually from a phone 1. Load your originals. For additional information, see Load an original in the automatic document feeder (ADF). 2. Dial - HP Officejet J3600 | User Guide - Page 53
recipient, remain on the line until the fax transmission is complete. To send a fax manually from a phone using the attached handset 1. Load your originals print side down and and cause your PIN not to be recognized by the calling card service. If this is the case, you can create a speed dial entry to - HP Officejet J3600 | User Guide - Page 54
Chapter 6 NOTE: Make sure the volume is turned on, or you will not hear a dial tone. NOTE: The HP Officejet J3500 supports black-and-white faxes only. To send a fax using monitor dialing from the control panel 1. Load your originals. For additional information, see Load an original - HP Officejet J3600 | User Guide - Page 55
You can only schedule one fax to be sent at a time. You can continue to send faxes normally, however, while a fax is scheduled. NOTE: You can only send faxes in black and white due to memory limitations. To schedule a fax from the control panel 1. Load your originals print side down into the - HP Officejet J3600 | User Guide - Page 56
Chapter 6 3. Press START FAX Black. 4. When prompted, load your originals print side up and top first in the center of the document feeder tray. For additional information, see Load an original in the automatic document feeder (ADF). 5. Press START FAX Black again. You can send a fax to multiple - HP Officejet J3600 | User Guide - Page 57
detects an original loaded in the automatic document feeder, it sends the document to the number you entered. NOTE: If the recipient's fax machine only supports black-and-white faxes, the HP All-in-One automatically sends the fax in black and white. A message appears after the fax has been sent - HP Officejet J3600 | User Guide - Page 58
Chapter 6 The following resolution settings are available for sending faxes: Fine, Very Fine, Photo, and Standard. • Fine: provides high-quality text suitable for faxing most documents. This is the default setting. When sending faxes in color, the device always uses the Fine setting. • Very Fine: - HP Officejet J3600 | User Guide - Page 59
Mode. 3. Press to select On or Off. 4. Press OK. Receive a fax You can receive faxes automatically or manually. If you turn off the Auto Answer option, you must receive faxes manually. If you turn on the Auto Answer option (the default setting), the device automatically answers incoming calls and - HP Officejet J3600 | User Guide - Page 60
on the phone, the person you are speaking with can send you a fax while you are still connected. This is referred to as manual faxing. Use the instructions in this section to receive a manual fax. NOTE: You can pick up the handset to talk or listen for fax tones. You can receive faxes - HP Officejet J3600 | User Guide - Page 61
The following Backup Fax Reception modes are available: On On Error Only Off The default setting. When Backup Fax Reception is On, the device stores all received faxes in memory. This enables you to reprint up to eight of the most recently printed faxes if they are still saved in memory. NOTE: - HP Officejet J3600 | User Guide - Page 62
from it. The designated fax machine must be set for polling and have a fax ready to send. NOTE: The HP All-in-One does not support polling pass codes. Polling pass codes are a security feature that require the receiving fax machine to provide a pass code to the device it is polling - HP Officejet J3600 | User Guide - Page 63
HP recommends that you verify the number you are forwarding to is a working fax line. Send a test fax to make sure the fax machine is able to receive your forwarded faxes. To forward faxes from the control panel 1. Press Setup. 2. Select Advance Fax Setup, and then select Fax Forwarding Black Only. - HP Officejet J3600 | User Guide - Page 64
supported in your country/region, Junk Fax Blocker Set Up does not appear in the Basic Fax Setup menu. NOTE: If no phone numbers are added in the Caller ID list, it is assumed that the user has not signed up for the Caller ID service subscribe to a caller ID service through your phone provider, or - HP Officejet J3600 | User Guide - Page 65
each number you want to block. • If you are done, press No. To manually enter a number to block 1. Press Setup. 2. Press Basic Fax Setup, and then No. Change fax settings After completing the steps in the getting started guide that came with the device, use the following steps to change the initial - HP Officejet J3600 | User Guide - Page 66
faxes. • Turn off the Auto Answer setting if you want to receive faxes manually. You must be available to respond in person to the incoming fax call or the device does not receive faxes. To set the answer mode to manual or automatic via the control panel ▲ Press Auto Answer to turn the light - HP Officejet J3600 | User Guide - Page 67
answers the call and receives the fax. If you do not have a distinctive ring service, use the default ring pattern, which is All Rings. NOTE: The HP fax of the fax be resent. Turn off error correction only if you are having trouble sending or receiving a fax, and you want to accept the errors in the - HP Officejet J3600 | User Guide - Page 68
, setting the fax speed to a slower speed might be required: • An Internet phone service • A PBX system • Fax over Internet Protocol (FoIP) • An integrated services digital network (ISDN) service If you experience problems sending and receiving faxes, you might want to try setting the Fax Speed - HP Officejet J3600 | User Guide - Page 69
If you have questions about internet faxing, contact your internet faxing services support department. Test fax setup You can test your fax setup to the problem and rerun the test. To test fax setup 1. Set up the device for faxing according to your particular home or office setup instructions. - HP Officejet J3600 | User Guide - Page 70
problems found. Use reports You can set up the device to print error reports and confirmation reports automatically for each fax you send and receive. You can also manually that your faxes were successfully sent, follow these instructions to enable fax confirmation before sending any faxes. - HP Officejet J3600 | User Guide - Page 71
software. For more information, see Use the HP photo and imaging software. 2. See the onscreen Help for the HP photo and imaging software for further instructions. The log lists faxes that have been sent from the control panel and the HP photo and imaging software and all faxes that have been - HP Officejet J3600 | User Guide - Page 72
Chapter 6 To print the fax log from the control panel 1. On the control panel, press Setup. 2. Press the arrow key to move down to Print Report, and then press OK. 3. Press the arrow key to move down to Fax Log, and then press OK. 4. Press OK again to print the log. Cancel a fax You can cancel a fax - HP Officejet J3600 | User Guide - Page 73
• Toolbox Mac OS • Device control panel • HP Printer Utility NOTE: Mac OS is supported by HP Officejet J3600 only. • Monitor the device • Administer the device Monitor the device This section provides instructions for monitoring the device. NOTE: The ink levels shown are an estimate only. Actual ink - HP Officejet J3600 | User Guide - Page 74
and time: Press Setup, press Tools, and then press Date and Time. Perform device maintenance tasks: Click the Device Services tab. Perform device maintenance tasks: Open the Information and Support panel, and then click the option for the task that you want to perform. Use device management tools - HP Officejet J3600 | User Guide - Page 75
following tabs. Tabs Estimated Ink Level Device Services Contents • Ink Level Information: Shows estimated . • Align the Print Cartridges: Guides you through aligning the print cartridges. online, and find Web site support information. NOTE: Mac OS is supported by HP Officejet J3600 only. - HP Officejet J3600 | User Guide - Page 76
HP Web site where you can find support for the device, register the device, and find information about returning and recycling used printing supplies. Set up faxing for the device After completing all the steps in the getting started guide, use the instructions in this section to complete your fax - HP Officejet J3600 | User Guide - Page 77
for faxing, determine which kind of phone system your country/region uses. The instructions for fax setup differ depending on whether you have a serial- or parallel To fax successfully, you need to know what types of equipment and services (if any) share the same phone line with the device. This is - HP Officejet J3600 | User Guide - Page 78
voice calls at the same phone number you will use for fax calls on the device? Continue answering questions. 7. Do you subscribe to a voice mail service through your telephone company at the same phone number you will use for fax calls on the device? After you have completed answering the questions - HP Officejet J3600 | User Guide - Page 79
second or third column based on your phone system. Step-by-step instructions are included for each case in the sections that follow. If you use another phone cord, you might experience problems sending and receiving faxes. Other equipment/services sharing your fax line Recommended fax setup for - HP Officejet J3600 | User Guide - Page 80
6 only.) Case J: Shared voice/fax line with computer modem and answering machine Not applicable. Voice calls, computer dial-up modem, and voice mail service (You answered Yes to questions 4, 5, and 7 only.) Case K: Shared voice/fax line with computer dial-up modem and voice mail Not applicable - HP Officejet J3600 | User Guide - Page 81
fax machine and receives the fax. Case B: Set up the device with DSL If you have a DSL service through your telephone company, and do not connect any equipment to the device, use the instructions in this section to connect a DSL filter between the telephone wall jack and the device. The DSL filter - HP Officejet J3600 | User Guide - Page 82
and Group 3 fax and another port for multiple purposes. If you have problems when connected to the fax/phone port of your ISDN converter, try using device. Refer to the documentation that came with your PBX phone system for instructions on how to turn off the call-waiting tone. • If you are using - HP Officejet J3600 | User Guide - Page 83
the same line If you subscribe to a distinctive ring service (through your telephone company) that allows you to have the device to connect to the 1-LINE port To set up the device with a distinctive ring service 1. Using the phone cord supplied in the box with the device, connect one end to your - HP Officejet J3600 | User Guide - Page 84
Chapter 7 Case E: Shared voice/fax line If you receive both voice calls and fax calls at the same phone number, and you have no other office equipment (or voice mail) on this phone line, set up the device as described in this section. Figure 7-4 Back view of the device 1 Telephone wall jack 2 - HP Officejet J3600 | User Guide - Page 85
the device as described in this section. NOTE: You cannot receive faxes automatically if you have a voice mail service at the same phone number you use for fax calls. You must receive faxes manually; this means you must be available to respond in person to incoming fax calls. If you want to - HP Officejet J3600 | User Guide - Page 86
. 3. Run a fax test. You must be available to respond in person to incoming fax calls, or the device cannot receive faxes. You must initiate the manual fax before voicemail picks up the line. Case G: Fax line shared with computer modem (no voice calls received) If you have a fax line on which - HP Officejet J3600 | User Guide - Page 87
fax. Set up the device with a computer DSL/ADSL modem If you have a DSL line and use that phone line to send faxes, follow these instructions to set up your fax. Set up faxing for the device 83 - HP Officejet J3600 | User Guide - Page 88
Chapter 7 1 Telephone wall jack 2 Parallel splitter 3 DSL/ADSL filter Connect one end of the phone jack that was supplied with the device to connect to the 1-LINE port on the back of the device. Connect the other end of the cord to the DSL/ADSL filter. 4 Computer 5 Computer DSL/ADSL modem - HP Officejet J3600 | User Guide - Page 89
DSL/ADSL modem Shared voice/fax with computer dial-up modem If you use your phone line for both fax and telephone calls, use these instructions to set up your fax. There are two different ways to set up the device with your computer based on the number of phone ports - HP Officejet J3600 | User Guide - Page 90
you need to decide how you want the device to answer calls, automatically or manually: • If you set up the device to answer calls automatically, it answers all from a sending fax machine, you will need to answer the fax call manually. If you use your phone line for voice, fax, and your computer - HP Officejet J3600 | User Guide - Page 91
Shared voice/fax with computer DSL/ADSL modem Use these instructions if your computer has a DSL/ADSL modem 1 Telephone wall jack 2 Parallel splitter 3 DSL/ADSL filter 4 Phone cord supplied with the device 5 DSL/ADSL modem 6 Computer 7 - HP Officejet J3600 | User Guide - Page 92
modem 1. Obtain a DSL filter from your DSL provider. NOTE: Phones in other parts of the home/office sharing the same phone number with DSL service will need to be connected to additional DSL filters, otherwise you will experience noise when making voice calls. 2. Using the phone cord supplied in the - HP Officejet J3600 | User Guide - Page 93
answering machine to answer after a low number of rings. 7. Change the Rings to Answer setting on the device to the maximum number of rings supported by your device. (The maximum number of rings varies by country/region.) 8. Run a fax test. When the phone rings, your answering machine answers after - HP Officejet J3600 | User Guide - Page 94
Chapter 7 NOTE: Since your computer dial-up modem shares the phone line with the HP device, you cannot use both your modem and the device simultaneously. For example, you cannot use the HP device for faxing while you are using your computer dial-up modem to send an e-mail or access the Internet. • - HP Officejet J3600 | User Guide - Page 95
answering machine to answer after a low number of rings. 9. Change the Rings to Answer setting on the HP device to the maximum number of rings supported by your HP device. (The maximum number of rings varies by country/ region.) 10. Run a fax test. NOTE: If you are using a computer with two - HP Officejet J3600 | User Guide - Page 96
Chapter 7 When the phone rings, your answering machine answers after the number of rings you have set, and then plays your recorded greeting. The device monitors the call during this time, "listening" for fax tones. If incoming fax tones are detected, the device emits fax reception tones and - HP Officejet J3600 | User Guide - Page 97
on the device to the maximum number of rings supported by the device. NOTE: The maximum number of fax, and have a computer DSL modem, follow these instructions to set up your fax. Case K: Shared voice mail service at the same phone number you use for fax calls. You must receive faxes manually; this - HP Officejet J3600 | User Guide - Page 98
Chapter 7 Since your computer dial-up modem shares the phone line with the device, you cannot use both your modem and the device simultaneously. For example, you cannot use the device for faxing if you are using your computer dial-up modem to send an e-mail or access the Internet. There are two - HP Officejet J3600 | User Guide - Page 99
To set up the device on the same phone line as a computer with two phone ports 1. Remove the white plug from the port labeled 2-EXT on the back of the device. 2. Find the phone cord that connects from the back of your computer (your computer dial-up modem) to a telephone wall jack. Disconnect the - HP Officejet J3600 | User Guide - Page 100
XP, or Windows Vista. Only the printer and scanner drivers are supported by devices running Windows 2000. When setting up the device, HP Starter CD. 3. On the CD menu, click Install and follow the onscreen instructions. 4. When prompted, turn on the device and connect it to the computer using - HP Officejet J3600 | User Guide - Page 101
Browse to locate the root directory on the Starter CD (for example, D), and then click OK. 5. Click Next and follow the onscreen instructions. 6. Click Finish to close the Found New Hardware wizard. The wizard automatically starts the installation program (this might take a short while). 7. Complete - HP Officejet J3600 | User Guide - Page 102
in your CD drive. Configure the device (Mac OS) NOTE: Mac OS is supported by HP Officejet J3600 only. You can use the device with a single Macintosh on the Starter CD. 3. Click Install Software and follow the onscreen instructions. 4. If necessary, share the device with other Macintosh computer users - HP Officejet J3600 | User Guide - Page 103
For more information about USB device sharing, see the support information on the Apple Web site (www.apple. select HP, select Officejet J3500/J3600 Series, and then click Uninstall. 4. Follow the onscreen instructions. 5. If you are asked whether you would like to remove shared files, click No. - HP Officejet J3600 | User Guide - Page 104
on the device, you might have to wait several minutes for all of the Plug and Play events to complete. 10. Follow the onscreen instructions. When the software installation is complete, the HP Digital Imaging Monitor icon appears in the Windows system tray. To uninstall from a Windows computer - HP Officejet J3600 | User Guide - Page 105
into your computer's CD-ROM drive. 6. On the desktop, open the CD-ROM, and then double-click HP All-in-One Installer. 7. Follow the onscreen instructions and also see Configure the device (Mac OS). NOTE: If you cannot launch the HP Device Manager, you can uninstall the software by opening the - HP Officejet J3600 | User Guide - Page 106
Chapter 7 102 Configure and manage - HP Officejet J3600 | User Guide - Page 107
unexpected printouts • Solve paper-feed problems • Solve copy problems • Solve scan problems • Solve fax problems • Troubleshoot installation issues • Clear paper jams • Avoid paper jams Work with print cartridges This section contains the following topics: • Supported print cartridges • Handle the - HP Officejet J3600 | User Guide - Page 108
or the ink nozzles. NOTE: Handle the print cartridges carefully. Dropping or jarring cartridges can cause temporary printing problems, or even permanent damage. Replace the print cartridges Follow these instructions when the ink level is low. NOTE: When the ink level for a print cartridge is low - HP Officejet J3600 | User Guide - Page 109
country/region, follow the prompts to select your product, and then click one of the shopping links on the page. NOTE: The HP Officejet J3500 supports one black print cartridge only. To replace the print cartridges 1. Make sure the device is on. CAUTION: If the HP All-in-One is off - HP Officejet J3600 | User Guide - Page 110
cartridges free of charge. For more information, go to the following Web site: www.hp.com/hpinfo/globalcitizenship/environment/recycle/inkjet.html 106 Maintain and troubleshoot - HP Officejet J3600 | User Guide - Page 111
6. Remove the new print cartridge from its packaging and, being careful to touch only the black plastic, gently remove the plastic tape by using the pink pull tab. 1 Copper-colored contacts 2 Plastic tape with pink pull tab (must be removed before installing) 3 Ink nozzles under tape CAUTION: Do not - HP Officejet J3600 | User Guide - Page 112
cartridges. It remembers the alignment values for that print cartridge, so you do not need to realign the print cartridges. NOTE: The HP Officejet J3500 supports one black print cartridge only. 108 Maintain and troubleshoot - HP Officejet J3600 | User Guide - Page 113
box, click the Services tab, and then click Service this device. The Printer Toolbox appears. 3. Click the Device Services tab. 4. Click Printer Utility (Mac OS). Click Align and follow the onscreen instructions. NOTE: Mac OS is supported by HP Officejet J3600 only. Clean the print cartridges Use - HP Officejet J3600 | User Guide - Page 114
box, click the Services tab, and then click Service this device. The Printer Toolbox appears. 3. Click the Device Services tab. 4. Click (Mac OS). 2. Click Clean and follow the onscreen instructions. NOTE: Mac OS is supported by HP Officejet J3600 only. Clean the print cartridge and troubleshoot - HP Officejet J3600 | User Guide - Page 115
Make sure you have the following materials available: • Dry foam rubber swabs, lint-free cloth, or any soft material that will not come apart or leave fibers. TIP: Coffee filters are lint-free and work well for cleaning print cartridges. • Distilled, filtered, or bottled water (tap water might - HP Officejet J3600 | User Guide - Page 116
not touch the copper-colored contacts or ink nozzles. Touching these parts can result in clogs, ink failure, and bad electrical connections. 112 Maintain and troubleshoot - HP Officejet J3600 | User Guide - Page 117
To clean the area around the ink nozzles 1. Turn on the device and open the print cartridge door. The print carriage moves to the far right side of the device. 2. Wait until the print carriage is idle and silent, and then unplug the power cord from the back of the device. NOTE: Depending how long - HP Officejet J3600 | User Guide - Page 118
it. Do not place or spray liquid directly on the glass. The liquid might seep under the glass and damage the device. 114 Maintain and troubleshoot - HP Officejet J3600 | User Guide - Page 119
4. Close the automatic document feeder cover. CAUTION: Make sure you close the automatic document feeder cover before loading any paper or originals. If you do not close the cover, you might damage the mechanism. 5. Plug in the power cord, and then turn on the device. Clean the white strip Minor - HP Officejet J3600 | User Guide - Page 120
from the interior of the device, as well as from the control panel. Troubleshooting tips and resources Use the following tips and resources to resolve printing problems. • For a paper jam, see Clear paper jams. • For paper-feed problems, such as the paper skew and paper pick, see Solve paper- feed - HP Officejet J3600 | User Guide - Page 121
power cord, network cable, and USB cable), wait about 20 seconds, and reconnect the cables. If the problem persists, visit the HP Web site (www.hp.com/support) for the latest troubleshooting information, or product fixes and updates. The device is not responding (nothing prints) There are print jobs - HP Officejet J3600 | User Guide - Page 122
one page is being picked For more information on paper-feed problems, see Solve paper-feed problems. There is a blank page in the file Check the low on ink. For more information, see Manage the device and Supported print cartridges. Check the margin settings Make sure the margin settings troubleshoot - HP Officejet J3600 | User Guide - Page 123
Check how the media is loaded Make sure the media width and length guides fit snugly against the edges of the stack of media, and make sure of these electromagnetic fields. If the above solutions do not work, the problem may be caused by the inability of the application to interpret print settings - HP Officejet J3600 | User Guide - Page 124
not low on ink. For more information, see Manage the device and Supported print cartridges. Check the paper quality The paper might be too moist or sure the cable connections at both ends are secure. If the problem persists, turn off the device, disconnect the cable from the Maintain and troubleshoot - HP Officejet J3600 | User Guide - Page 125
Ink is smearing Check the print settings (HP Officejet J3600 only) • When you print documents that use much ink, allow more time to dry before handling the printouts. This is especially true for transparencies. In the printer driver, select the Best print quality, and also increase the ink drying - HP Officejet J3600 | User Guide - Page 126
and the print cartridges are not low on ink. For more information, see Manage the device and Supported print cartridges. Check the graphics placement Use the zoom or print preview feature of your software to check ink. For more information, see Manage the device. 122 Maintain and troubleshoot - HP Officejet J3600 | User Guide - Page 127
problems For information on resolving jams, see Clear paper jams. Media is not supported for the printer or tray Use only media that is supported for the device. For more information, see Understand specifications for supported to the paper guides. If needed, pull out the tray from the device - HP Officejet J3600 | User Guide - Page 128
Use HP media for optimum performance and efficiency. Solve copy problems If the following topics do not help, see Support and warranty for information about HP support. No copy came out • Check the power Make sure , or the background might appear in a different shade. 124 Maintain and troubleshoot - HP Officejet J3600 | User Guide - Page 129
the ADF input tray is not too full. • Make sure that the ADF width adjusters are snug against the sides of the media. Solve copy problems 125 - HP Officejet J3600 | User Guide - Page 130
more information see Load originals. Solve scan problems If the following topics do not help, see Support and warranty for information about HP support. NOTE: If you are starting the scan from a computer, see the onscreen software Help for troubleshooting information. Scanner did nothing • Check the - HP Officejet J3600 | User Guide - Page 131
than the one that you are attempting. See the onscreen Help for the HP photo and imaging software for instructions about changing the properties. Text cannot be edited • Check the settings • Make sure that the OCR software is on the original does not scan well, if at all. Solve scan problems 127 - HP Officejet J3600 | User Guide - Page 132
a screen. If the following suggestions do not solve the problem, you might need to use a better-quality version of loaded incorrectly. Be sure to use the media guides when you load the originals into the ADF. the device for cleaning instructions. • The defects might be on the original and - HP Officejet J3600 | User Guide - Page 133
settings might be set to reduce the scanned image. See the product software Help for more information about changing the settings. Solve fax problems This section contains fax setup troubleshooting information for the device. If the device is not set up properly for faxing, you might experience - HP Officejet J3600 | User Guide - Page 134
device is ready for faxing. If the Fax Hardware Test continues to fail and you experience problems faxing, contact HP Support. Go to www.hp.com/support. If prompted, choose your country/region, and then click Contact HP for information on calling for technical support. 130 Maintain and troubleshoot - HP Officejet J3600 | User Guide - Page 135
. • If you are using a phone splitter, this can cause faxing problems. (A splitter is a two-cord connector that plugs into a telephone wall can send or receive a fax successfully, there might not be a problem. After you resolve any problems found, run the fax test again to make sure it passes and - HP Officejet J3600 | User Guide - Page 136
with the device, run the fax test again. • If you are using a phone splitter, this can cause faxing problems. (A splitter is a two-cord connector that plugs into a telephone wall jack.) Try removing the splitter and connecting of the phone cord should be connected to the 132 Maintain and troubleshoot - HP Officejet J3600 | User Guide - Page 137
equipment, which uses the same phone line as the device, might be causing the test to fail. To find out if other equipment is causing a problem, disconnect everything from the phone line, and then run the test again. If the Dial Tone Detection Test passes without the other equipment, then one - HP Officejet J3600 | User Guide - Page 138
If the country/region setting is not set or is set incorrectly, the test might fail and you might have problems sending and receiving faxes. • Make sure you connect the device to an analog phone line or you will not to the port labeled 1-LINE on the back of the device. 134 Maintain and troubleshoot - HP Officejet J3600 | User Guide - Page 139
the other equipment, connect the device to a working phone line and continue reviewing the troubleshooting information in this section. • If you are using a phone splitter, this can cause faxing problems. (A splitter is a two-cord connector that plugs into a telephone wall jack.) Try removing the - HP Officejet J3600 | User Guide - Page 140
your local telephone company for service. • Other equipment, which message providing information about the problem and how to solve it noise) can cause faxing problems. Check the sound quality problem persists, contact your telephone company. • If you are using a digital subscriber line (DSL) service - HP Officejet J3600 | User Guide - Page 141
If the device shares the same phone line with a DSL service, the DSL modem might not be properly grounded. If provider for support. • If you are using a phone splitter, this can cause faxing problems. (A wall jack. The device is having problems sending a manual fax Solution: NOTE: This possible - HP Officejet J3600 | User Guide - Page 142
you will need to receive faxes manually; otherwise, the device will not receive the fax. For information on receiving faxes manually, see Receive a fax manually. • If you have a voice mail service at the same phone number you use the device from receiving fax calls. 138 Maintain and troubleshoot - HP Officejet J3600 | User Guide - Page 143
one at a time and receiving a fax each time, until you identify which equipment is causing the problem. • If you have a special ring pattern for your fax phone number (using a distinctive ring service through your telephone company), make sure that the Distinctive Ring feature on the device is set - HP Officejet J3600 | User Guide - Page 144
mail service could be interfering with the recipient's phone line. You can also ask the recipient to check the receiving fax machine for any problems. rings and the device to answer in the maximum number of rings supported. (The maximum number of rings varies by country/region.) In this troubleshoot - HP Officejet J3600 | User Guide - Page 145
open port on the coupler and to the telephone wall jack. Troubleshoot installation issues If the following topics do not help, see Support and warranty for information about HP support. • Hardware installation suggestions • Software installation suggestions Hardware installation suggestions Check - HP Officejet J3600 | User Guide - Page 146
CD drive, inspect the CD for damage. You can download the device driver from the HP Web site (www.hp.com/ support). • In the Windows device manager, make sure that the USB drivers have not been disabled. • If you are using need to clear the paper jam from the rear door. 142 Maintain and troubleshoot - HP Officejet J3600 | User Guide - Page 147
Paper can also jam in the automatic document feeder. Several common actions can cause paper to jam the automatic document feeder: • Placing too much paper in the document feeder tray. • Using paper that is too thick or too thin for the device. • Trying to add paper to the document feeder tray while - HP Officejet J3600 | User Guide - Page 148
. Make sure the paper-width guide does not bend the paper in the input tray. • Do not force paper too far forward in the input tray. • Use paper types that are recommended for the HP All-in-One. For more information, see Understand specifications for supported media. 144 Maintain and troubleshoot - HP Officejet J3600 | User Guide - Page 149
live in Europe, go to www.hp.com/eu/hard-to-find-supplies to locate information on HP print cartridges. NOTE: The HP Officejet J3500 supports black print cartridges only. HP media To order media such as HP Premium Plus Photo Paper or HP Premium Paper, go to www.hpshopping.com - HP Officejet J3600 | User Guide - Page 150
Appendix A 146 HP supplies - HP Officejet J3600 | User Guide - Page 151
and warranty The information in Maintain and troubleshoot suggests solutions to common problems. If your device is not operating correctly and those suggestions did not solve your problem, try using one of the following support services to obtain assistance. This section contains the following - HP Officejet J3600 | User Guide - Page 152
Appendix B Hewlett-Packard limited warranty statement 148 Support and warranty - HP Officejet J3600 | User Guide - Page 153
following topics: • Before you call • Support process • HP support by phone • Additional warranty options • HP Quick Exchange Service (Japan) • Call HP Korea customer support Before you call Visit the HP Web site (www.hp.com/support) for the latest troubleshooting information, or product fixes and - HP Officejet J3600 | User Guide - Page 154
B • Valuable troubleshooting information for common problems • Proactive device updates, support alerts, and HP newsgrams that are available when you register the HP All-in-One 3. Call HP support. Support options and availability vary by device, country/region, and language. HP support by phone This - HP Officejet J3600 | User Guide - Page 155
Obtain HP telephone support 151 - HP Officejet J3600 | User Guide - Page 156
cost. Help may also be available at the HP online support Web site: www.hp.com/support. Contact your HP dealer or call the support phone number for your country/region to learn more about support options. Additional warranty options Extended service plans are available for the HP All-in-One at - HP Officejet J3600 | User Guide - Page 157
For instructions on how to pack your device for exchange, see Pack the device. Call HP Korea customer support Prepare the device for shipment If after contacting HP Customer Support or returning to the point of purchase, you are requested to send the device in for service, make sure you remove and - HP Officejet J3600 | User Guide - Page 158
device does not turn on, you can unplug the power cord and then manually slide the print carriage to the far right side to remove the print cartridges aside. Do not send them with the device unless the HP customer support call agent instructs you to. 5. Close the print cartridge door and wait a few - HP Officejet J3600 | User Guide - Page 159
on the replacement device. NOTE: See the setup poster that came with the device for instructions on how to attach your control-panel faceplate. The replacement device might come with instructions for setting up your device. Pack the device Complete the following steps after you have prepared - HP Officejet J3600 | User Guide - Page 160
shipping label on the outside of the box. 3. Include the following items in the box: • A complete description of symptoms for service personnel (samples of print quality problems are helpful). • A copy of the sales slip or other proof of purchase to establish the warranty coverage period. • Your - HP Officejet J3600 | User Guide - Page 161
Supply yields Visit www.hp.com/pageyield/ for more information on estimated print cartridge yields. Device languages HP PCL 3 enhanced Font support US fonts: CG Times, CG Times Italic, Universe, Universe Italic, Courier, Courier Italic, Letter Gothic, Letter Gothic Italic. Duty cycle Up - HP Officejet J3600 | User Guide - Page 162
(HP Officejet J3600 only) • Linux Minimum requirements • Windows 2000 Service Pack 4: Intel Pentium II or Celeron processor, 128 MB RAM, 150 64, AMD Opteron, Intel Xeon processor with Intel EM64T support, or Intel Pentium 4 processor with Intel EM64T support, 256 MB RAM, 300 MB free hard disk space - HP Officejet J3600 | User Guide - Page 163
varies by model) • Fit to page, pre-scan NOTE: HP Officejet J3500 supports black and white copies only. Mode Best Normal Fast Type Black Color Black Color pages or higher resolution takes longer and uses more memory. • Manual fax send and receive. • Automatic busy redial up to five times - HP Officejet J3600 | User Guide - Page 164
If you have Internet access, you can get acoustic information for the HP Officejet J3500 from the HP website. Go to www.hp.com/support. HP Officejet J3600 • Sound pressure (bystander position) • Color printing: LpAd 42 (dBA) • Black-and-white printing and copying: LpAd 47 (dBA) • Black-and-white - HP Officejet J3600 | User Guide - Page 165
• Sending black-and-white fax: LpAd 40 (dBA) • Idle: LpAd 21 (dBA) • Sound power • Color printing: LwAd 5.5 (BA) • Black-and-white printing and copying: LwAd 5.9 (BA) • Black-and-white printing (Fast mode): LwAd 6.4 (BA) • Sending black-and-white fax: LwAd 5.3 (BA) • Idle: LwAd 3.3 (BA) Acoustic - HP Officejet J3600 | User Guide - Page 166
Appendix C 162 Device specifications - HP Officejet J3600 | User Guide - Page 167
D Regulatory information The device meets product requirements from regulatory agencies in your country/region. This section contains the following topics: • FCC statement • Notice to users in Korea • VCCI (Class B) compliance statement for users in Japan • Notice to users in Japan about the power - HP Officejet J3600 | User Guide - Page 168
installation. This equipment generates, uses and can radiate radio frequency energy and, if not installed and used in accordance with the instructions, may cause harmful interference to radio communications. However, there is no guarantee that interference will not occur in a particular installation - HP Officejet J3600 | User Guide - Page 169
Notice to users in Japan about the power cord RoHS notices (China only) Toxic and hazardous substance table Noise emission statement for Germany Geräuschemission LpA < 70 dB am Arbeitsplatz im Normalbetrieb nach DIN 45635 T. 19 Notice to users in Japan about the power cord 165 - HP Officejet J3600 | User Guide - Page 170
will be given advance notice so you will have the opportunity to maintain uninterrupted service. If you experience trouble with this equipment, please contact the manufacturer, or look elsewhere in this manual, for warranty or repair information. Your telephone company might ask you to disconnect - HP Officejet J3600 | User Guide - Page 171
Notice to users of the Canadian telephone network Note à l'attention des utilisateurs du réseau téléphonique canadien/Notice to users of the Canadian telephone network Cet appareil est conforme aux spécifications techniques des équipements terminaux d'Industrie Canada. Le numéro d'enregistrement - HP Officejet J3600 | User Guide - Page 172
. Contact the vendor or Hewlett-Packard Company if additional product support is necessary. This equipment has been certified by the manufacturer DTMF tone dialing and loop disconnect dialing. In the unlikely event of problems with loop disconnect dialing, it is recommended to use this equipment - HP Officejet J3600 | User Guide - Page 173
Declaration of conformity DECLARATION OF CONFORMITY according to ISO/IEC 17050-1 and EN17050-1 Manufacturer's Name: Hewlett-Packard Company DoC#: SDGOB-0604-rel. 2.1 Manufacturer's Address: 16399 West Bernardo Drive San Diego CA 92127, USA Declares, that the product: Product Name: - HP Officejet J3600 | User Guide - Page 174
Appendix D Environmental product stewardship program Hewlett-Packard is committed to providing quality products in an environmentally sound manner. Design for recycling has been incorporated into this product. The number of materials has been kept to a minimum while ensuring proper functionality and - HP Officejet J3600 | User Guide - Page 175
more information about where you can drop off your waste equipment for recycling, please contact your local city office, your household waste disposal service or the shop where you purchased the product. Évacuation des équipements usagés par les utilisateurs dans les foyers privés au sein de l'Union - HP Officejet J3600 | User Guide - Page 176
Appendix D Energy consumption This product is designed to reduce power consumption and save natural resources without compromising product performance. It has been designed to reduce total energy consumption both during operation and when the device is not active. Specific information on power - HP Officejet J3600 | User Guide - Page 177
20 load originals 20 media sizes supported 22 automatic fax reduction 59 B backup fax reception 56 baud rate 64 best copy quality 39 black and white pages copy 37 fax 47 troubleshoot 122 black dots or streaks, troubleshoot copies 125 scan 129 blank pages, troubleshoot copy 124 print 118 scan 129 - HP Officejet J3600 | User Guide - Page 178
support 149 warranty 152 cut-off pages, troubleshoot 119 D dark images, troubleshoot copies 125 scans 129 darken copies 41 faxes 54 Declaration of Conformity (DOC) 169 default settings control panel 16 copy 38 driver 33 fax 55 print 33 deleting faxes from memory 58 Device Services 67 manual receive - HP Officejet J3600 | User Guide - Page 179
menu 15 fax port, locating 11 Fax Resolution 12 firewalls, troubleshoot 117 fit to page 40 FoIP 65 fonts supported 157 forwarding faxes 58 G getting started guide 9 glass strip clean 114 grainy or white bands on copies, troubleshoot 126 graphics incompletely filled on copies 125 ink not filling in - HP Officejet J3600 | User Guide - Page 180
manual faxing receive 56 send 48, 49 margins setting, specifications 24 media ADF capacity 20 duplexing 34 HP, order 145 load tray 24 print on custom-sized 29 selecting 21 skewed pages 123 specifications 22 supported sizes 22 troubleshoot 38 paper-feed problems, troubleshoot 123 parallel phone - HP Officejet J3600 | User Guide - Page 181
basic fax 47 color fax 53 manually 48 memory, from 50 monitor dialing 49, 51 multiple recipients 51 schedule 50 troubleshoot 135, 137, 140 send scans for OCR 45 to a program 43 troubleshoot 126 serial phone systems countries/regions with 73 setup types 73 Services tab, Toolbox (Windows) 71 settings - HP Officejet J3600 | User Guide - Page 182
, 122 unclear on copies, troubleshoot 125 unclear scans 129 tone dialing 64 Toolbox (Windows) about 70 administrator settings 70 Estimated Ink Level tab 71 opening 71 Services tab 71 transparencies copy 38 load 28 trays capacities 23 load media 24 locating 10 media sizes supported 22 media types and - HP Officejet J3600 | User Guide - Page 183
guides illustration 10 troubleshoot feeding 123 troubleshoot picked 123 nothing prints 117 paper-feed problems 123 power 117 print 116 print quality support 149 environmental programs 170 European print cartridges 145 order supplies 145 supply yield data sheet 157 white bands or stripes, troubleshoot - HP Officejet J3600 | User Guide - Page 184
180 - HP Officejet J3600 | User Guide - Page 185
- HP Officejet J3600 | User Guide - Page 186
© 2007 Hewlett-Packard Development Company, L.P. www.hp.com/support
-
 1
1 -
 2
2 -
 3
3 -
 4
4 -
 5
5 -
 6
6 -
 7
7 -
8
-
9
-
10
-
11
-
12
-
13
-
14
-
15
-
16
-
17
-
18
-
19
-
20
-
21
-
22
-
23
-
24
-
25
-
26
-
27
-
28
-
29
-
30
-
31
-
32
-
33
-
34
-
35
-
36
-
37
-
38
-
39
-
40
-
41
-
42
-
43
-
44
-
45
-
46
-
47
-
48
-
49
-
50
-
51
-
52
-
53
-
54
-
55
-
56
-
57
-
58
-
59
-
60
-
61
-
62
-
63
-
64
-
65
-
66
-
67
-
68
-
69
-
70
-
71
-
72
-
73
-
74
-
75
-
76
-
77
-
78
-
79
-
80
-
81
-
82
-
83
-
84
-
85
-
86
-
87
-
88
-
89
-
90
-
91
-
92
-
93
-
94
-
95
-
96
-
97
-
98
-
99
-
100
-
101
-
102
-
103
-
104
-
105
-
106
-
107
-
108
-
109
-
110
-
111
-
112
-
113
-
114
-
115
-
116
-
117
-
118
-
119
-
120
-
121
-
122
-
123
-
124
-
125
-
126
-
127
-
128
-
129
-
130
-
131
-
132
-
133
-
134
-
135
-
136
-
137
-
138
-
139
-
140
-
141
-
142
-
143
-
144
-
145
-
146
-
147
-
148
-
149
-
150
-
151
-
152
-
153
-
154
-
155
-
156
-
157
-
158
-
159
-
160
-
161
-
162
-
163
-
164
-
165
-
166
-
167
-
168
-
169
-
170
-
171
-
172
-
173
-
174
-
175
-
176
-
177
-
178
-
179
-
180
-
181
-
182
-
183
-
184
-
185
-
186
 |
 |

HP Officejet J3500/J3600
User Guide