HP Officejet Pro 8600 Getting Started Guide - Page 13
English, Fax Error Correction Mode - setup
 |
View all HP Officejet Pro 8600 manuals
Add to My Manuals
Save this manual to your list of manuals |
Page 13 highlights
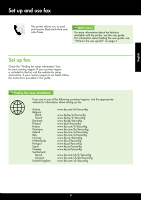
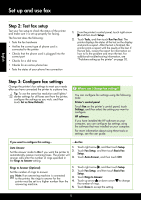
English Set up and use fax If you want to configure this setting... ...do this: Distinctive Ring 1. Touch right arrow , and then touch Setup. Change the answer ring pattern for distinctive ring Note: If you are using a distinctive ring service, you can use more than one telephone number on the same telephone line. You can change this setting to enable the printer to determine automatically which ring pattern it should use for fax calls only. 2. Touch Fax Setup, and then touch Advanced Fax Setup. 3. Touch Distinctive Ring. 4. A message appears stating that this setting should not be changed unless you have multiple phone numbers on the same telephone line. Touch Yes to continue. Tip: You can also use the Ring Pattern Detection 5. Do one of the following: feature in the printer's control panel to set distinctive ring. With this feature, the printer recognizes and records the ring pattern of an incoming call and, based on this call, • Touch the ring pattern assigned by your telephone company to fax calls. Or automatically determines the distinctive ring pattern assigned by your telephone company to fax calls. • Touch Ring Pattern Detection, and then follow the instructions on the printer's control panel. Note: If you are using either a PBX phone system that has different ring patterns for internal and external calls, you must call the fax number from an external number. Fax Speed Set the fax speed used to communicate between the printer and other fax machines when sending and receiving faxes. Note: If you experience problems sending and receiving faxes, try using a lower fax speed. 1. Touch right arrow , and then touch Setup. 2. Touch Fax Setup, and then touch Advanced Fax Setup. 3. Touch Fax Speed. 4. Touch to select Fast, Medium, or Slow. Fax Error Correction Mode 1. Touch right arrow , and then touch Setup. If the printer detects an error signal during the transmission and the error-correction setting is turned 2. Touch Fax Setup, and then touch Advanced Fax Setup. on, the printer can request that a portion of the fax 3. Touch down arrow , and then touch Error be resent. Correction Mode. Note: If you have problems sending and 4. Select On or Off. receiving faxes, turn off error correction. Also, turning off this setting might be useful when you are trying to send a fax to another country/ region or receive a fax from another country/ region or if you are using a satellite phone connection. Volume Change the volume of the printer sounds, including the fax tones. 1. Touch right arrow , and then touch Setup. 2. Touch Fax Setup, and then touch Basic Fax Setup. 3. Touch Fax Sound Volume. 4. Touch to select Soft, Loud, or Off. 13
-
 1
1 -
2
-
3
-
4
-
5
-
6
-
7
-
 8
8 -
 9
9 -
 10
10 -
 11
11 -
 12
12 -
 13
13 -
 14
14 -
 15
15 -
 16
16 -
 17
17 -
 18
18 -
19
-
20
-
21
-
22
-
23
-
24
-
25
-
26
-
27
-
28
-
29
-
30
-
31
-
32
-
33
-
34
-
35
-
36
-
37
-
38
-
39
-
40
-
41
-
42
-
43
-
44
-
45
-
46
-
47
-
48
-
49
-
50
-
51
-
52
-
53
-
54
-
55
-
56
-
57
-
58
-
59
-
60
-
61
-
62
-
63
-
64
-
65
-
66
-
67
-
68
-
69
-
70
-
71
-
72
-
73
-
74
-
75
-
76
-
77
-
78
-
79
-
80
-
81
-
82
-
83
-
84
-
85
-
86
-
87
-
88
-
89
-
90
-
91
-
92
-
93
-
94
-
95
-
96
-
97
-
98
-
99
-
100
-
101
-
102
-
103
-
104
-
105
-
106
-
107
-
108
 |
 |