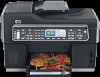
HP Officejet Pro L7600 User Guide - Page 31
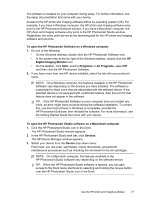
Digital Imaging Monitor, All Programs - ink cartridges
 |
View all HP Officejet Pro L7600 manuals
Add to My Manuals
Save this manual to your list of manuals |
Page 31 highlights
The software is installed on your computer during setup. For further information, see the setup documentation that came with your device. Access to the HP photo and imaging software differs by operating system (OS). For example, if you have a Windows computer, the HP photo and imaging software entry point is the HP Photosmart Software window. If you have a Macintosh computer, the HP photo and imaging software entry point is the HP Photosmart Studio window. Regardless, the entry point serves as the launching pad for the HP photo and imaging software and services. To open the HP Photosmart Software on a Windows computer 1. Do one of the following: • On the Windows desktop, double-click the HP Photosmart Software icon. • In the system tray at the far right of the Windows taskbar, double-click the HP Digital Imaging Monitor icon. • On the taskbar, click Start, point to Programs or All Programs, select HP, and then click the HP Photosmart Software. 2. If you have more than one HP device installed, select the tab with your product's name. NOTE: On a Windows computer, the features available in the HP Photosmart Software vary depending on the devices you have installed. The software is customized to show icons that are associated with the selected device. If the selected device is not equipped with a particular feature, then the icon for that feature does not appear in the software. TIP: If the HP Photosmart Software on your computer does not contain any icons, an error might have occurred during the software installation. To correct this, use the Control Panel in Windows to completely uninstall the HP Photosmart Software; then reinstall the software. For more information, see the Getting Started Guide that came with your device. To open the HP Photosmart Studio software on a Macintosh computer 1. Click the HP Photosmart Studio icon in the Dock. The HP Photosmart Studio window appears. 2. In the HP Photosmart Studio task bar, click Devices. The HP Device Manager window appears. 3. Select your device from the Device drop-down menu. From here, you can scan, send faxes, import documents, and perform maintenance procedures such as checking the ink levels for the ink cartridges. NOTE: On a Macintosh computer, the features available in the HP Photosmart Studio software vary depending on the selected device. TIP: When the HP Photosmart Studio software is opened, you can gain access to the Dock menu shortcuts by selecting and holding the mouse button over the HP Photosmart Studio icon in the Dock. Use the HP photo and imaging software 27
-
 1
1 -
2
-
3
-
4
-
5
-
6
-
7
-
8
-
9
-
10
-
11
-
12
-
13
-
14
-
15
-
16
-
17
-
18
-
19
-
20
-
21
-
22
-
23
-
24
-
25
-
 26
26 -
 27
27 -
 28
28 -
 29
29 -
 30
30 -
 31
31 -
 32
32 -
 33
33 -
 34
34 -
 35
35 -
 36
36 -
37
-
38
-
39
-
40
-
41
-
42
-
43
-
44
-
45
-
46
-
47
-
48
-
49
-
50
-
51
-
52
-
53
-
54
-
55
-
56
-
57
-
58
-
59
-
60
-
61
-
62
-
63
-
64
-
65
-
66
-
67
-
68
-
69
-
70
-
71
-
72
-
73
-
74
-
75
-
76
-
77
-
78
-
79
-
80
-
81
-
82
-
83
-
84
-
85
-
86
-
87
-
88
-
89
-
90
-
91
-
92
-
93
-
94
-
95
-
96
-
97
-
98
-
99
-
100
-
101
-
102
-
103
-
104
-
105
-
106
-
107
-
108
-
109
-
110
-
111
-
112
-
113
-
114
-
115
-
116
-
117
-
118
-
119
-
120
-
121
-
122
-
123
-
124
-
125
-
126
-
127
-
128
-
129
-
130
-
131
-
132
-
133
-
134
-
135
-
136
-
137
-
138
-
139
-
140
-
141
-
142
-
143
-
144
-
145
-
146
-
147
-
148
-
149
-
150
-
151
-
152
-
153
-
154
-
155
-
156
-
157
-
158
-
159
-
160
-
161
-
162
-
163
-
164
-
165
-
166
-
167
-
168
-
169
-
170
-
171
-
172
-
173
-
174
-
175
-
176
-
177
-
178
-
179
-
180
-
181
-
182
-
183
-
184
-
185
-
186
-
187
-
188
-
189
-
190
-
191
-
192
-
193
-
194
-
195
-
196
-
197
-
198
-
199
-
200
-
201
-
202
-
203
-
204
-
205
-
206
-
207
-
208
-
209
-
210
-
211
-
212
-
213
-
214
-
215
-
216
-
217
-
218
-
219
-
220
-
221
-
222
-
223
-
224
-
225
-
226
-
227
-
228
-
229
-
230
-
231
-
232
-
233
-
234
-
235
-
236
-
237
-
238
-
239
-
240
-
241
-
242
-
243
-
244
-
245
 |
 |