HP Officejet Pro L7600 User Guide - Page 58
Scan an original to a program on a computer (direct connection), Select Computer
 |
View all HP Officejet Pro L7600 manuals
Add to My Manuals
Save this manual to your list of manuals |
Page 58 highlights
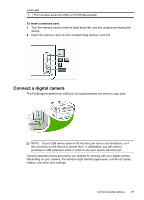
Chapter 6 the previous section. For more information, also see Set up network folders as speeddial entries (some models) or the Getting Started Guide that came with the device. To send a scan to a network folder 1. Load the original on the scanner glass or in the automatic document feeder (ADF). For more information, see Load the originals. 2. Press Digital Filing, and then do one of the following: • Select a destination from the speed-dial entries on the display. • Select a destination by pressing one of the five speed-dial buttons on the display. NOTE: If a PIN has been set up for the speed-dial entry, you must enter your PIN before continuing. 3. Press START SCAN. NOTE: The connection might take some time, depending on network traffic and connection speed. Scan an original to a program on a computer (direct connection) Use the following steps if your device is directly connected to a computer via a USB cable. When the scan is complete, the program that you have selected opens and displays the document that you have scanned. To send a scan to a program on a computer from the HP photo and imaging software 1. At the computer, open the HP photo and imaging software. For more information, see Use the HP photo and imaging software. 2. See the onscreen Help for further instructions. To send a scan to a program on a computer from the control panel (direct connect) 1. Load the original on the scanner glass or in the ADF. For more information, see Load the originals. 2. Press the Scan Menu or Scan To button. 3. Press the arrow keys to select the program that you want to use (such as the HP photo and imaging software), and then press OK. 4. Press START SCAN. To send a scan to a program on a computer from the control panel (network connection) 1. Load the original on the scanner glass or in the ADF. For more information, see Load the originals. 2. Press the Scan Menu or Scan To button. 3. Select Select Computer. 54 Scan
-
 1
1 -
2
-
3
-
4
-
5
-
6
-
7
-
8
-
9
-
10
-
11
-
12
-
13
-
14
-
15
-
16
-
17
-
18
-
19
-
20
-
21
-
22
-
23
-
24
-
25
-
26
-
27
-
28
-
29
-
30
-
31
-
32
-
33
-
34
-
35
-
36
-
37
-
38
-
39
-
40
-
41
-
42
-
43
-
44
-
45
-
46
-
47
-
48
-
49
-
50
-
51
-
52
-
 53
53 -
 54
54 -
 55
55 -
 56
56 -
 57
57 -
 58
58 -
 59
59 -
 60
60 -
 61
61 -
 62
62 -
 63
63 -
64
-
65
-
66
-
67
-
68
-
69
-
70
-
71
-
72
-
73
-
74
-
75
-
76
-
77
-
78
-
79
-
80
-
81
-
82
-
83
-
84
-
85
-
86
-
87
-
88
-
89
-
90
-
91
-
92
-
93
-
94
-
95
-
96
-
97
-
98
-
99
-
100
-
101
-
102
-
103
-
104
-
105
-
106
-
107
-
108
-
109
-
110
-
111
-
112
-
113
-
114
-
115
-
116
-
117
-
118
-
119
-
120
-
121
-
122
-
123
-
124
-
125
-
126
-
127
-
128
-
129
-
130
-
131
-
132
-
133
-
134
-
135
-
136
-
137
-
138
-
139
-
140
-
141
-
142
-
143
-
144
-
145
-
146
-
147
-
148
-
149
-
150
-
151
-
152
-
153
-
154
-
155
-
156
-
157
-
158
-
159
-
160
-
161
-
162
-
163
-
164
-
165
-
166
-
167
-
168
-
169
-
170
-
171
-
172
-
173
-
174
-
175
-
176
-
177
-
178
-
179
-
180
-
181
-
182
-
183
-
184
-
185
-
186
-
187
-
188
-
189
-
190
-
191
-
192
-
193
-
194
-
195
-
196
-
197
-
198
-
199
-
200
-
201
-
202
-
203
-
204
-
205
-
206
-
207
-
208
-
209
-
210
-
211
-
212
-
213
-
214
-
215
-
216
-
217
-
218
-
219
-
220
-
221
-
222
-
223
-
224
-
225
-
226
-
227
-
228
-
229
-
230
-
231
-
232
-
233
-
234
-
235
-
236
-
237
-
238
-
239
-
240
-
241
-
242
-
243
-
244
-
245
 |
 |