HP Officejet Pro L7600 User Guide - Page 72
Save photos to your computer
 |
View all HP Officejet Pro L7600 manuals
Add to My Manuals
Save this manual to your list of manuals |
Page 72 highlights
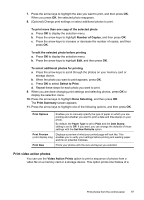
Chapter 7 video on one sheet of paper in the order that they appear in the video. The video frames are automatically selected by your device. To create video action prints 1. Insert a memory card into the appropriate slot on the device, or connect a storage device to the front USB port. The Photosmart Express menu appears. By default, View & Print is highlighted. 2. Press OK to select View & Print. When you press OK, the most recent photo appears on the display. 3. Press the arrow keys to scroll through the photos and videos on your memory card or storage device. 4. When the video you want to print appears, press OK. The Print menu appears. 5. Press the arrow keys to highlight Projects, and then press OK. The Projects menu appears. 6. Press the arrow keys to highlight Video Action Prints, and then press OK. 7. Press the arrow keys to highlight the size you want to print, and then press OK. 8. Press the arrow keys to highlight the type of paper you are printing on, and then press OK. 9. The video reappears, press OK to continue. 10. (Optional) Edit the video or print the video. To edit the selected photo before printing a. Press OK to display the selection menu. b. Press the arrow keys to highlight Edit, and then press OK. To print now ▲ Select Print Now, press OK. Save photos to your computer After you take photos with your digital camera, you can print them immediately or save them to your computer. To save the photos to your computer, remove the memory card from your digital camera and insert it in the appropriate memory card slot on the device. You can also save photos from a storage device (such as a digital camera or keychain drive) by plugging the device into the front USB port on the device. 68 Work with memory devices (some models only)
-
 1
1 -
2
-
3
-
4
-
5
-
6
-
7
-
8
-
9
-
10
-
11
-
12
-
13
-
14
-
15
-
16
-
17
-
18
-
19
-
20
-
21
-
22
-
23
-
24
-
25
-
26
-
27
-
28
-
29
-
30
-
31
-
32
-
33
-
34
-
35
-
36
-
37
-
38
-
39
-
40
-
41
-
42
-
43
-
44
-
45
-
46
-
47
-
48
-
49
-
50
-
51
-
52
-
53
-
54
-
55
-
56
-
57
-
58
-
59
-
60
-
61
-
62
-
63
-
64
-
65
-
66
-
 67
67 -
 68
68 -
 69
69 -
 70
70 -
 71
71 -
 72
72 -
 73
73 -
 74
74 -
 75
75 -
 76
76 -
 77
77 -
78
-
79
-
80
-
81
-
82
-
83
-
84
-
85
-
86
-
87
-
88
-
89
-
90
-
91
-
92
-
93
-
94
-
95
-
96
-
97
-
98
-
99
-
100
-
101
-
102
-
103
-
104
-
105
-
106
-
107
-
108
-
109
-
110
-
111
-
112
-
113
-
114
-
115
-
116
-
117
-
118
-
119
-
120
-
121
-
122
-
123
-
124
-
125
-
126
-
127
-
128
-
129
-
130
-
131
-
132
-
133
-
134
-
135
-
136
-
137
-
138
-
139
-
140
-
141
-
142
-
143
-
144
-
145
-
146
-
147
-
148
-
149
-
150
-
151
-
152
-
153
-
154
-
155
-
156
-
157
-
158
-
159
-
160
-
161
-
162
-
163
-
164
-
165
-
166
-
167
-
168
-
169
-
170
-
171
-
172
-
173
-
174
-
175
-
176
-
177
-
178
-
179
-
180
-
181
-
182
-
183
-
184
-
185
-
186
-
187
-
188
-
189
-
190
-
191
-
192
-
193
-
194
-
195
-
196
-
197
-
198
-
199
-
200
-
201
-
202
-
203
-
204
-
205
-
206
-
207
-
208
-
209
-
210
-
211
-
212
-
213
-
214
-
215
-
216
-
217
-
218
-
219
-
220
-
221
-
222
-
223
-
224
-
225
-
226
-
227
-
228
-
229
-
230
-
231
-
232
-
233
-
234
-
235
-
236
-
237
-
238
-
239
-
240
-
241
-
242
-
243
-
244
-
245
 |
 |