HP P2000 HP P2000 G3 MSA System SMU Reference Guide - Page 35
Configuring the system, Using the Configuration Wizard, Step 1: Starting the wizard - default ip
 |
View all HP P2000 manuals
Add to My Manuals
Save this manual to your list of manuals |
Page 35 highlights
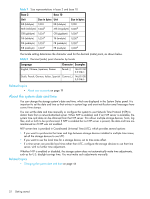
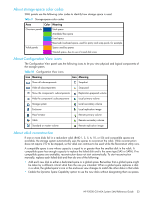
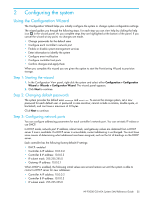
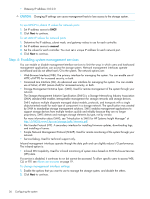
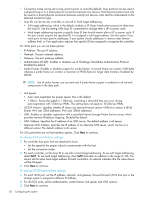
2 Configuring the system Using the Configuration Wizard The Configuration Wizard helps you initially configure the system or change system configuration settings. The wizard guides you through the following steps. For each step you can view help by clicking the help icon in the wizard panel. As you complete steps they are highlighted at the bottom of the panel. If you cancel the wizard at any point, no changes are made. • Change passwords for the default users • Configure each controller's network port • Enable or disable system-management services • Enter information to identify the system • Configure event notification • Configure controller host ports • Confirm changes and apply them When you complete this wizard you are given the option to start the Provisioning Wizard to provision storage. Step 1: Starting the wizard 1. In the Configuration View panel, right-click the system and select either Configuration > Configuration Wizard or Wizards > Configuration Wizard. The wizard panel appears. 2. Click Next to continue. Step 2: Changing default passwords The system provides the default users manage and monitor. To secure the storage system, set a new password for each default user. A password is case sensitive; cannot include a comma, double quote, or backslash; and can have a maximum of 32 bytes. Click Next to continue. Step 3: Configuring network ports You can configure addressing parameters for each controller's network port. You can set static IP values or use DHCP. In DHCP mode, network port IP address, subnet mask, and gateway values are obtained from a DHCP server if one is available. If a DHCP server is unavailable, current addressing is unchanged. You must have some means of determining what addresses have been assigned, such as the list of bindings on the DHCP server. Each controller has the following factory-default IP settings: • DHCP: enabled • Controller A IP address: 10.0.0.2 • Controller B IP address: 10.0.0.3 • IP subnet mask: 255.255.255.0 • Gateway IP address: 10.0.0.1 When DHCP is enabled, the following initial values are set and remain set until the system is able to contact a DHCP server for new addresses: • Controller A IP address: 10.0.0.2 • Controller B IP address: 10.0.0.3 • IP subnet mask: 255.255.255.0 HP P2000 G3 MSA System SMU Reference Guide 35
-
 1
1 -
2
-
3
-
4
-
5
-
6
-
7
-
8
-
9
-
10
-
11
-
12
-
13
-
14
-
15
-
16
-
17
-
18
-
19
-
20
-
21
-
22
-
23
-
24
-
25
-
26
-
27
-
28
-
29
-
 30
30 -
 31
31 -
 32
32 -
 33
33 -
 34
34 -
 35
35 -
 36
36 -
 37
37 -
 38
38 -
 39
39 -
 40
40 -
41
-
42
-
43
-
44
-
45
-
46
-
47
-
48
-
49
-
50
-
51
-
52
-
53
-
54
-
55
-
56
-
57
-
58
-
59
-
60
-
61
-
62
-
63
-
64
-
65
-
66
-
67
-
68
-
69
-
70
-
71
-
72
-
73
-
74
-
75
-
76
-
77
-
78
-
79
-
80
-
81
-
82
-
83
-
84
-
85
-
86
-
87
-
88
-
89
-
90
-
91
-
92
-
93
-
94
-
95
-
96
-
97
-
98
-
99
-
100
-
101
-
102
-
103
-
104
-
105
-
106
-
107
-
108
-
109
-
110
-
111
-
112
-
113
-
114
-
115
-
116
-
117
-
118
-
119
-
120
-
121
-
122
-
123
-
124
-
125
-
126
-
127
-
128
-
129
-
130
-
131
-
132
-
133
-
134
-
135
-
136
-
137
-
138
-
139
-
140
-
141
-
142
-
143
-
144
-
145
-
146
-
147
-
148
-
149
-
150
-
151
-
152
-
153
-
154
-
155
-
156
-
157
-
158
-
159
-
160
 |
 |