HP Pavilion a6000 Getting Started Guide
HP Pavilion a6000 - Desktop PC Manual
 |
View all HP Pavilion a6000 manuals
Add to My Manuals
Save this manual to your list of manuals |
HP Pavilion a6000 manual content summary:
- HP Pavilion a6000 | Getting Started Guide - Page 1
Getting Started - HP Pavilion a6000 | Getting Started Guide - Page 2
services. Nothing herein should be construed as constituting an additional warranty. HP shall not be liable for technical or editorial errors or omissions contained herein. HP in the United States and/or other countries/regions. HP supports lawful use of technology and does not endorse or encourage - HP Pavilion a6000 | Getting Started Guide - Page 3
to the computer 2 Connecting a Digital Camera (Photo or Video 4 Connecting Other Devices 5 Storing Documentation and Recovery Discs 6 Adjusting the Monitor 6 Setting Up a Local Area Network 6 Setting Up a Wired (Ethernet) Connection 8 Integrated Wireless Devices 8 Connecting the Wireless LAN - HP Pavilion a6000 | Getting Started Guide - Page 4
35 Finding Onscreen Guides 35 Finding Guides on the Web 35 Using the Onscreen Help and Support Center 36 Using the PC Help & Tools Folder 36 Using HP Connections or Compaq Connections 36 Getting messages 37 Turning off messages 37 Reactivating messages 38 Turning On Your Computer for the - HP Pavilion a6000 | Getting Started Guide - Page 5
Transferring Files and Settings from Your Old Computer to Your New Computer ..........51 Using HP Total Care Advisor Software 51 Using the 63 Introducing Your Computer Software 65 Learning More About Software 65 Using the Desktop 65 Removing desktop icons 66 Retrieving desktop icons 66 Using - HP Pavilion a6000 | Getting Started Guide - Page 6
Insertion Guide 90 Understanding the Activity Light 93 Formatting a Memory Card 93 Troubleshooting the Memory Card Reader 94 Using the HP Personal Media Drive and HP Pocket Media Drive 95 Connecting the Drive 96 Inserting the Drive into an HP drive bay 96 Connecting the Drive to a Computer - HP Pavilion a6000 | Getting Started Guide - Page 7
Windows Media Player 103 Playing DVDs ...104 Using country/region codes 104 Playing DVDs with Windows Media Player 104 Playing Video CDs (VCDs 105 Playing Video CDs (VCDs) with Windows Media Player 105 Creating Audio and Data Discs 107 Erasing Rewritable Discs Before Recording 108 Working - HP Pavilion a6000 | Getting Started Guide - Page 8
viii Getting Started - HP Pavilion a6000 | Getting Started Guide - Page 9
WARNING: Please read "Safety Information" in the Warranty and Support Guide before installing and connecting your computer to the electrical power system. Putting Your Computer Together Follow the steps on the setup poster to set up your computer. Read the topics in this section to learn more about - HP Pavilion a6000 | Getting Started Guide - Page 10
strips provide surge protection; the power strip must be specifically labeled as having this capability. Use a power strip whose manufacturer offers a damage replacement policy that replaces your equipment if surge protection fails. Connecting to the computer Connect your main hardware devices, such - HP Pavilion a6000 | Getting Started Guide - Page 11
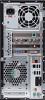
port for some digital cameras or other serial devices Audio Line Out (powered speakers) Audio Line In Headphones Microphone FireWire® (IEEE 1394) for video cameras or other devices with very fast transfer rates Digital audio in and digital audio out Side speaker out Setting Up Your Computer 3 - HP Pavilion a6000 | Getting Started Guide - Page 12
) Rear speaker out Center/subwoofer Connecting a Digital Camera (Photo or Video) The following instructions apply only to digital photo cameras and digital video cameras. NOTE: When connecting an analog video camera to the computer, use the Video and Audio In connectors on the front or back of the - HP Pavilion a6000 | Getting Started Guide - Page 13
using USB or FireWire (IEEE 1394) ports. These peripheral devices include printers, scanners, video cameras, digital photo cameras, memory card readers, and PDAs (personal digital assistant) or handheld computers. Refer to the documentation that came with your device. NOTE: Some peripheral devices - HP Pavilion a6000 | Getting Started Guide - Page 14
idea to store your system recovery discs with your documentation. This allows easy access to all important computer documents and files. Adjusting the Monitor To change the screen resolution: 1 Right-click an empty area of the desktop, and then click Personalize. 2 Click the Display Settings. 3 If - HP Pavilion a6000 | Getting Started Guide - Page 15
The preceding illustration shows a home LAN. The desktop computer has a wired connection to a wireless router. The desktop computer also has a printer that it shares with the other computers on the network. Each notebook computer has a wireless connection to the network router. Setting Up Your - HP Pavilion a6000 | Getting Started Guide - Page 16
network. 1 Connect an Ethernet cable to the Ethernet connector (A) on the back of the computer, and to the network router or LAN device. NOTE: Your computer may not come with an Ethernet connector. A Ethernet connector (RJ-45 port) B Ethernet indicator lights 2 With the computer turned on, check the - HP Pavilion a6000 | Getting Started Guide - Page 17
can use your computer as a wireless client (Station Mode) if you already have a wireless network running. You need an existing wireless LAN with an Internet connection (consult your Internet Service Provider [ISP] for further information). An external antenna is supplied with your system; you must - HP Pavilion a6000 | Getting Started Guide - Page 18
, wireless LAN, or 802.11. NOTE: If no WLAN device is listed, either your computer does not have an integrated WLAN device, or the driver for the onscreen instructions. For more information about setting up a wireless network: Click the Windows Start Button on the taskbar, click Help and Support, and - HP Pavilion a6000 | Getting Started Guide - Page 19
in this guide. The modem is used for connecting to an ISP that provides a telephone dial-up connection to the Internet. NOTE: Your computer may not and faxes, you must connect your telephone service line to the modem (A), which is on the back of the computer (B). The setup poster shows you how to - HP Pavilion a6000 | Getting Started Guide - Page 20
12 Getting Started - HP Pavilion a6000 | Getting Started Guide - Page 21
button and no power cord) or active (power button or power cord). Your computer supports only active (powered) speaker systems; the speaker system must have its own power cord. A stereo speaker set is a left-right, two-channel speaker system. A multichannel audio speaker system is a system with more - HP Pavilion a6000 | Getting Started Guide - Page 22
connectors on the back of your computer. You can connect up to a 7.1 audio system to the computer. Type 3 6 Sound card Your computer may include a sound See the following S connector card. You can connect up to a 5.1 illustration. audio system (7.1 audio system for select models) or digital - HP Pavilion a6000 | Getting Started Guide - Page 23
sound connectors on the back panel of computer systems. Sound connector Type 3 Type 6 Type S Description Line Side (gray) for side speakers in an eight-speaker system (7.1). A Line C/Sub (gold) for center/subwoofer speakers in a multichannel audio configuration. B Line Rear (black) for rear - HP Pavilion a6000 | Getting Started Guide - Page 24
a Microphone." HP computers support many different audio options, sound connections, and speaker configurations. You may set up your computer for two stereo speakers or for multichannel audio speaker systems. Connect your speaker system to the computer, and then configure the audio software for - HP Pavilion a6000 | Getting Started Guide - Page 25
sold separately. Refer to the product documentation for your speakers. Your computer supports only an active (powered) speaker system. An active speaker system must have its own power cord. A home audio system does not require active speakers, because the receiver provides amplification. A stereo - HP Pavilion a6000 | Getting Started Guide - Page 26
NOTE: Type 3 is three connectors. Type 6 is six connectors. Type S is sound card. 3 Connect the cable to the audio system. For 2.1 speakers that were shipped with your computer (select models only), connect the Audio Line Out connector to the subwoofer. 4 Connect the left and right speakers to the - HP Pavilion a6000 | Getting Started Guide - Page 27
NOTE: Type 3 is three connectors. Type 6 is six connectors. Type S is sound card. 3 Connect the rear speaker cable to the black connector that matches the back of your computer. 3 6 S For type 3-connector systems, the blue Audio Line In connector functions as a Rear Line Out when a multichannel - HP Pavilion a6000 | Getting Started Guide - Page 28
7 Plug in the speaker system power. 8 Turn on the speaker system. 9 After the speakers are connected to the computer, configure the audio software for sound output for your computer model. See "Configuring Speaker and Sound Options." Type 3: See "Configuring Audio Output with Multichannel Sound - HP Pavilion a6000 | Getting Started Guide - Page 29
rear speaker cable to the black connector that matches the back of your computer. 3 6 S For type 3-connector systems, the blue Audio Line In connector functions as a Rear Line Out when a multichannel audio configuration is activated. 4 Connect the center/subwoofer speaker cable to the gold (or - HP Pavilion a6000 | Getting Started Guide - Page 30
two rear speakers, a center speaker, and a subwoofer for eight-channel (7.1 speaker) output: 1 Turn off the computer. 2 Connect the front speaker cable to the lime green Audio Line Out connector on the back of your computer. 3 Connect the rear speaker cable to the black connector on the back of your - HP Pavilion a6000 | Getting Started Guide - Page 31
the speaker documentation. 8 Turn on the computer. NOTE: Always turn on the computer before you turn on the speaker system. 9 Plug in the speaker system power. 10 Turn on the speaker system. 11 After the speakers are connected to the computer, configure the audio software for sound output for your - HP Pavilion a6000 | Getting Started Guide - Page 32
: One Y adapter cable 4/4.1 speaker system: Two Y adapter cables 6/5.1 speaker system: Three Y adapter cables 8/7.1 speaker system: Four Y adapter cables Connecting a home stereo to a computer typically requires audio cables that are long enough to connect from the computer to the stereo. You may - HP Pavilion a6000 | Getting Started Guide - Page 33
may be different. A B Center C Front Surr. Back Sub E C DE Computer to 2.1 multichannel audio system connection A Computer back-panel connectors (type 3, type 6, or sound card) B Y adapter cables C Receiver/amplifier (audio input jacks) D Subwoofer E Front speakers (left and right) Connecting - HP Pavilion a6000 | Getting Started Guide - Page 34
may be different. A B Center C Front Surr. Back Sub F E C D G Computer to 5.1 multichannel audio system connection A Computer back-panel connectors (type 3, type 6, or sound card) B Y adapter cables C Receiver/amplifier (audio input jacks) D Subwoofer E Center speaker F Front speakers (left - HP Pavilion a6000 | Getting Started Guide - Page 35
cable into the Audio Line In (blue) or the Rear Speaker Out (black) connector that matches the back of your computer. 3 6 computer. 3 6 S Connect the left and right ends of the Y adapter cable into the center/subwoofer inputs on the back of the receiver/amplifier (6/5.1 or higher-channel system - HP Pavilion a6000 | Getting Started Guide - Page 36
different. A B Center C Front Surr. Back Sub IN OUT F E C D G Computer to 7.1 multichannel audio system connection A Computer back-panel connectors (type 3, type 6, or sound card) B Y adapter cables C Receiver/amplifier (audio input jacks) D Subwoofer E Center speaker F Front speakers (left - HP Pavilion a6000 | Getting Started Guide - Page 37
audio system to the computer: 1 Turn off the computer. 2 Turn off the receiver/amplifier. 3 Connect the front stereo mini-jack end of a Y adapter cable into the lime green Audio cable into the Audio Line In (blue) or the Rear Speaker Out (black) connector that matches the back of your computer. 3 6 - HP Pavilion a6000 | Getting Started Guide - Page 38
on the back panel of your computer to the digital input (S/PDIF) on digital speakers or a digital audio system. 3 6 S NOTE: Type 3 is three connectors. Type 6 is six connectors. Type S is sound card. 3 Turn on the computer. NOTE: Always turn on the computer before you turn on the speaker - HP Pavilion a6000 | Getting Started Guide - Page 39
4 Plug in the speaker system power. 5 Turn on the speaker system. 6 After the speakers are connected to the computer, configure the audio software for sound output for your computer model. See "Configuring Speaker and Sound Options." Audio card with digital output and type 3 connectors: See " - HP Pavilion a6000 | Getting Started Guide - Page 40
connector." To connect the X-Fi sound card to your speakers: 1 Use the audio connection table to connect your audio system to the sound card. 2 Turn on the computer. 3 Plug in and turn on the speaker system power. After connecting the speaker system to the sound card, follow the steps in "Connecting - HP Pavilion a6000 | Getting Started Guide - Page 41
Connecting the FlexiJack connector The FlexiJack connector performs three functions: Digital Input/Output Line In Microphone You must select the function in the Creative Console Launcher. NOTE: If you are using the FlexiJack as your Digital In connection and you want to connect digital speakers as - HP Pavilion a6000 | Getting Started Guide - Page 42
34 Getting Started - HP Pavilion a6000 | Getting Started Guide - Page 43
and Drivers. 4 Click See support and troubleshooting information, enter the model number of your computer, and then click Search . 5 Click Manuals. 6 Locate the manual you want, and then do one of the following: Click the title to display the file in Adobe Acrobat Reader (which you can download from - HP Pavilion a6000 | Getting Started Guide - Page 44
offers for your computer Messages arrive while you're connected to the Internet, and display an alert or a notice on your desktop. Messages may also display within the HP Total Care Advisor. You can view messages as they arrive or read them later. Most support updates that HP Connections or Compaq - HP Pavilion a6000 | Getting Started Guide - Page 45
. You can exit this window, and HP Connections or Compaq Connections remains active. If HP Connections or Compaq Connections has not been activated on your system, the screen contains an Activate button to activate the service. Click Activate to start the service and view a list of messages that - HP Pavilion a6000 | Getting Started Guide - Page 46
receive messages as they become available. To turn on the service: 1 Click the Windows Start Button on the taskbar. 2 Click All Programs. 3 Click PC Help & Tools. 4 Click HP Connections or Compaq Connections. HP Connections or Compaq Connections displays. 5 Click Activate to reactivate the - HP Pavilion a6000 | Getting Started Guide - Page 47
ergonomic information: Click the Windows Start Button on the taskbar, click All Programs, click User Guides, and then click Safety & Comfort Guide. Or Type http://www.hp.com/ergo into your Web browser address box, and then press Enter on the keyboard. Turning On Your Computer for the First Time 39 - HP Pavilion a6000 | Getting Started Guide - Page 48
Security software (firewall program) Windows Vista updates Unauthorized access to Setup Utility, BIOS settings, and other system identification information Administrator password Ongoing or future threats to the computer Critical security updates from Microsoft Using passwords A password is - HP Pavilion a6000 | Getting Started Guide - Page 49
information on Windows Vista passwords, such as screen saver passwords, type passwords into the Search box in the Help and Support Center. Password Function Windows Vista Administrator password Protects administrator-level access to computer contents. Windows Vista User password Protects - HP Pavilion a6000 | Getting Started Guide - Page 50
computer against new viruses beyond the free period by purchasing extended update service. Instructions for using and updating Norton Internet Security software, and for purchasing extended update service e-mail attachments. To temporarily solve the problem, disable the firewall, perform the task - HP Pavilion a6000 | Getting Started Guide - Page 51
system and other software may have become available after the computer was shipped. Download all available updates and install them onto your computer. To get the latest updates for your computer, click the Windows Start Button on the taskbar, click Help and Support, and then click Software, drivers - HP Pavilion a6000 | Getting Started Guide - Page 52
you were. Hibernate mode saves your system memory to a temporary file on the hard disk and then turns off the hardware. Some computers also have a reduced-power state called away mode. Away mode turns off the display and mutes the audio, but otherwise keeps the computer operational. During away mode - HP Pavilion a6000 | Getting Started Guide - Page 53
retrieve e-mail messages and download information from the Internet automatically, if you set it to do so. To put the computer into sleep mode manually: Press the Sleep button on the keyboard, if it is present. Or 1 Click the Windows Start Button on the taskbar. 2 Click the Power button. Or 1 Click - HP Pavilion a6000 | Getting Started Guide - Page 54
drive everything that is in computer memory, turns off the monitor and the hard disk drive, and then turns itself off. When you turn on the computer again, your programs, folders, and documents are restored to the screen. To put the computer into hibernate mode manually: 1 Click the Windows Start - HP Pavilion a6000 | Getting Started Guide - Page 55
the Internet that do not use the telephone modem, such as a LAN (local area network) or DSL (digital subscriber line). Check with your ISP for specific information on your connection. Refer to the "Setting Up Your Computer" of this guide to make the hardware connections: for a modem see "Connecting - HP Pavilion a6000 | Getting Started Guide - Page 56
desktop, and log in. 4 Open your Web browser and browse the Internet. You can use any Web browser; most computers Update message, allow the updates to download to your system. If you update the system weekly, or even monthly, the time required for download is minimal. To configure Automatic Updates - HP Pavilion a6000 | Getting Started Guide - Page 57
-compatible software and drivers. Limited Not allowed accounts: More memory (RAM) usage Multiple computer stays private and secure. Use the following list as a basic guide when choosing your password: Choose a password that is easy for you to remember but difficult for others to guess. Choose a long - HP Pavilion a6000 | Getting Started Guide - Page 58
with your computer - check the operating system, memory, and other requirements listed for the new software. Install the new software according to the directions provided by the software manufacturer. If you need help, check the manufacturer's documentation or customer service - HP Pavilion a6000 | Getting Started Guide - Page 59
moving your files onto your new computer. Using HP Total Care Advisor Software HP Total Care Advisor is a desktop tool you use to monitor and access system health information about key areas of you computer. HP Total Care Advisor has four major areas: PC Health & Security provides a dashboard view - HP Pavilion a6000 | Getting Started Guide - Page 60
52 Getting Started - HP Pavilion a6000 | Getting Started Guide - Page 61
wireless keyboard. The keyboard is the primary way you enter text and commands for the computer. A standard keyboard connects to the keyboard connector in the back of the computer. A wireless keyboard (select models only) uses a receiver/transmitter, instead of a connector cable, to communicate with - HP Pavilion a6000 | Getting Started Guide - Page 62
for the software program being used. Pressing F3 displays a search window. Edit keys The edit keys are Insert, Home, Page Up, Delete, End, and Page Down. Use these keys to insert and delete text, and to quickly move the cursor on the screen. The edit keys function differently with some software - HP Pavilion a6000 | Getting Started Guide - Page 63
Numeric keys Press the Num Lock key to lock and unlock the numeric key functions: When the Num Lock light on the keyboard is on, the numeric keys work in the same way as the number keys and arithmetic functions found on a basic calculator. When the Num Lock light on the keyboard is off, the numeric - HP Pavilion a6000 | Getting Started Guide - Page 64
you to the Internet, or provide quick access to specific functions. (Some keyboard models have some of these computer into or out of power-saving mode. It may take 10-30 seconds before screen reappears. Switches between computer users. Information Opens Help and Support Center. ? Or Pictures - HP Pavilion a6000 | Getting Started Guide - Page 65
to open any Web site or software program. Opens e-mail program. Can be reconfigured to open any Web site or software program. Links to HP Web site. Compaq My Presario Shopping Links to Compaq Web site. Sports Finance Connect to Internet Search Goes to popular Web sites. Can be reconfigured - HP Pavilion a6000 | Getting Started Guide - Page 66
Media control or playback buttons Icon Label Description Eject 1 and Opens or closes upper and lower optical drive trays. Eject 2 Rec Starts recording to selected media. Stop Stops media. Play/Pause Plays or pauses media. Prev Next Volume Or Or -+ Rewinds media. Fast-forwards media. Volume - HP Pavilion a6000 | Getting Started Guide - Page 67
press simultaneously to perform specific actions. For example, from the Windows Vista desktop, press the Alt (alternate) key, the Ctrl (control) key, and the S key (the letter S) to display support information for the computer (including the model number, serial number, and service ID). You will see - HP Pavilion a6000 | Getting Started Guide - Page 68
60 Getting Started - HP Pavilion a6000 | Getting Started Guide - Page 69
computer includes a mouse for directing the cursor (pointer) on the Windows Vista desktop. The mouse uses a roller ball or optics (a light and sensor) to sense movement and cause the cursor on the screen an item. Click the right mouse button (C) to display a menu of commands for the item you clicked. - HP Pavilion a6000 | Getting Started Guide - Page 70
You see these terms for using the mouse: Click means to press and release the left mouse button once. Double-click means to click the left mouse button and then quickly click it again. Right-click means to press and release the right button once. To select an item, click it. To select sequential - HP Pavilion a6000 | Getting Started Guide - Page 71
secondary buttons. 6 Click Apply (using the new primary button) and then OK. Changing Mouse Pointer Speed To change the speed of the cursor on the screen relative to the motion of the mouse: 1 Click the Windows Start Button on the taskbar. 2 Click Control Panel. 3 Click Hardware and Sound, if it is - HP Pavilion a6000 | Getting Started Guide - Page 72
64 Getting Started - HP Pavilion a6000 | Getting Started Guide - Page 73
by two kinds of software: The Microsoft Windows Vista operating system, which displays the desktop on the monitor and controls your computer's hardware, peripherals, and software programs. Software programs that perform specific functions, such as word processing. The software programs included with - HP Pavilion a6000 | Getting Started Guide - Page 74
or change settings. Using the All Programs menu To find the software programs on your computer: 1 Click the Windows Start Button on the taskbar. 2 Click All Programs. The All Programs menu displays a list of folders organized according to task (select models only). A folder contains a list of items - HP Pavilion a6000 | Getting Started Guide - Page 75
an item: 1 Right-click the item. 2 Click Copy. 3 Go to the desktop or folder, right-click an empty space, and then click Paste. If you use and other components and features of the computer. The Control Panel also provides tools for changing system performance, adding hardware, adding or removing - HP Pavilion a6000 | Getting Started Guide - Page 76
, such as a digital camera or a digital video camera, to the computer either directly or through a docking station. Digital picture files you copy or download from the device appear in the Pictures folder. Digital cameras and other digital imaging devices use memory cards, or media, to store digital - HP Pavilion a6000 | Getting Started Guide - Page 77
fee for their services. When your computer connects to the Internet, it is actually communicating with the Internet computer belonging to the ISP. The ISP verifies your account and then provides you access to the Internet. You use a Web browser program to search for and display Web site information - HP Pavilion a6000 | Getting Started Guide - Page 78
displays the home Web page. You can go to a different Web site by entering its address (such as http://www.hp.com) into the address box in the browser, and pressing Enter on your keyboard. Or you can use the browser search feature to search for references to a specific the computer to show the - HP Pavilion a6000 | Getting Started Guide - Page 79
and Support or updates. You can enable Symantec's LiveUpdate™ to obtain protection updates automatically whenever you are online. HP strongly recommends that you protect the computer against new viruses beyond the trial period by purchasing an extended update service. Introducing Your Computer - HP Pavilion a6000 | Getting Started Guide - Page 80
Norton Internet Security again. 2 Click Next and follow the onscreen instructions if prompted. For information about using and updating the Norton Internet Security software, you can click the Windows Start Button on the taskbar, click Help and Support, and then type virus into the Search Help box - HP Pavilion a6000 | Getting Started Guide - Page 81
pictures, postcards, and even music and video clips. NOTE: E-mail may contain a virus in the message itself or as an attachment. To protect your computer 6 Follow the onscreen instructions to add your account. Using the e-mail program provided by your ISP Follow the instructions provided by your ISP - HP Pavilion a6000 | Getting Started Guide - Page 82
Table (Select models only) Your computer includes a number of software programs that: Record and play CDs. Record data CDs. Import and edit video files. Record video CDs and DVDs. Organize digital media files. The following table describes the functionality specific to each of these programs. Use - HP Pavilion a6000 | Getting Started Guide - Page 83
PC (select models only) You can: (continued) Add your own style to your movies with music, pictures motion effects applied to your pictures. Play music CDs, .mp3s, and other audio files. Play DVD movies. CDs or DVDs from files on your computer. Copy video files. Verify that the disc has been - HP Pavilion a6000 | Getting Started Guide - Page 84
want to keep available to you on your desktop. Comparison-shop using the convenient shopping search engine. Get HP software and driver updates. Get important messages from HP. Access PC Health and Security and PC Help tools. Import audio, video, and other media files from videotape, audiotape, Web - HP Pavilion a6000 | Getting Started Guide - Page 85
on your computer involves working with files. The computer can copy files to other storage media within component drives, such as diskettes, memory cards, CDs on your computer: The Computer view enables you to quickly see all the files and folders within a specific folder on your computer. It also - HP Pavilion a6000 | Getting Started Guide - Page 86
unusable. 1 Click the Windows Start Button on the taskbar, and then click Computer. Or Right-click Windows Start Button on the taskbar, and then click Explore more Windows Explorer windows open at one time.) Select an item in Computer or in Windows Explorer, and then press and hold the right mouse - HP Pavilion a6000 | Getting Started Guide - Page 87
what you type. It displays files if your term matches the file name, tags, or other file properties. It displays text documents if the term could make the file unrecognizable to the computer. 1 Click the Windows Start Button on the taskbar, and click Computer. Or Right-click Windows Start Button on - HP Pavilion a6000 | Getting Started Guide - Page 88
Bin is emptied manually or it is cleared to make room for more recently deleted files. 1 Double-click the Recycle Bin icon on your desktop. 2 Find the copy files by dragging them into a new location. Select an item in Computer or in Windows Explorer and then press and hold the right mouse button - HP Pavilion a6000 | Getting Started Guide - Page 89
printer drivers. In many cases your computer automatically finds the necessary printer driver for your particular printer to work with your computer. If it does not, follow instructions that come with your printer to install the specific printer driver manually. You can print text and graphics from - HP Pavilion a6000 | Getting Started Guide - Page 90
82 Getting Started - HP Pavilion a6000 | Getting Started Guide - Page 91
Using CD and DVD Media Drives Using Your CD and DVD Drives Your computer can come with several types of CD or DVD drives that allow you to do different tasks. What you can do depends on what kind - HP Pavilion a6000 | Getting Started Guide - Page 92
: Use only standard-shaped (circular) discs in your drives. Using nonstandard discs, such as heart-shaped discs or business-card discs, may damage your drive. To insert a CD or DVD: 1 With your computer turned on, press the Eject button near the front of the drive to open the disc tray. NOTE: On - HP Pavilion a6000 | Getting Started Guide - Page 93
case. 4 Close the disc tray by gently pushing the tray into the computer. Compatibility Information An important feature of a DVD Writer/CD Writer drive is in most computer DVD-ROM and CD-ROM drives. The DVDs that you create are compatible with some DVD video players and with most computer DVD-ROM - HP Pavilion a6000 | Getting Started Guide - Page 94
Compatibility Table Disc CD-ROM CD-R CD-RW DVD-ROM DVD-RAM DVD+R and DVD-R Double-layer DVD+R/DVD-R DVD+RW and disc compatibility information for your computer, go to the HP Support Web site at: http://www.hp.com/support NOTE: Double-layer DVD technology is supported by select models only. NOTE - HP Pavilion a6000 | Getting Started Guide - Page 95
Record DVD No movies Play games Yes Create LightScribe No label CD-RW Yes No Yes Yes Yes No No Yes No DVD-ROM DVD-RAM Yes Yes DVD+RW/+R DVD-RW/-R Yes Doublelayer DVD Yes Yes Yes Yes Yes Yes Yes Yes Yes Yes Yes Yes Yes No Yes Yes - HP Pavilion a6000 | Getting Started Guide - Page 96
88 Getting Started - HP Pavilion a6000 | Getting Started Guide - Page 97
: Do not click Stop in the Safely Remove Hardware window with the USB Mass Storage Device selected. Doing so removes the operating system recognition of the memory card reader from your computer, and you must restart the computer to see your memory card reader again. Using the Memory Card Reader 89 - HP Pavilion a6000 | Getting Started Guide - Page 98
media. A steady activity light indicates that the computer is not reading or writing the media card. CAUTION: Do not try to remove media when the activity light is blinking. Doing so may cause loss of data. Media Insertion Guide 4-slot memory card reader (select models only) A Activity light B Upper - HP Pavilion a6000 | Getting Started Guide - Page 99
) E (lower-right) E (lower-right) E (lower-right) B (upper-left) B (upper-left) *Select models only. Not available in all countries/regions. NOTE: Some memory cards, such as CF Ultra/III, are not compatible with the memory card reader that came with your computer. Using the Memory Card Reader 91 - HP Pavilion a6000 | Getting Started Guide - Page 100
reader (select models only) A Activity light F Upper slot G Lower slot Card Secure Digital (SD) Memory Card MultiMediaCard (MMC) Memory Stick (MS) Memory Card Memory Stick (MS-Pro) Memory Card SmartMedia (SM) Memory Card Insert the media 2-slot reader location Facing up (gold connector fingers - HP Pavilion a6000 | Getting Started Guide - Page 101
in your digital camera. Follow the instructions that came with your digital camera. Or Insert the media into the correct card slot on the reader until it stops and locks into place. The activity light on the memory card reader lights, and the computer automatically detects the media. 2 Click the - HP Pavilion a6000 | Getting Started Guide - Page 102
when the activity light is not blinking, and shine a flashlight into the empty slot. If any of the pins are bent, replace the memory card reader, or have the computer serviced if a pin is touching another pin. To straighten slightly bent pins, use the tip of a fine-point retracted ballpoint pen with - HP Pavilion a6000 | Getting Started Guide - Page 103
, digital video camcorders, and MP3 players. Quickly transfer files between PCs. Play media files. Back up your files. Perform system backups for added data security. For more information about using your HP Media Drives with Windows Media Center, refer to the documentation on the HP Support Web - HP Pavilion a6000 | Getting Started Guide - Page 104
can be inserted into specifically designed HP computers. These computers have a special power from the computer is turned off, the drive automatically turns off. When the computer is in sleep mode (a reduced power state), the drive remains turned on. WARNING: Do not move the computer with the HP - HP Pavilion a6000 | Getting Started Guide - Page 105
provided. When connecting the drive to a computer without a drive bay, the HP Personal Media Drive requires a separate power supply in addition to a USB 2.0 connection. The HP Pocket Media Drive does not require a separate power supply because power is supplied through the USB 2.0 connection. NOTE - HP Pavilion a6000 | Getting Started Guide - Page 106
USB port on your computer. Plug the square end of the USB 2.0 cable (D) into the USB connector on the back of the HP Media Drive. NOTE: USB 2.0 uses only one USB connector. USB 1.x systems use both USB connectors. 3 Install the software and drivers. Refer to the HP Media Drive documentation for - HP Pavilion a6000 | Getting Started Guide - Page 107
for long periods of time, the aluminum case of the HP Media Drive may become very warm. This is part of the HP Media video you have created. To transfer your files manually: 1 Connect the drive to your computer. 2 Select your files, and then drag and drop them to the HP Media Drive in the Computer - HP Pavilion a6000 | Getting Started Guide - Page 108
off. 2 Double-click the Safely Remove Hardware icon in the system tray at the bottom of the desktop. If this icon is hidden, click the arrows on the taskbar to display it. The Safely Remove Hardware window opens. NOTE: For some computers, this may be called the Unplug Hardware or Eject Hardware icon - HP Pavilion a6000 | Getting Started Guide - Page 109
the computer. Troubleshooting the HP Media Drive Microsoft updates Make sure you have the latest Microsoft operating system service packs and other Windows updates installed on your system before you try to troubleshoot a drive problem. These service packs are issued to fix bugs, add drivers, and - HP Pavilion a6000 | Getting Started Guide - Page 110
Administrator privilege for installing software Depending on your operating system, you may need to be logged on as the administrator to install software. To change a user's account: 1 Click Windows Start Button on the taskbar. 2 Click - HP Pavilion a6000 | Getting Started Guide - Page 111
, or VCDs This section describes how to play CDs, VCDs, or DVDs by using Windows Media Player, or other audio and video programs. This section also describes using Music, radio, changing DVD and audio settings. Playing Music CDs To play music CDs, you must have either a CD or DVD drive. 1 Insert the - HP Pavilion a6000 | Getting Started Guide - Page 112
locks, you can play DVDs from that country/region only. If the country/region code locks and you need help, contact Support. Playing DVDs with Windows Media Player Your computer must have a DVD drive to play DVD movies. 1 Insert the music DVD movie into the drive. The Windows Media Player window - HP Pavilion a6000 | Getting Started Guide - Page 113
. You may have to scroll down in the window to see all available programs. 2 Use the controls in the video CD program to play the video CD. Playing Video CDs (VCDs) with Windows Media Player To play Video CDs (VCDs) with Windows Media Player you must have either a CD or DVD drive. 1 Insert your - HP Pavilion a6000 | Getting Started Guide - Page 114
106 Getting Started - HP Pavilion a6000 | Getting Started Guide - Page 115
enable you to copy, archive, and manage music, video, image, and data files and then record the files to CDs or DVDs. You can also use Windows Media Player to download and copy music files to a portable device or memory card. IMPORTANT: HP supports the lawful use of technology and does not endorse - HP Pavilion a6000 | Getting Started Guide - Page 116
the Erase Disc icon. Working with Audio CDs You can create audio CDs that play in your car or home CD player, and on computers. You can create two main types must be erased first. CD-R discs cannot be erased. IMPORTANT: HP supports the lawful use of technology and does not endorse or encourage the - HP Pavilion a6000 | Getting Started Guide - Page 117
speed. NOTE: HP supports the lawful use of technology and does not endorse or encourage the use of our products for purposes other than those permitted by copyright law. Before you begin creating discs Save all work and close all open programs. Turn off your screen saver. Creating audio CDs This - HP Pavilion a6000 | Getting Started Guide - Page 118
instructions on creating an audio CD that plays in most car and home CD players, see "Creating audio supported). Creating video discs This section provides instructions for creating a video disc. You can create a video disc from files on the computer hard disk drive or directly from a digital video - HP Pavilion a6000 | Getting Started Guide - Page 119
area. 8 When ready to create the video disc, click Burn. For more help using only one disc drive, Roxio Creator stores an image file of the disc temporarily on the computer hard disk drive. Use these steps to copy a CD or DVD using one disc tab. 4 Click Copy Disc. Creating Audio and Data Discs 111 - HP Pavilion a6000 | Getting Started Guide - Page 120
photo (slide show) discs This section provides instructions for creating a slide show disc using photos on the computer hard disk drive. To create a slide Add Photos and add picture files from the computer hard disk drive. 6 If desired, click Add Background Audio to add audio to the slide show. - HP Pavilion a6000 | Getting Started Guide - Page 121
instructions on making a paper label, refer to "Making a paper disc label." LightScribe requirements Burning a label with LightScribe requires three things: A LightScribe-enabled disc drive (select models only), identified by the LightScribe logo. Labeling software that supports your computer hard - HP Pavilion a6000 | Getting Started Guide - Page 122
, the Printer, and Paper Source. 7 Click OK to create the label. The estimated time to complete the label displays, along with a progress bar. It is possible to continue to work on the computer while the label is created. For more help using Roxio Express Labeler, refer to the Help menu in the - HP Pavilion a6000 | Getting Started Guide - Page 123
mpeg-2 .mpeg-4 .mov .wmv .asf .jpg, .jpeg .gif .png .tif .bmp File type Digital Video Audio Video Interleaved Motion Picture Experts Group video playback MPEG for DVD video playback MPEG for high-quality video format (Web streaming, wireless devices, and so on) QuickTime Movie Windows Media AV file - HP Pavilion a6000 | Getting Started Guide - Page 124
.aac .mp3 .m4a .wav .wma File type Advanced Audio Coding MPEG Layer 3 MPEG-4 Audio layer (unprotected AAC) Windows Audio Windows Media Audio 4 Select a style: Apply a movie style editing template for different effects and picture transitions in your movie. 5 Add captions: Personalize your movie - HP Pavilion a6000 | Getting Started Guide - Page 125
to your project. Open the Add Pictures window to add existing "Adding pictures." still-image files to your project. Open the Add Music window to add existing "Adding music." music files to your project. Open the muvee Settings window to adjust audio and video production settings for your movie - HP Pavilion a6000 | Getting Started Guide - Page 126
DV camera to the FireWire (IEEE 1394) port on your computer. 2 Turn on the camera and set it to VCR mode. Refer to the instructions in the manufacturer's documentation. 3 Click the Get Video from Camera button. 4 Click the Play button on the screen to begin viewing the video. 118 Getting Started - HP Pavilion a6000 | Getting Started Guide - Page 127
specify a file name for the captured video file. 10 Click Done to add captured video files automatically to your movie project. Adding videos To add video files to your movie production: 1 Click the Add Video button in the Add Video/Pictures area. The Add Videos window opens. 2 Browse the folders on - HP Pavilion a6000 | Getting Started Guide - Page 128
4 You can use the magicMoments feature in muvee autoProducer to mark specific scenes in a video clip that you want to include in, or to leave out, of your final movie: a Select a video file in the Select Video/Pictures window, and then click the magicMoments button. The magicMoments window opens. b - HP Pavilion a6000 | Getting Started Guide - Page 129
you use also affects how muvee autoProducer combines the video, picture, and music files in your movie project to produce the final movie. For example, using the Cinema style results in a movie that is moderately paced, colorenhanced, and in a wide-screen format. To select a style, just click it in - HP Pavilion a6000 | Getting Started Guide - Page 130
style to move the slider bar to determine the frequency of sequencing still images and video clips. Place a check in the Interleave pictures check box to blend pictures with video at intervals. 4 Click the Audio tab to set the sound preferences. Click one of the following settings: Use all music - HP Pavilion a6000 | Getting Started Guide - Page 131
the ending credits. 4 Click Apply. 5 Click OK to close the muvee Title and Credits window. Making the movie After you have added at least one video or picture file to your movie project, you can have muvee autoProducer make the movie. The muvee autoProducer program makes a movie by combining the - HP Pavilion a6000 | Getting Started Guide - Page 132
another similar picture or video segment. Click the Auto-replace with different button to automatically replace a picture or video segment with a completely different picture or video segment. Click the Manually replace button to replace a picture or video segment with a picture or video segment of - HP Pavilion a6000 | Getting Started Guide - Page 133
the trash can icon to delete the file. 4 The TV System area shows the current TV format (NTSC or PAL). To change PC Computer playback E-mail Web streaming AVI TV DV camera DVD VCD SVCD Mobile Devices Mobile phone Pocket computer 7 Click the Change Settings button to change the video and audio - HP Pavilion a6000 | Getting Started Guide - Page 134
to disc to create copies of all of the picture and video files used to create the muvee file. 5 The TV System area shows the current TV format (NTSC or PAL window. 9 Select the CD or DVD burner drive. 10 Select the type of video disc to create: DVD, VCD, or SVCD. The window shows the disc capacity, - HP Pavilion a6000 | Getting Started Guide - Page 135
muvees. (Purchasing DivX videos from DivX services may require a subscription.) To see muvee autoProducer offers for HP customers: 1 At the top of the muvee autoProducer window, click Help. 2 Click Check for updates. The program accesses the Internet and displays muvee autoProducer offers. Creating - HP Pavilion a6000 | Getting Started Guide - Page 136
128 Getting Started - HP Pavilion a6000 | Getting Started Guide - Page 137
Off, See turning off PC 44 buttons, keyboard customizing 59 C card reader, memory 89 carpal tunnel syndrome 39 CDs erasing rewritable 108 change the speed of the cursor 63 computer transferring files 51 Computer Playback 124 connecting devices 5 digital camera 4 digital video camera 4 headphones 31 - HP Pavilion a6000 | Getting Started Guide - Page 138
116 picture 115 video 115 FireWire 118, 119 Found New Hardware message, connecting a digital camera 4 H headphones using 31 Help and Support 36 home stereo system connecting to the PC 24 home videos 110, 118 HP Media Drive inserting a drive 96 HP Personal Media Drive 95 activity and power lights - HP Pavilion a6000 | Getting Started Guide - Page 139
systems 16 speakers connecting multichannel audio speakers to the PC 15, 18-31 stereo connecting to the PC 24 Support messages 36 surge protector 2 SVCD 126 switching mouse button functions 63 T transferring information to your new computer 51 turning off PC 44 tweak muvee 124 U update, Windows - HP Pavilion a6000 | Getting Started Guide - Page 140
WEP 10 Windows Media Player play DVDs 104 play music CDs 103 playing video CDs 105 Windows Movie Maker, features 76 Windows Vista update 48 wired network connection 8 wireless devices 8 wireless LAN 9 wireless LAN connection connection 9 wireless local area network (WLAN) 8 wireless network name 10
-
 1
1 -
 2
2 -
 3
3 -
 4
4 -
 5
5 -
 6
6 -
 7
7 -
8
-
9
-
10
-
11
-
12
-
13
-
14
-
15
-
16
-
17
-
18
-
19
-
20
-
21
-
22
-
23
-
24
-
25
-
26
-
27
-
28
-
29
-
30
-
31
-
32
-
33
-
34
-
35
-
36
-
37
-
38
-
39
-
40
-
41
-
42
-
43
-
44
-
45
-
46
-
47
-
48
-
49
-
50
-
51
-
52
-
53
-
54
-
55
-
56
-
57
-
58
-
59
-
60
-
61
-
62
-
63
-
64
-
65
-
66
-
67
-
68
-
69
-
70
-
71
-
72
-
73
-
74
-
75
-
76
-
77
-
78
-
79
-
80
-
81
-
82
-
83
-
84
-
85
-
86
-
87
-
88
-
89
-
90
-
91
-
92
-
93
-
94
-
95
-
96
-
97
-
98
-
99
-
100
-
101
-
102
-
103
-
104
-
105
-
106
-
107
-
108
-
109
-
110
-
111
-
112
-
113
-
114
-
115
-
116
-
117
-
118
-
119
-
120
-
121
-
122
-
123
-
124
-
125
-
126
-
127
-
128
-
129
-
130
-
131
-
132
-
133
-
134
-
135
-
136
-
137
-
138
-
139
-
140
 |
 |

Getting Started