HP Pavilion dv6000 External Media Cards - Windows XP
HP Pavilion dv6000 - Entertainment Notebook PC Manual
 |
View all HP Pavilion dv6000 manuals
Add to My Manuals
Save this manual to your list of manuals |
HP Pavilion dv6000 manual content summary:
- HP Pavilion dv6000 | External Media Cards - Windows XP - Page 1
External Media Cards User Guide - HP Pavilion dv6000 | External Media Cards - Windows XP - Page 2
in the express warranty statements accompanying such products and services. Nothing herein should be construed as constituting an additional warranty. HP shall not be liable for technical or editorial errors or omissions contained herein. First Edition: July 2006 Document Part Number: 416611-001 - HP Pavilion dv6000 | External Media Cards - Windows XP - Page 3
Table of contents 1 Digital Media Slot cards (select models only) Inserting a digital card ...2 Stopping or removing a digital card ...3 2 ExpressCards Configuring an ExpressCard ...5 Inserting an ExpressCard ...6 Stopping or removing an ExpressCard 8 Index ...9 ENWW iii - HP Pavilion dv6000 | External Media Cards - Windows XP - Page 4
iv ENWW - HP Pavilion dv6000 | External Media Cards - Windows XP - Page 5
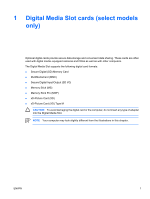
with other computers. The Digital Media Slot supports the following digital card formats: ● Secure Digital (SD) Memory Card ● MultiMediaCard (MMC) ● Secure Digital Input/Output (SD I/O) ● Memory Stick (MS) ● Memory Stick Pro (MSP) ● xD-Picture Card (XD) ● xD-Picture Card (XD) Type M CAUTION To avoid - HP Pavilion dv6000 | External Media Cards - Windows XP - Page 6
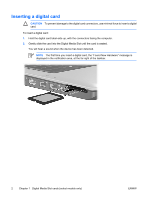
connectors facing the computer. 2. Gently slide the card into the Digital Media Slot until the card is seated. You will hear a sound when the device has been detected. NOTE The first time you insert a digital card, the "Found New Hardware" message is displayed in the notification area, at the far - HP Pavilion dv6000 | External Media Cards - Windows XP - Page 7
. NOTE To stop data transfer, click Cancel in the operating system Copying window. 2. To stop the digital card: a. Double-click the Safely Remove Hardware icon in the notification area, at the far right of the taskbar. NOTE To display the Safely Remove Hardware icon, click the Show Hidden Icons icon - HP Pavilion dv6000 | External Media Cards - Windows XP - Page 8
4 Chapter 1 Digital Media Slot cards (select models only) ENWW - HP Pavilion dv6000 | External Media Cards - Windows XP - Page 9
of support for other ExpressCards, install only the software required for the device. If you are instructed by the ExpressCard manufacturer to install device drivers: Install only the device drivers for your operating system. Do not install other software, such as card services, socket services, or - HP Pavilion dv6000 | External Media Cards - Windows XP - Page 10
damage to the computer or a PC card, do not insert a PC Card into an ExpressCard slot. To card into the ExpressCard slot until the card is seated. You will hear a sound when the device has been detected. NOTE The first time you insert an ExpressCard, the "Found New Hardware" message is displayed - HP Pavilion dv6000 | External Media Cards - Windows XP - Page 11
NOTE An inserted ExpressCard uses power even when idle. To conserve power, stop or remove an ExpressCard when it is not in use. ENWW Inserting an ExpressCard 7 - HP Pavilion dv6000 | External Media Cards - Windows XP - Page 12
stop a data transfer, click Cancel in the operating system Copying window. 2. To stop the ExpressCard: a. Double-click the Safely Remove NOTE To display the Safely Remove Hardware icon, click the Show Hidden Icons icon (< or - HP Pavilion dv6000 | External Media Cards - Windows XP - Page 13
Index C configuring ExpressCards 5 D digital cards defined 1 inserting 2 removing 3 stopping 3 E ExpressCards configuring 5 defined 5 inserting 6 removing 8 removing insert 6 stopping 8 ENWW Index 9 - HP Pavilion dv6000 | External Media Cards - Windows XP - Page 14
10 Index ENWW - HP Pavilion dv6000 | External Media Cards - Windows XP - Page 15
- HP Pavilion dv6000 | External Media Cards - Windows XP - Page 16
-
 1
1 -
 2
2 -
 3
3 -
 4
4 -
 5
5 -
 6
6 -
 7
7 -
8
-
9
-
10
-
11
-
12
-
13
-
14
-
15
-
16
 |
 |

External Media Cards
User Guide