HP Pavilion m6-1000 User Guide - Page 63
Inserting an optical disc, down onto the tray spindle until the disc snaps into place.
 |
View all HP Pavilion m6-1000 manuals
Add to My Manuals
Save this manual to your list of manuals |
Page 63 highlights
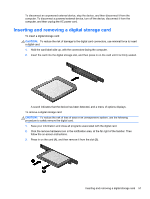
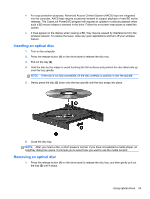
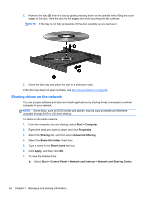
● For copy protection purposes, Advanced Access Content System (AACS) keys are integrated into the computer. AACS keys require occasional renewal to support playback of new BD movie releases. The CyberLink PowerDVD program will request an update to continue playback when such a BD movie release is inserted in the drive. Follow the on-screen instructions to install the update. ● If lines appear on the display when viewing a BD, they may be caused by interference from the wireless network. To resolve the issue, close any open applications and turn off your wireless feature. Inserting an optical disc 1. Turn on the computer. 2. Press the release button (1) on the drive bezel to release the disc tray. 3. Pull out the tray (2). 4. Hold the disc by the edges to avoid touching the flat surfaces and position the disc label-side up over the tray spindle. NOTE: If the tray is not fully accessible, tilt the disc carefully to position it over the spindle. 5. Gently press the disc (3) down onto the tray spindle until the disc snaps into place. 6. Close the disc tray. NOTE: After you insert a disc, a short pause is normal. If you have not selected a media player, an AutoPlay dialog box opens. It prompts you to select how you want to use the media content. Removing an optical disc 1. Press the release button (1) on the drive bezel to release the disc tray, and then gently pull out the tray (2) until it stops. Using optical drives 53
-
 1
1 -
2
-
3
-
4
-
5
-
6
-
7
-
8
-
9
-
10
-
11
-
12
-
13
-
14
-
15
-
16
-
17
-
18
-
19
-
20
-
21
-
22
-
23
-
24
-
25
-
26
-
27
-
28
-
29
-
30
-
31
-
32
-
33
-
34
-
35
-
36
-
37
-
38
-
39
-
40
-
41
-
42
-
43
-
44
-
45
-
46
-
47
-
48
-
49
-
50
-
51
-
52
-
53
-
54
-
55
-
56
-
57
-
 58
58 -
 59
59 -
 60
60 -
 61
61 -
 62
62 -
 63
63 -
 64
64 -
 65
65 -
 66
66 -
 67
67 -
 68
68 -
69
-
70
-
71
-
72
-
73
-
74
-
75
-
76
-
77
-
78
-
79
-
80
-
81
-
82
-
83
-
84
-
85
-
86
-
87
-
88
-
89
-
90
-
91
-
92
-
93
-
94
-
95
-
96
-
97
-
98
-
99
-
100
-
101
 |
 |
