HP Pavilion p7-1200 Quick Setup Guide
HP Pavilion p7-1200 Manual
 |
View all HP Pavilion p7-1200 manuals
Add to My Manuals
Save this manual to your list of manuals |
HP Pavilion p7-1200 manual content summary:
- HP Pavilion p7-1200 | Quick Setup Guide - Page 1
VGA DVI HDMI DISPLAY HDMI-DVI VGA-DVI - HP Pavilion p7-1200 | Quick Setup Guide - Page 2
- HP Pavilion p7-1200 | Quick Setup Guide - Page 3
- HP Pavilion p7-1200 | Quick Setup Guide - Page 4
www.hp.com/support - HP Pavilion p7-1200 | Quick Setup Guide - Page 5
services are set forth in the express statements accompanying such products and services. Nothing herein should be construed as constituting an additional warranty. HP and other countries. HP supports lawful use of provided HP Limited Warranty applicable to your product in the start menu on your PC - HP Pavilion p7-1200 | Quick Setup Guide - Page 6
- HP Pavilion p7-1200 | Quick Setup Guide - Page 7
. User Manuals. ● Find electronic user guides and specifications for your computer model. ● Order parts and find additional troubleshooting help. HP Support website: http://www.hp.com/support ● Upgrade or replace Upgrading and Servicing Guide components of your computer. HP Support website - HP Pavilion p7-1200 | Quick Setup Guide - Page 8
PC Help & Tools. ● Maintain your computer. HP Support Assistant - Maintains your computer performance and resolve problems faster by using automated updates, on-board diagnostics, and guided assistance. Click Start, click All Programs, click HP, and then click HP Support Assistant. Troubleshooting - HP Pavilion p7-1200 | Quick Setup Guide - Page 9
sure to use ergonomically correct lifting procedures when moving the computer. To reduce the risk of serious injury read the Safety & Comfort Guide. The guide is located on the web at http://www.hp.com/ergo. 1. Place the computer so that all ventilation openings are unobstructed and cabling is not - HP Pavilion p7-1200 | Quick Setup Guide - Page 10
. h. Follow the on-screen instructions to install each downloaded update. 4. Look in the computer box for additional printed details or updates. 5. Read the Safety and Regulatory Information document in the HP User Manuals folder. 6. Read the Safety & Comfort Guide for proper workstation setup - HP Pavilion p7-1200 | Quick Setup Guide - Page 11
NOTE: Online Services provides a list of ISPs; however, you might choose another ISP or transfer an existing account to this computer. To transfer existing accounts, follow the instructions provided by the ISP. 3. Using your Internet connection through your ISP, open a web browser and browse the - HP Pavilion p7-1200 | Quick Setup Guide - Page 12
, a media card reader, Wireless 802.11n networking, full support for Beats Audio™ devices (sold separately), and high quality speakers. HP TouchSmart 5.0 provides a unique, touch-based computer experience. Magic Canvas provides an interactive desktop that expands to the left and right, allowing you - HP Pavilion p7-1200 | Quick Setup Guide - Page 13
TouchSmart 5.0, tap the Start button, tap Help and Support, and then tap HP TouchSmart, or tap the Help and Support icon on the Carousel and then tap HP TouchSmart. Using Beats Audio™ (select models only) Your HP TouchSmart PC features audio connectors (headphone and Audio Out ) that are optimized - HP Pavilion p7-1200 | Quick Setup Guide - Page 14
by rightclicking on the desktop, or from the Start Menu, tap All Programs, tap HP, and then tap HP My Display TouchSmart Edition. Online help for HP My Display TouchSmart into the HDMI port, the volume on the computer is muted. Pressing the +/- buttons on the side panel does not change the volume of - HP Pavilion p7-1200 | Quick Setup Guide - Page 15
signs of dust and debris, and clean it about once every three months. ● Visit www.hp.com/support for additional cleaning instructions. Cleaning the computer vents Air vents keep the computer cool. Keep these vents clean by using a small, batterypowered vacuum cleaner. (A battery-powered vacuum - HP Pavilion p7-1200 | Quick Setup Guide - Page 16
on a battery-powered vacuum cleaner, to avoid removing key caps and springs. 1. Vacuum between the keys of the keyboard and along the grooves. models only) Follow these steps to clean the touch screen: 1. Turn off the computer. Tap the Start button, and then tap Shut Down. 2. Disconnect the power - HP Pavilion p7-1200 | Quick Setup Guide - Page 17
about peripheral-specific problems, such as issues with a monitor or a printer. The following tables present some issues you might encounter while installing, starting up, or using your computer and possible solutions. For more information or for additional troubleshooting options, see Getting - HP Pavilion p7-1200 | Quick Setup Guide - Page 18
turn off the computer, and then press the Power button to restart the computer. Error message: Invalid system disk or NonSystem disk or Disk error. When drive activity stops, remove the disc and press the spacebar on the keyboard. The computer should start up. 12 Chapter 5 Troubleshooting ENWW - HP Pavilion p7-1200 | Quick Setup Guide - Page 19
air vents are not blocked and that the internal fan is running - see : Cleaning procedures on page 9. (Your computer might not have an internal fan.) Display (monitor) Symptom Screen is blank. Possible solution Press the space bar on the keyboard or move the mouse - HP Pavilion p7-1200 | Quick Setup Guide - Page 20
movement. Use the keyboard to save changes in all open programs, and then restart your computer: 1. Press the Alt+Tab keys simultaneously to navigate to an open program. 2. Press the mouse connector to the back of your computer, and then restart your computer. 14 Chapter 5 Troubleshooting ENWW - HP Pavilion p7-1200 | Quick Setup Guide - Page 21
30 cm (12 inches) of the receiver, and away from interference from other devices. 1. Unplug the receiver from a USB connector on the computer, and then reconnect it. Your computer model might have a connector dedicated to the receiver. If you have a choice, use a USB connector on the front of the - HP Pavilion p7-1200 | Quick Setup Guide - Page 22
Panel, click Action Center, and then click Troubleshooting. 2. Under Hardware and Sound, click Troubleshoot and audio playback. If you are using built (active) speakers and that they are turned on. Turn off your computer, and then unplug and reconnect the speakers. Ensure that the speakers are - HP Pavilion p7-1200 | Quick Setup Guide - Page 23
the product) or hardware driver to factory defaults. ● System Recovery (see Troubleshooting and Maintenance Guide on your computer. At the bottom of your screen, click on Start, then click HP Help and Support and HP User Manuals. ) - Erase and reformat the hard disk drive, and then reinstall the - HP Pavilion p7-1200 | Quick Setup Guide - Page 24
then follow the on-screen instructions. Microsoft System Restore If you have a problem that might be due to software that was installed on your computer, use System Restore to return the computer to a previous restore point. You can also set restore points manually. NOTE: Always use this System - HP Pavilion p7-1200 | Quick Setup Guide - Page 25
and follow the on-screen instructions. 4. When you have finished reinstalling, restart the computer. Do not skip this last step. You must restart the computer after recovering software programs or Select the program you want to remove, and then click Uninstall. ENWW Software troubleshooting 19 - HP Pavilion p7-1200 | Quick Setup Guide - Page 26
Center, run the hardware diagnostic tools that are preinstalled on your computer. Click Start, All Programs, PC Help & Tools, and then click Hardware Diagnostic Tools. 3. For help online, go to the HP Customer Care Center website at http://www.hp.com/support. 20 Chapter 6 Support information ENWW - HP Pavilion p7-1200 | Quick Setup Guide - Page 27
to fix your computer. These services are covered during the warranty period. There are a few limitations and exclusions to the warranty (as well as some important details), which are described in the Hardware Limited Warranty section of the Limited Warranty and Support Guide. Before upgrading your - HP Pavilion p7-1200 | Quick Setup Guide - Page 28
produits et services. Aucun élément de ce document ne saurait être considéré comme une garantie supplémentaire. La société HP ne saurait CD/DVD livré dans la boîte. Dans certains pays ou régions, une garantie limitée HP imprimée est livrée dans la boîte. Dans les pays ou régions où la garantie n' - HP Pavilion p7-1200 | Quick Setup Guide - Page 29
Connectez-vous à Internet. Guide d'installation rapide (ce guide) ● Restaurer les paramètres d'usine. Guide de dépannage et de maintenance sur votre ordinateur. Dans la partie inférieure de l'écran, cliquez sur Démarrer, puis sur Aide et support HP et Manuels de l'utilisateur HP. ● Regarder les - HP Pavilion p7-1200 | Quick Setup Guide - Page 30
problèmes plus rapidement grâce aux mises à jour automatisées, aux diagnostics intégrés et à l'assistance guidée. Cliquez successivement sur Démarrer, Tous les programmes, HP, puis HP Support Assistant. Guide de dépannage et de maintenance Cliquez successivement sur Démarrer, Tous les programmes et - HP Pavilion p7-1200 | Quick Setup Guide - Page 31
. Où trouver Informations sur la sécurité et les réglementations Cliquez successivement sur Démarrer, Aide et Support HP et Manuels de l'utilisateur HP ou consultez le site Web http://www.hp.com/support. Guide de sécurité et ergonomie du poste de travail Cliquez successivement sur Démarrer, Aide et - HP Pavilion p7-1200 | Quick Setup Guide - Page 32
adéquate lors de sa manipulation.. Pour réduire les risques de blessures graves, lisez le guide Sécurité et ergonomie du poste de travail. Le manuel est disponible sur le Web à l'adresse http://www.hp.com/ergo. 1. Placez l'ordinateur de telle sorte qu'aucune ouverture de ventilation ne soit obstru - HP Pavilion p7-1200 | Quick Setup Guide - Page 33
et allez sur http://www.hp.com/ support. c. Si besoin est, choisissez votre pays et la langue, puis cliquez sur Support et pilotes. d. Sélectionnez chaque mise à jour que vous souhaitez télécharger. h. Suivez les instructions à l'écran pour installer chaque mise à jour téléchargée. 4. Vérifiez - HP Pavilion p7-1200 | Quick Setup Guide - Page 34
lors de la configuration initiale, faites-le maintenant en utilisant les Services en ligne : a. Cliquez successivement sur Démarrer, Tous les programmes, Services en ligne, puis Connexion. b. Suivez les instructions à l'écran pour sélectionner un fournisseur d'accès Internet et configurer votre - HP Pavilion p7-1200 | Quick Setup Guide - Page 35
3. Appuyez sur le bouton Connecter sous le clavier (A) pendant cinq secondes. La diode électroluminescente (DEL) témoin d'activité du récepteur sans fil s'allume lorsque la commande de synchronisation a été reçue et s'éteint lorsque la synchronisation est terminée. REMARQUE : Votre clavier et l' - HP Pavilion p7-1200 | Quick Setup Guide - Page 36
BEATS Audio au moyen des haut-parleurs internes, HP recommande de connecter des enceintes intégrées (subwoofer) HP adaptées au sous-connecteur sur le panneau arri ètres pour pouvoir entendre le son. C'est pour cela que HP vous recommande de connecter des haut-parleurs analogiques à l'ordinateur si - HP Pavilion p7-1200 | Quick Setup Guide - Page 37
pour fermer la fenêtre. Cela termine la procédure pour activer le son HDMI. Ajustement de la résolution Pour ajuster la résolution, suivez les instructions concernant votre type de carte graphique. Cliquez avec le bouton droit de la souris sur une zone vide du Bureau, puis cliquez sur . FRWW - HP Pavilion p7-1200 | Quick Setup Guide - Page 38
la zone Sélection d'une tâche, sur la gauche, dans Afficher, cliquez sur Changer la résolution. La fenêtre Changer la résolution s'ouvre. 3. Si votre ordinateur HP est connecté à un moniteur HP, assurez-vous que la case Afficher uniquement les résolutions TV n'est pas cochée. Si votre ordinateur - HP Pavilion p7-1200 | Quick Setup Guide - Page 39
résolutions TV n'est pas cochée. Si votre ordinateur HP est connecté à un moniteur autre que HP, assurez-vous que la case Afficher uniquement les résolutions suivantes pour connecter et configurer des moniteurs supplémentaires : Ces instructions servent pour la configuration de deux écrans. Si vous - HP Pavilion p7-1200 | Quick Setup Guide - Page 40
le mode d'affichage d'un écran, sélectionnez Démarrer, Panneau de configuration, puis Affichage, sélectionnez l'option que vous désirez changer et suivez les instructions à l'écran. Installation de ATI Eyefinity Catalyst™ 1. Faites un clic droit sur l'icône Eyefinity Catalyst™ icône sur le bureau - HP Pavilion p7-1200 | Quick Setup Guide - Page 41
visible de poussière et de débris, et nettoyez-le au moins une fois tous les trois mois. ● Visitez la page www.hp.com/support pour plus d'informations sur le nettoyage. Nettoyage des grilles d'aération de l'ordinateur Les fentes d'aération permettent de refroidir l'ordinateur. Nettoyez ces fentes - HP Pavilion p7-1200 | Quick Setup Guide - Page 42
5 Dépannage Reportez-vous à la documentation fournie par le fabricant du produit pour obtenir de plus amples informations sur les problèmes spécifiques aux périphériques, comme les problèmes de moniteur ou d'imprimante. Les tableaux suivants présentent quelques problèmes que vous pourriez rencontrer - HP Pavilion p7-1200 | Quick Setup Guide - Page 43
Symptôme Solution L'ordinateur semble bloqué et ne répond pas. Utilisez le Gestionnaire des tâches de Windows pour fermer tous les programmes qui ne répondent pas, ou pour redémarrer votre ordinateur : 1. Appuyez simultanément sur les touches Ctrl+Alt+Supprimer du clavier. 2. Cliquez sur Ouvrir - HP Pavilion p7-1200 | Quick Setup Guide - Page 44
Affichage (moniteur) Symptôme Solution L'écran n'affiche rien, et le voyant d'alimentation du moniteur est éteint. Rebranchez le câble d'alimentation au dos du moniteur et à la prise murale. Appuyez sur le bouton de mise sous tension du moniteur. L'écran n'affiche rien. Appuyez sur la barre d' - HP Pavilion p7-1200 | Quick Setup Guide - Page 45
Symptôme Solution Le curseur ne se déplace pas lorsque les touches fléchées du clavier numérique sont utilisées. Appuyez sur Verr Num sur le clavier pour désactiver Verr Num, afin de pouvoir utiliser les touches fléchées du clavier numérique. Le curseur ne suit pas les mouvements de la souris. - HP Pavilion p7-1200 | Quick Setup Guide - Page 46
Clavier et souris (sans fil) Symptôme Solution Le clavier ou la ● Assurez-vous d'utiliser un clavier ou une souris sans fil situé à portée du récepteur, souris sans fil ne approximativement 10 mètres (32 pieds) pour une utilisation normale, et 30 cm fonctionne pas ou (12 pouces) lors de la - HP Pavilion p7-1200 | Quick Setup Guide - Page 47
des haut-parleurs analogiques au connecteur de sortie audio pour entendre les sons lors de la configuration initiale de votre ordinateur. Reportez-vous aux instructions de mise en route pour savoir comment connecter les haut-parleurs analogiques. Si vous utilisez des haut-parleurs intégrés dans le - HP Pavilion p7-1200 | Quick Setup Guide - Page 48
. 2. Dans la fenêtre Centre Réseau et partage, cliquez sur Configurer une connexion ou un réseau pour ouvrir l'assistant, puis suivez les instructions qui s'affichent à l'écran. Si votre système dispose d'une antenne externe, essayez de placer l'antenne dans une meilleure position. Si l'antenne est - HP Pavilion p7-1200 | Quick Setup Guide - Page 49
) ou du pilote matériel. ● Réinstallation du système (voir Guide de dépannage et de maintenance sur votre ordinateur. Dans la partie inférieure de l'écran, cliquez sur Démarrer, puis sur Aide et support HP et Manuels de l'utilisateur HP. ) - Efface et reformate le disque dur, puis réinstalle le syst - HP Pavilion p7-1200 | Quick Setup Guide - Page 50
Ordinateur, puis Propriétés. 3. Cliquez successivement sur Protection du système, Restauration système et sur Suivant, puis suivez les instructions qui s'affichent à l'écran. Pour ajouter des points de restauration manuellement : 1. Fermez tous les programmes. 2. Cliquez sur Démarrer, cliquez avec - HP Pavilion p7-1200 | Quick Setup Guide - Page 51
sur Réinstallation des logiciels, puis sur Suivant dans l'écran de bienvenue. 3. Choisissez le programme à installer, cliquez sur Suivant et suivez les instructions qui apparaissent à l'écran. 4. Après la récupération, redémarrez l'ordinateur. Cette dernière étape est impérative. Vous devez toujours - HP Pavilion p7-1200 | Quick Setup Guide - Page 52
l'aide Simple d'accès. Facile à utiliser. Le service d'assistance clientèle HP déjà plusieurs fois récompensé incarne notre engagement à ! Rendez-vous sur : http://www.hp.com/apac/register. Où obtenir de l'aide 1. Utilisez le Centre d'aide et de support pour répondre à vos questions concernant le - HP Pavilion p7-1200 | Quick Setup Guide - Page 53
hp.com/support. L'assistance téléphonique à votre disposition est offerte pendant une durée de trente (30) jours à compter de la date d'achat de votre ordinateur. Passé ce délai de trente (30) jours, le service de la configuration, reportez-vous aux instructions de mise en route incluses sur votre - HP Pavilion p7-1200 | Quick Setup Guide - Page 54
est, conformément à la réglementation locale en vigueur, régi par les termes et conditions énoncés dans la section Garantie limitée sur le matériel du Guide de garantie limitée et d'assistance technique. 26 Chapitre 6 Informations sur l'assistance technique FRWW - HP Pavilion p7-1200 | Quick Setup Guide - Page 55
- HP Pavilion p7-1200 | Quick Setup Guide - Page 56
designed this product with the environment in mind. If this computer is a replacement for an older computer you no longer need, go to www.hp.com/go/recycle to find out if HP can help you dispose of your old computer with minimum impact on the planet. Le pouvoir de changer les choses Nous vous
-
 1
1 -
 2
2 -
 3
3 -
 4
4 -
 5
5 -
 6
6 -
 7
7 -
8
-
9
-
10
-
11
-
12
-
13
-
14
-
15
-
16
-
17
-
18
-
19
-
20
-
21
-
22
-
23
-
24
-
25
-
26
-
27
-
28
-
29
-
30
-
31
-
32
-
33
-
34
-
35
-
36
-
37
-
38
-
39
-
40
-
41
-
42
-
43
-
44
-
45
-
46
-
47
-
48
-
49
-
50
-
51
-
52
-
53
-
54
-
55
-
56
 |
 |
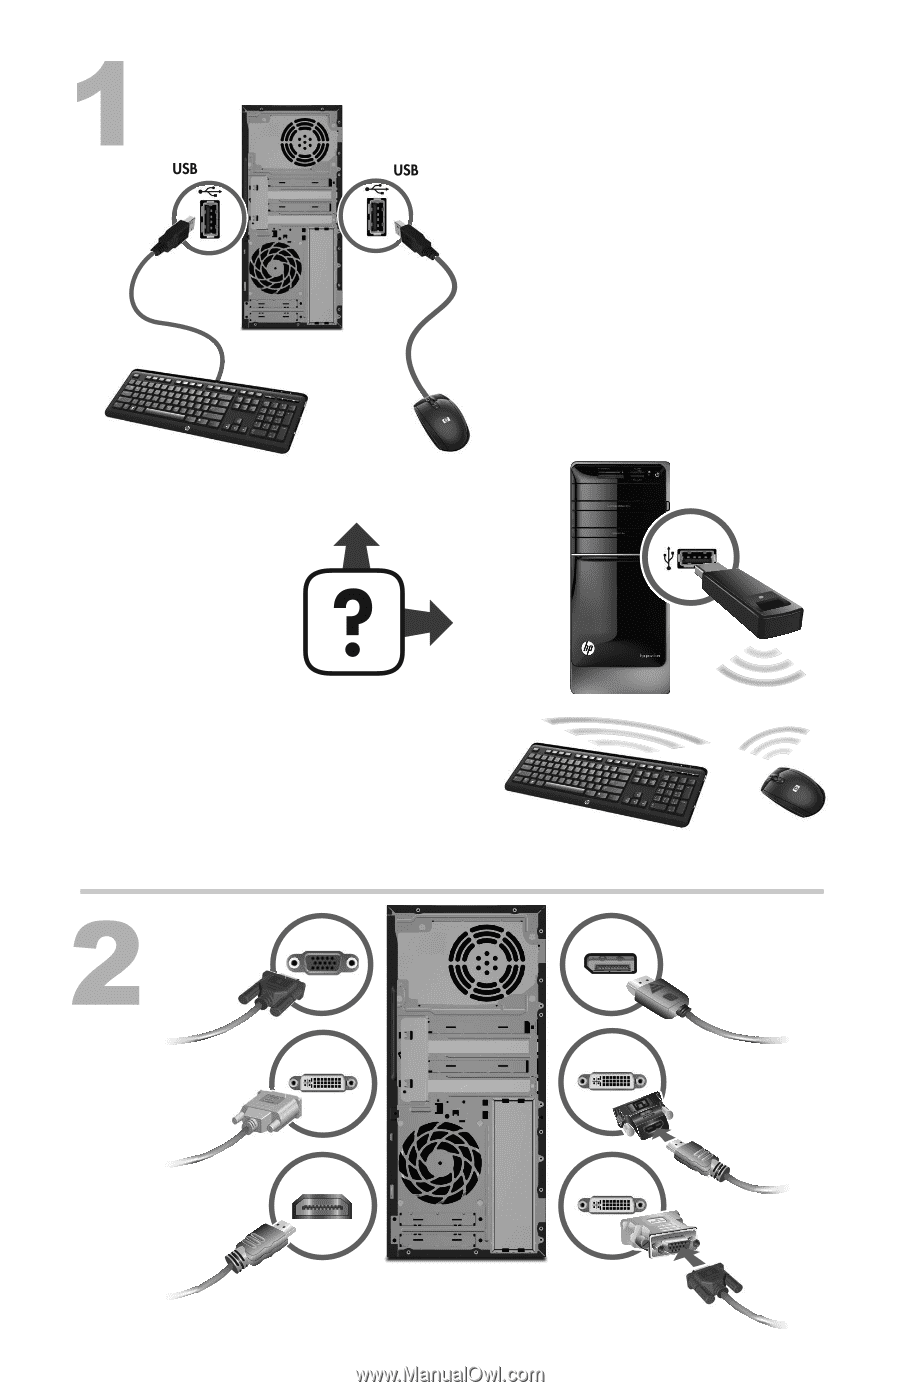
DISPLAY
VGA
DVI
HDMI-DVI
VGA-DVI
HDMI