HP Photosmart 2600 Setup Guide
HP Photosmart 2600 - All-in-One Printer Manual
 |
View all HP Photosmart 2600 manuals
Add to My Manuals
Save this manual to your list of manuals |
HP Photosmart 2600 manual content summary:
- HP Photosmart 2600 | Setup Guide - Page 1
2004 Hewlett-Packard Development Company, L.P. Magyar Italiano Japanese Español Norsk Português Russian Simplified Chinese Slovencina Slovenšcina Español Svenska TraditionalChinese Thai Türkçe Ukrainian HP Photosmart 2600/2700 series all-in-one User Guide HP Photosmart 2600/2700 series all-in-one - HP Photosmart 2600 | Setup Guide - Page 2
overlay above the device. b Press down firmly on all edges of the overlay to secure it. The control-panel overlay must be attached for the HP all-in-one to work! 5 Lift the color graphics display For best viewing, remove the protective film from the display. 6 Load plain white paper - HP Photosmart 2600 | Setup Guide - Page 3
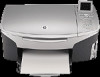
phone cord, see the Troubleshooting Information chapter in the User Guide. 9 Press the On button On a After you press the On button, the green light flashes, and then becomes solid. This may take up to a minute. b Wait for the print cartridge prompt before continuing. 3 • HP all-in-one - HP Photosmart 2600 | Setup Guide - Page 4
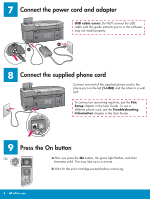
and black latches on the inside of the HP all-in-one. 11 Remove tape from both cartridges Pull the pink tab to remove the tape from both print cartridges. Do not touch the coppercolored contacts or retape the cartridges. 12 Insert the tri-color print cartridge Make sure the device is ON before - HP Photosmart 2600 | Setup Guide - Page 5
13 Insert the black print cartridge a Hold the black print cartridge with the HP label facing up. b Place the black print cartridge in front of the right slot. c Push the cartridge firmly into the slot until it stops. then wait for the desktop to appear. b Close any open programs. 5 • HP all-in-one - HP Photosmart 2600 | Setup Guide - Page 6
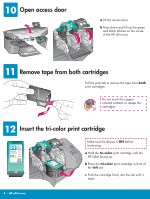
to one computer. (Do not connect until the software instructs you to.) Equipment needed: USB cable. For a USB connection, go to Section A for instructions. B: cable. For an Ethernet cable connection, go to Section B for instructions. If you are not connecting the device to a computer or network, continue - HP Photosmart 2600 | Setup Guide - Page 7
Users: a Insert the HP all-in-one Windows CD. b Follow the onscreen instructions. c On the Connection Type screen, make sure to select directly to this computer. Continue to the next page. Insert the HP all-in-one Macintosh CD. Go to the next page before installing the software. If the startup - HP Photosmart 2600 | Setup Guide - Page 8
you do not see these screens, see Troubleshooting in the last section. b Double-click the HP All-in-One installer icon. c Make sure you complete all the Print Center button to add the HP all-in-one to your printer list. b Follow the onscreen instructions to complete the Fax Setup Wizard and Sign - HP Photosmart 2600 | Setup Guide - Page 9
a b Connect the Ethernet cable a Remove the yellow plug from the back of the device. b Connect one end of the Ethernet cable to the Ethernet port on the back of the device. c Connect the other network. If you already connected the USB cable, do not connect the Ethernet cable. c 9 • HP all-in-one - HP Photosmart 2600 | Setup Guide - Page 10
Windows Users: Macintosh Users: a Insert the HP all-in-one Windows CD. b Follow the onscreen instructions. c On the Connection Type screen, make sure to select through the network. Follow the onscreen instructions Center button to add the HP all-in-one to your printer list. If the startup screen - HP Photosmart 2600 | Setup Guide - Page 11
HP Photosmart 2600/2700 series all-in-one User Guide Horizontal cover image: Replace this guideline area with either a cropped product photograph or a straight-on front-view illustration When you see the Congratulations! screen, you are ready to use your HP all-in-one. See the User Guide - HP Photosmart 2600 | Setup Guide - Page 12
a keyboard or non-powered hub. Refer to Section A. For network software problems, see the Network Guide. Refer to the User Guide for more information. Printed on recycled paper. Visit www.hp.com/support for assistance. © Copyright 2004 Hewlett-Packard Development Company, L.P. Printed in country [].
-
 1
1 -
 2
2 -
 3
3 -
 4
4 -
 5
5 -
 6
6 -
 7
7 -
8
-
9
-
10
-
11
-
12
 |
 |

2
3
1
Title in HP Futura Book
14-20 pt., centered
Subtitle in 10-14 pt., centered, white
Title in HP Futura Book
14-20 pt., centered
Subtitle in 10-14 pt., centered, white
HP Photosmart 2600/2700 series all-in-one
HP Photosmart 2600/2700 series all-in-one
HP Photosmart 2600/2700 series all-in-one
HP Photosmart 2600/2700 series all-in-one
Start Here
USB cable users: Do not connect the USB cable until this guide
instructs you to or the software may not install properly.
Remove all tape
Locate components
Windows CD
Macintosh CD
User Guide
& Network Guide
print cartridges
power cord and
adapter
control-panel overlay
(may be attached)
USB cable*
HP Photosmart 2600 series all-in-one Setup Guide
* Purchased separately.
The contents of your box may differ. Additional equipment needed for
network setup is specified later in this guide.
Use this guide to set up the hardware and connect the HP all-in-one to either your computer or network. If you
have problems during setup, see
Troubleshooting
in the last section.
Ethernet cable
(wider end)
phone cord