HP Photosmart 5520 User Guide - Page 36
Connect a new printer, Change network settings, Tips for setting up and using a networked printer - troubleshooting
 |
View all HP Photosmart 5520 manuals
Add to My Manuals
Save this manual to your list of manuals |
Page 36 highlights
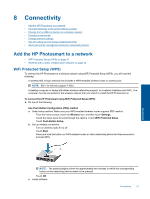
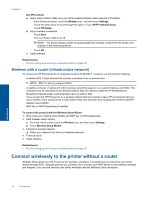
Chapter 8 Connect a new printer To connect a new printer from the printer software If you haven't finished connecting the printer to your computer, you need to connect it from the printer software. If you want to connect another new printer of the same model to your computer, you don't need to install the printer software once again. ▲ Do one of the following according to your operating system. On Windows: a. From the Start menu on your computer, click All Programs, and then click HP. b. Click HP Photosmart 5520 series, click Printer Setup & Software, and then click Connect a new printer c. Follow the instructions on the screen. On Mac: a. From the Home screen, touch the Wireless icon, and then touch Settings. b. Follow the instructions on the screen to connect the printer. c. Use HP Setup Assistant in Applications/Hewlett-Packard/Device Utilities to change the software connection to this printer to wireless. Change network settings If you want to change the wireless settings that you previously configured to a network, you need to run the Wireless Setup Wizard from the printer display. To run Wireless Setup Wizard to change network settings 1. From the Home screen, touch the Wireless icon, and then touch Settings. 2. Touch Wireless Setup Wizard. 3. Follow the instructions on the screen to change the network settings. Tips for setting up and using a networked printer Use the following tips to set up and use a networked printer: • When setting up the wireless networked printer, make sure your wireless router is powered on. The printer searches for wireless routers, then lists the detected network names on the display. • To verify the wireless connection, touch the Wireless button on the control panel. If it shows Wireless Off, touch Turn On. • If your computer is connected to a Virtual Private Network (VPN), you need to disconnect from the VPN before you can access any other device on your network, including the printer. • Learn more about configuring your network and the printer for wireless printing. Click here to go online for more information. • Learn how to find your network security settings. Click here to go online for more information. • Learn about the Network Diagnostic Utility (Windows only) and other troubleshooting tips. Click here to go online for more information. • Learn how to change from a USB to wireless connection. Click here to go online for more information. • Learn how to work with your firewall and anti-virus programs during printer setup. Click here to go online for more information. Connectivity 34 Connectivity
-
 1
1 -
2
-
3
-
4
-
5
-
6
-
7
-
8
-
9
-
10
-
11
-
12
-
13
-
14
-
15
-
16
-
17
-
18
-
19
-
20
-
21
-
22
-
23
-
24
-
25
-
26
-
27
-
28
-
29
-
30
-
 31
31 -
 32
32 -
 33
33 -
 34
34 -
 35
35 -
 36
36 -
 37
37 -
 38
38 -
 39
39 -
 40
40 -
 41
41 -
42
-
43
-
44
-
45
-
46
-
47
-
48
-
49
-
50
-
51
-
52
-
53
-
54
-
55
-
56
-
57
-
58
-
59
-
60
-
61
-
62
 |
 |