HP Photosmart A520 Basics Guide
HP Photosmart A520 Manual
 |
View all HP Photosmart A520 manuals
Add to My Manuals
Save this manual to your list of manuals |
HP Photosmart A520 manual content summary:
- HP Photosmart A520 | Basics Guide - Page 1
HP Photosmart A520 series Basics Guide Guía básica Guide d'utilisation - HP Photosmart A520 | Basics Guide - Page 2
services. Nothing herein should be construed as constituting an additional warranty. HP shall not be liable for technical or editorial errors or omissions contained herein. © 2007 Hewlett-Packard Development Company, L.P. Windows, Windows 2000, and Windows comerciales registradas Bluetooth son - HP Photosmart A520 | Basics Guide - Page 3
HP Photosmart A520 series HP Photosmart A520 series Basics Guide English - HP Photosmart A520 | Basics Guide - Page 4
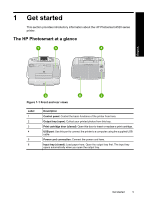
HP Photosmart at a glance 5 Control panel buttons and indicator lights 6 Printer menu...7 2 Print basics Load paper...7 Insert a memory card...8 Print a photo...9 Remove red eye in photos...9 Connect to a computer...9 Install the software and connect the USB cable 9 3 Troubleshooting and Support - HP Photosmart A520 | Basics Guide - Page 5
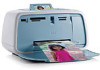
the HP Photosmart A520 series printer. The HP Photosmart at a glance English Figure 1-1 Front and rear views Label 1 2 3 4 5 6 Description Control panel: Control the basic functions of the printer from here. Output tray (open): Collect your printed photos from this tray. Print cartridge door - HP Photosmart A520 | Basics Guide - Page 6
. The Print button glows when the printer power is on. Navigation arrows: Press or to scroll through photos on a memory card or to navigate the printer menu. Cancel: Press to stop an action, exit a menu, or to cancel printing a queued image. Figure 1-3 Indicator lights 6 HP Photosmart A520 series - HP Photosmart A520 | Basics Guide - Page 7
. The printer is set, by default, to print the best quality photos on HP Advanced Photo Paper. If you print on a different type of paper, be sure to change the paper type. For information on changing the paper type, see the onscreen Help. To order HP papers and other supplies, go to www.hp.com/buy - HP Photosmart A520 | Basics Guide - Page 8
(MMC) CAUTION: Do not pull out the memory card while the memory card light is flashing. A flashing light means the printer or computer is accessing the memory card. When the memory card light on the printer is solid, it is safe to pull the card out of the slot. 8 HP Photosmart A520 series - HP Photosmart A520 | Basics Guide - Page 9
, double-click the HP Photosmart CD icon. 2. Click Next and follow the onscreen 4. Double-click the HP Installer icon, and instructions. follow the instructions on each installation 3. When prompted, connect one end of the screen to install the printer software. USB cable to the USB port - HP Photosmart A520 | Basics Guide - Page 10
guide fits close to the edge of the paper. For paper-loading instructions, see "Load paper" on page 7. • The print cartridge may need to be aligned. For more information, see the onscreen Help. • The printer may need attention. Read the printer screen for instructions. 10 HP Photosmart A520 series - HP Photosmart A520 | Basics Guide - Page 11
on and the power cord is securely connected. • The paper may have jammed while printing. See the following section for instructions on clearing a paper jam. English The paper jammed while printing. Solution: Try the following steps to clear the paper jam: 1. Turn off the printer, and then unplug - HP Photosmart A520 | Basics Guide - Page 12
following features: • Fast access to qualified online support specialists • Software and driver updates for the HP Photosmart • Valuable HP Photosmart and troubleshooting information for common problems • Proactive device updates, support alerts, and HP newsgrams that are available when you register - HP Photosmart A520 | Basics Guide - Page 13
information, see the onscreen Help. Find more information Your new HP Photosmart A520 series printer comes with the following documentation: • Setup Guide: The setup instructions explain how to set up the printer, install the HP Photosmart software, and print a photo. Read this document first - HP Photosmart A520 | Basics Guide - Page 14
paper 10 x 30 cm (4 x 12 inches) Paper Tray One 10 x 15 cm (4 x 6 inches) photo paper tray Paper Tray Capacity 20 sheets of photo paper, maximum thickness 292 µm (11.5 mil) per sheet 10 sheets of 10 x 30 cm (4 x 12 inches) photo paper for panoramic printing English 14 HP Photosmart A520 series - HP Photosmart A520 | Basics Guide - Page 15
HP Warranty English HP Warranty 15 - HP Photosmart A520 | Basics Guide - Page 16
Chapter 3 English 16 HP Photosmart A520 series - HP Photosmart A520 | Basics Guide - Page 17
Serie HP Photosmart A520 Guía básica de Serie HP Photosmart A520 Español - HP Photosmart A520 | Basics Guide - Page 18
efecto de ojos rojos de las fotografías 23 Conéctese a un equipo...24 Instale el software y conecte el cable USB 24 3 Solución de problemas y asistencia técnica Problemas de impresión y información 28 Especificaciones de la impresora 29 Garantía de HP...30 Español 18 HP Photosmart A520 series - HP Photosmart A520 | Basics Guide - Page 19
Esta sección ofrece información básica acerca de la impresora Serie HP Photosmart A520. El HP Photosmart de un vistazo Español Figura 1-1 Vistas frontal y impresora a un equipo mediante el cable USB suministrado. Conexión del cable de alimentación: conecte el cable de alimentación aquí. Bandeja de - HP Photosmart A520 | Basics Guide - Page 20
la impresora. Cancelar: pulse este botón para interrumpir una acción, salir de un menú o cancelar la impresión de una imagen en cola. Español 20 HP Photosmart A520 series - HP Photosmart A520 | Basics Guide - Page 21
Español Figura 1-3 Indicadores luminosos Etiqueta 1 2 Descripción del producto LED de atención: se pone rojo y parpadea cuando la impresora precisa atención. Indicador LED de la tarjeta de memoria: este indicador se pone de azul claro cuando la tarjeta de memoria se ha insertado correctamente. Y - HP Photosmart A520 | Basics Guide - Page 22
mo cambiar el tipo de papel consulte la Ayuda en línea. Para pedir papeles HP y otros consumibles, visite www.hp.com/buy/supplies. Si se le solicita, seleccione el país/región, siga las indicaciones para seleccionar la ranura correcta para su tarjeta de memoria. 22 HP Photosmart A520 series - HP Photosmart A520 | Basics Guide - Page 23
Para imprimir copias adicionales de la imagen actual, vuelva a pulsar Imprimir. Elimine el efecto de ojos rojos de las fotografías La HP Photosmart A520 series incluye una función de reducción del efecto de ojos rojos que corrige dicho efecto que a veces ocurre con fotografías tomadas con flash - HP Photosmart A520 | Basics Guide - Page 24
por separado. Instale el software y conecte el cable USB Usuarios de Windows Usuarios de Mac Importante: no conecte el cable USB hasta 1. Conecte un extremo del cable USB al que lo indique la impresora. puerto USB situado en la parte posterior de 1. Inserte el CD de HP Photosmart en la - HP Photosmart A520 | Basics Guide - Page 25
de la impresora. Si el botón de encendido se ilumina, el cable de alimentación estará funcionando correctamente. Si no se ilumina, visite el sitio web www.hp.com/support o póngase en contacto con el servicio de asistencia técnica de HP. El papel no entra correctamente en la impresora o la imagen - HP Photosmart A520 | Basics Guide - Page 26
haya una conexión suelta. Compruebe si la impresora está encendida y el cable de alimentación bien conectado. • El papel puede haberse atascado al imprimir. el cartucho de impresión HP 110 Tri-color Inkjet para imprimir fotografías en blanco y negro, y de color. 26 HP Photosmart A520 series - HP Photosmart A520 | Basics Guide - Page 27
en el cartucho después de su utilización. Para más información, visite www.hp.com/go/inkusage. Para insertar o sustituir un cartucho de impresión 1. HP Photosmart. 2. Consulte el sitio Web de ayuda en línea de HP en www.hp.com/support. Todos los clientes de HP tienen acceso a la ayuda en línea de HP - HP Photosmart A520 | Basics Guide - Page 28
. Una vez que haya instalado el software HP Photosmart en el equipo, podrá ver la Ayuda en pantalla en su equipo: • Equipo con Windows: En el menú Inicio, seleccione Programas (en Windows XP, seleccione Todos los programas) > HP > HP Photosmart A520 Series > Ayuda de Photosmart. • Mac: En el Finder - HP Photosmart A520 | Basics Guide - Page 29
buscar más información" en la página 28. Sistema operativo Microsoft® Windows XP Home, XP Professional, x64 Edition o Vista Mac® OS Número de modelo de la fuente de alimentación Pieza HP n.º 0957-2121 (Norteamérica), 120 Vac (±10%) 60 Hz (±3 Hz) Pieza HP n.º 0957-2120 (resto del mundo), 100-240 V CA - HP Photosmart A520 | Basics Guide - Page 30
Capítulo 3 Garantía de HP Español 30 HP Photosmart A520 series - HP Photosmart A520 | Basics Guide - Page 31
HP Photosmart série A520 Guide d'utilisation de l'imprimante HP Photosmart série A520 Français - HP Photosmart A520 | Basics Guide - Page 32
HP Photosmart 33 Boutons et voyants du panneau de commande 34 Menu de l'imprimante...35 2 Principes de base de l'impression Chargement de papier...36 Insertion d'une carte mémoire 36 Impression d'une photo Spécifications de l'imprimante 42 Garantie HP...44 Français 32 HP Photosmart série A520 - HP Photosmart A520 | Basics Guide - Page 33
HP Photosmart série A520. Présentation de l'appareil HP Photosmart Français Figure 1-1 Vues avant et arrière Libellé 1 2 3 4 5 6 Description Panneau de commande : Utilisez ce panneau pour activer les fonctions de base de l'imprimante. Bac de sortie (ouvert) : Contient vos sorties photo - HP Photosmart A520 | Basics Guide - Page 34
de navigation : Appuyez sur ou pour faire défiler les photos stockées sur une carte mémoire ou pour parcourir le menu de l'imprimante. Annuler : Appuyez pour arrêter une action, quitter un menu ou annuler l'impression d'une image placée dans la file d'attente. Français 34 HP Photosmart série A520 - HP Photosmart A520 | Basics Guide - Page 35
de nombreuses options d'impression, modifier les paramètres par défaut, disposer d'outils de dépannage et de maintenance et consulter des instructions relatives aux travaux d'impression courants. Remarque Les fonctionnalités disponibles sur l'imprimante sont variables selon les pays/régions et/ou le - HP Photosmart A520 | Basics Guide - Page 36
le haut et que les contacts métalliques soient introduits en premier. Reportez-vous à la figure afin de sélectionner l'emplacement correct pour votre carte mémoire. 36 HP Photosmart série A520 - HP Photosmart A520 | Basics Guide - Page 37
en cours, appuyez de nouveau sur Imprimer. Correction de l'effet yeux rouges sur vos photos L'appareil HP Photosmart série A520 inclut une fonction qui réduit l'effet yeux rouges pouvant apparaître sur certaines photos prises au flash. Cette fonction est désactivée par défaut lorsque vous allumez - HP Photosmart A520 | Basics Guide - Page 38
é du câble au port USB de votre ordinateur. 4. Suivez les instructions à l'écran jusqu'à ce que l'installation soit terminée et que votre ordinateur redémarre. 3 Dépannage et prise en charge : L'imprimante HP Photosmart série A520 est conçue pour être fiable et facile à utiliser. Cette section - HP Photosmart A520 | Basics Guide - Page 39
appareil photo numérique, lisez les instructions à l'écran de celui-ci. Si l'imprimante est connectée à un ordinateur, lisez les instructions à l'écran de l'ordinateur. • Mettez l'imprimante hors tension. • Si le voyant continue de clignoter, rendez-vous sur le site www.hp.com/support ou contactez - HP Photosmart A520 | Basics Guide - Page 40
les cartouches d'impression adéquates. À ce sujet, HP vous recommande de ne pas modifier ni de recharger ses cartouches d'impression. Tout dommage résultant de la modification ou de la recharge des cartouches d'impression HP n'est pas couvert par la garantie HP. 40 HP Photosmart série A520 - HP Photosmart A520 | Basics Guide - Page 41
suivante : 1. Consultez la documentation fournie avec l'appareil HP Photosmart. 2. Visitez le site Web d'assistance en ligne de HP à l'adresse suivante www.hp.com/ support. L'assistance en ligne HP est disponible pour tous les clients HP. L'assistance HP constitue le moyen le plus rapide d'obtenir - HP Photosmart A520 | Basics Guide - Page 42
supplémentaires Votre nouvelle imprimante HP Photosmart série A520 est livrée avec la documentation suivante : • Guide de configuration : Les instructions d'installation expliquent comment configurer l'imprimante, installer le logiciel HP Photosmart et imprimer une photo. Lisez ce document en - HP Photosmart A520 | Basics Guide - Page 43
(suite) Microsoft® Windows XP Edition familiale, XP Professionnel, x64 Edition ou Vista Mac® OS X 10 60 Hz (±3 Hz) Réf. HP 0957-2120 (Reste du monde), 100-240 Vac (±10 %) 50/60 Hz (±3 Hz) Formats des supports d'impression Papier photo 10 x 15 cm (4 x 6 pouces) Papier photo 10 x 15 cm avec languette - HP Photosmart A520 | Basics Guide - Page 44
Chapitre 3 Garantie HP Français 44 HP Photosmart série A520 - HP Photosmart A520 | Basics Guide - Page 45
-
 1
1 -
 2
2 -
 3
3 -
 4
4 -
 5
5 -
 6
6 -
 7
7 -
8
-
9
-
10
-
11
-
12
-
13
-
14
-
15
-
16
-
17
-
18
-
19
-
20
-
21
-
22
-
23
-
24
-
25
-
26
-
27
-
28
-
29
-
30
-
31
-
32
-
33
-
34
-
35
-
36
-
37
-
38
-
39
-
40
-
41
-
42
-
43
-
44
-
45
 |
 |

HP Photosmart A520 series
Basics Guide
Guide d’utilisation
Guía básica