HP Photosmart All-in-One Printer - B109 User Guide - Page 51
PHA TTOE = 0, Sample text area - jagged text
 |
View all HP Photosmart All-in-One Printer - B109 manuals
Add to My Manuals
Save this manual to your list of manuals |
Page 51 highlights
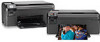
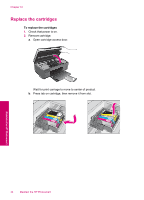
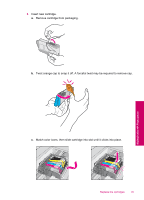
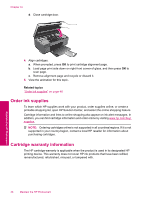
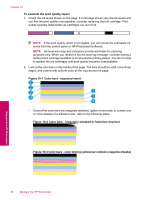
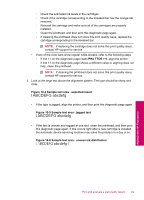
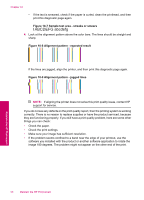
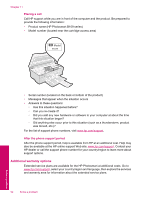
◦ Check the estimated ink levels in the cartridges. ◦ Check if the cartridge corresponding to the streaked bar has the orange tab removed. ◦ Reinstall the cartridge and make sure all of the cartridges are properly installed. ◦ Clean the printhead, and then print this diagnostic page again. ◦ If cleaning the printhead does not solve this print quality issue, replace the cartridge corresponding to the streaked bar. NOTE: If replacing the cartridge does not solve this print quality issue, contact HP support for service. • If any of the color bars show regular white streaks, refer to the following steps. ◦ If line 11 on the diagnostic page reads PHA TTOE = 0, align the printer. ◦ If line 11 on the diagnostic page shows a different value or aligning does not help, clean the printhead. NOTE: If cleaning the printhead does not solve this print quality issue, contact HP support for service. 3. Look at the large text above the alignment pattern. The type should be sharp and clear. Figure 10-4 Sample text area - expected result • If the type is jagged, align the printer, and then print this diagnostic page again. Figure 10-5 Sample text area - jagged text • If the text is uneven and ragged at one end, clean the printhead, and then print this diagnostic page again. If this occurs right after a new cartridge is installed, the automatic device servicing routines may solve the problem in a day or so. Figure 10-6 Sample text area - uneven ink distribution Maintain the HP Photosmart Print and evaluate a print quality report 49
-
 1
1 -
2
-
3
-
4
-
5
-
6
-
7
-
8
-
9
-
10
-
11
-
12
-
13
-
14
-
15
-
16
-
17
-
18
-
19
-
20
-
21
-
22
-
23
-
24
-
25
-
26
-
27
-
28
-
29
-
30
-
31
-
32
-
33
-
34
-
35
-
36
-
37
-
38
-
39
-
40
-
41
-
42
-
43
-
44
-
45
-
 46
46 -
 47
47 -
 48
48 -
 49
49 -
 50
50 -
 51
51 -
 52
52 -
 53
53 -
 54
54 -
 55
55 -
 56
56 -
57
-
58
-
59
-
60
-
61
-
62
-
63
-
64
-
65
-
66
-
67
-
68
-
69
-
70
-
71
-
72
-
73
-
74
-
75
-
76
-
77
-
78
-
79
-
80
-
81
-
82
-
83
-
84
-
85
-
86
-
87
-
88
-
89
-
90
-
91
-
92
-
93
-
94
-
95
-
96
-
97
-
98
-
99
-
100
-
101
-
102
-
103
-
104
-
105
-
106
-
107
-
108
-
109
-
110
-
111
-
112
 |
 |