HP Photosmart C4340 Setup Guide
HP Photosmart C4340 - All-in-One Printer Manual
 |
View all HP Photosmart C4340 manuals
Add to My Manuals
Save this manual to your list of manuals |
HP Photosmart C4340 manual content summary:
- HP Photosmart C4340 | Setup Guide - Page 1
software is installed correctly, do not connect the USB cable until step 11. ES ATENCIÓN: Para asegurarse de que el software graphics display, remove it. c. Close the print cartridge door. ES a. Baje la bandeja de papel y HP Photosmart C4340 All-in-One series /HP Photosmart série C4340 Tout-en-un - HP Photosmart C4340 | Setup Guide - Page 2
peut varier. *Peut être inclus b c EN a. Connect the power cord and adapter. b. Make sure you connect the supplied phone cord adapter to the port labelled 1-LINE. Connect one end of the phone cord to the adapter and the other to a wall jack. NOTE: See the Basics Guide if you want to use your own - HP Photosmart C4340 | Setup Guide - Page 3
region, press OK to confirm. • When a prompt appears asking to install print cartridges, go to the next step in this guide. FR • Lorsque vous êtes invité à définir la langue et un , le périphérique doit être allumé. HP Photosmart série C4340 Tout-en-un/HP Photosmart C4340 All-in-One series • 3 - HP Photosmart C4340 | Setup Guide - Page 4
cartridges with the HP logo on top. b. Insert the tri-color cartridge in the left cartridge slot and the black cartridge in the right cartridge slot. c. Make sure you push the cartridges installation de cartouches d'impression HP d'origine. 4 • HP Photosmart C4340 All-in-One series /HP Photosmart - HP Photosmart C4340 | Setup Guide - Page 5
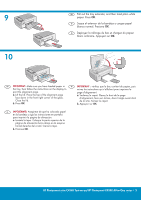
9 10 EN Pull out le bac contient du papier, puis the tray, then follow the instructions on the display to suivez les instructions qui s'affichent pour imprimer la print the alignment page. page tapa. b. Presione OK. HP Photosmart série C4340 Tout-en-un/HP Photosmart C4340 All-in-One series • 5 - HP Photosmart C4340 | Setup Guide - Page 6
de l'ordinateur. b. Suivez les instructions affichées à l'écran pour installer le logiciel. pas, double-cliquez sur l'icône Poste de travail, puis sur l'icône du CD-ROM ayant le logo HP, puis sur le fichier setup.exe. 6 • HP Photosmart C4340 All-in-One series /HP Photosmart série C4340 Tout-en-un - HP Photosmart C4340 | Setup Guide - Page 7
to any USB port on the computer. EN a. Insert the green CD. b. Double-click the HP Photosmart CD icon on the desktop. c. Double-click the HP All-in-One Installer icon. Follow the onscreen instructions. d. Complete the Setup Assistant screen. ES Conecte el cable USB al puerto ubicado en la parte - HP Photosmart C4340 | Setup Guide - Page 8
EN Troubleshooting ES Solución de problemas FR Dépannage www.hp.com/support EN Problem: (Windows) The Microsoft Add Hardware screen appears. Action: Cancel all screens. Unplug the USB cable, and then insert the green HP All-in-One CD. ES Problema: (Windows) Aparece la pantalla Agregar hardware de
-
 1
1 -
 2
2 -
 3
3 -
 4
4 -
 5
5 -
 6
6 -
 7
7 -
8
 |
 |

HP Photosmart C4340 All-in-One series
2
1
/HP Photosmart série C4340 Tout-en-un
Start Here
Lower both the paper tray and the print cartridge
door.
Remove all packing material and protective
fi
lm
from the device. If there is a sticker on the color
graphics display, remove it.
Close the print cartridge door.
a.
b.
c.
WARNING:
To ensure that the software is installed
correctly, do not connect the USB cable until
step 11.
Comience aquí
Baje la bandeja de papel y la puerta de los
cartuchos de impresión.
Extraiga todo el material de embalaje y la película
protectora del dispositivo. En caso de que haya
una pegatina en la pantalla de grá
fi
cos en color,
retírela.
Cierre la puerta del cartucho de impresión.
a.
b.
c.
ATENCIÓN:
Para asegurarse de que el software se
ha instalado correctamente, no conecte el cable USB
hasta el paso 11.
Commencez ici
AVERTISSEMENT :
pour garantir une installation
correcte du logiciel, ne connectez pas le
câble USB avant l’étape 11.
Abaissez le bac d’alimentation du papier
et ouvrez la porte d’accès aux cartouches
d’impression.
Retirez tout le matériel d’emballage et le
fi
lm
protecteur du périphérique. Si un autocollant est
apposé sur l’écran graphique couleur, retirez-le.
Fermez la porte d’accès aux cartouches
d’impression.
a.
b.
c.
a
b
c
FR
ES
EN
ES
EN
EN
ES
FR
FR