HP Photosmart C6200 Basics Guide
HP Photosmart C6200 - All-in-One Printer Manual
 |
View all HP Photosmart C6200 manuals
Add to My Manuals
Save this manual to your list of manuals |
HP Photosmart C6200 manual content summary:
- HP Photosmart C6200 | Basics Guide - Page 1
HP Photosmart C6200 All-in-One series Basics Guide - HP Photosmart C6200 | Basics Guide - Page 2
an additional warranty. HP shall not be liable for technical or editorial errors or omissions contained herein. © 2007 Hewlett-Packard Development Company, L.P. Windows, Windows 2000, and Windows XP are U.S. registered trademarks of Microsoft Corporation. Windows Vista is either a registered - HP Photosmart C6200 | Basics Guide - Page 3
...15 View and select photos...15 Scan an image...16 Make a copy...17 Replace the ink cartridges...17 Clean the HP All-in-One...20 4 Troubleshooting and support Uninstall and reinstall the software 22 Hardware setup troubleshooting 22 Network troubleshooting...25 Clear paper jams...26 Information - HP Photosmart C6200 | Basics Guide - Page 4
turning on your computer. NOTE: This guide introduces basic operations and troubleshooting, as well as provides information for contacting HP support and ordering supplies. The onscreen Help details the full range of features and functions, including use of the HP Photosmart software that came with - HP Photosmart C6200 | Basics Guide - Page 5
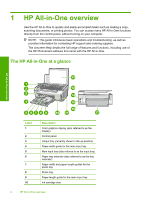
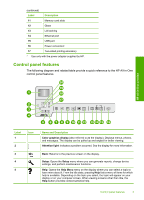
control panel features. HP All-in-One overview Label 1 2 3 4 5 Icon Name and Description Color graphics display (also referred to as the display): Displays menus, photos, and messages. The display can be pulled up and angled for better viewing. Attention light: Indicates a problem occurred. See - HP Photosmart C6200 | Basics Guide - Page 6
7 Photo Menu: Launches the Photosmart Express menu for printing, saving, editing, and sharing photos. 8 Red Eye Removal: Turns the Red Eye Removal feature on or off. By default, this feature is turned off. When the feature is turned on, the HP All-in-One automatically corrects red eye coloring - HP Photosmart C6200 | Basics Guide - Page 7
The Setup Guide provides instructions for setting up the HP All-in-One and installing software. Make sure you follow the steps in the Setup Guide in order. If you have problems during setup, see Troubleshooting in the last section of the Setup Guide, or see "Troubleshooting and support" on page - HP Photosmart C6200 | Basics Guide - Page 8
in a "Install the software for a network connection" networked environment. on page 8 Add connections to more computers on the network. "Connect to additional computers on a network" on page 9 Change the HP All-in-One from a USB connection to a network connection. NOTE: Use the instructions in - HP Photosmart C6200 | Basics Guide - Page 9
and thicker and always has 8 contacts on the end. A phone connector has between 2 and 6 contacts. ❑ A desktop computer or laptop with an Ethernet connection. NOTE: The HP All-in-One supports both 10 Mbps and 100 Mbps Ethernet networks. If you are purchasing, or have purchased, a network interface - HP Photosmart C6200 | Basics Guide - Page 10
of your computer. To install the Windows HP All-in-One software 1. Quit all applications running on your computer, including any virus detection software. 2. Insert the Windows CD that came with the HP All-in-One into the CD-ROM drive on your computer and follow the onscreen instructions. 3. If - HP Photosmart C6200 | Basics Guide - Page 11
the network, the Printers Found screen appears. Select the HP All-in-One you want to connect. 6. Follow the prompts to install the software. When you have finished installing the software, the HP All-in-One is ready for use. 7. If you disabled any virus detection software on your computer, make sure - HP Photosmart C6200 | Basics Guide - Page 12
settings to what they were when you purchased the HP All-inOne. 1. On the control panel of the HP All-in-One, press Setup. 2. Press until Network is highlighted, if you are an advanced user, you might want to manually change the IP address, subnet mask, or the default gateway. To see the IP - HP Photosmart C6200 | Basics Guide - Page 13
stay when you exit from the menu. CAUTION: Be careful when manually assigning an IP address. If you enter an invalid IP address during the installation, your network components will not be able to connect with the HP All-in-One. 1. Press Setup. 2. Press until Network is highlighted, then press OK - HP Photosmart C6200 | Basics Guide - Page 14
information about how to use the HP All-in-One for basic operations. In addition, it provides instructions about how to load paper and replace the ink cartridges. Load originals and load paper You can load many different types and sizes of paper in the HP All-in-One, including letter or A4 paper - HP Photosmart C6200 | Basics Guide - Page 15
and then slide the paper-width and paper-length guides to their outermost positions. 2. Tap a stack page first with the print side down. For more help on loading full-size paper and letterhead, refer to tray. 4. Slide the paper-width and paper-length guides inward until they stop at the edges of the - HP Photosmart C6200 | Basics Guide - Page 16
paper into the photo tray of the HP Allin-One. For the best results, use 10 x 15 cm (4 x 6 inch) HP Premium Plus Photo Paper or HP Premium Photo Paper. To load 10 x Slide the paper-length and paper-width guides inward against the stack of photo paper until the guides stop. Do not overload the photo - HP Photosmart C6200 | Basics Guide - Page 17
tray, and then lower the output tray. Avoid paper jams To help avoid paper jams, follow these guidelines. • Remove printed papers from guide does not bend the paper in the input tray. • Do not force paper too far forward in the input tray. • Use paper types that are recommended for the HP All-in-One - HP Photosmart C6200 | Basics Guide - Page 18
on the HP All-in-One. The Photosmart Express HP All-in-One only. NOTE: You can also use the software you installed with the HP All-in-One to scan images. Using this software, you can edit a scanned image and create special projects using a scanned image. Scan an original to a computer You can scan - HP Photosmart C6200 | Basics Guide - Page 19
original print side down on the right front corner of the glass. 3. Press Start Copy Black or Start Copy Color to begin copying. Replace the ink cartridges Follow these instructions when you need to replace ink cartridges. Use the HP All-in-One features Make a copy 17 - HP Photosmart C6200 | Basics Guide - Page 20
print head assembly at firsttime setup. If you do not already have replacement ink cartridges for the HP All-in-One, you can order them by clicking the Shop for HP Supplies icon on your computer. On a Windows computer this is located in the HP folder in the Start menu. For more information see www - HP Photosmart C6200 | Basics Guide - Page 21
from its packaging, and then, holding it by the handle, push the ink cartridge into the empty slot. Match the color and pattern of the ink cartridge to the color and pattern on the print carriage. Use the HP All-in-One features 6. Close the latch and make sure it is secure. 7. Repeat steps - HP Photosmart C6200 | Basics Guide - Page 22
Chapter 3 Clean the HP All-in-One To ensure that your copies and scans remain clear, you might need to clean the glass and lid backing. You might also want to dust the exterior of the HP All-in-One. TIP: You can purchase an HP Cleaning Kit for Inkjet Printers and All-in-Ones (Q6260A) that provides - HP Photosmart C6200 | Basics Guide - Page 23
the backing thoroughly with a damp cloth to remove any residual alcohol. CAUTION: Be careful not to spill alcohol on the glass or exterior of the HP Allin-One, as this might damage the device. Use the HP All-in-One features Clean the HP All-in-One 21 - HP Photosmart C6200 | Basics Guide - Page 24
installed the software that came with the HP Allin-One. To uninstall from a Windows computer and then reinstall 1. On the Windows taskbar, click Start, Settings, Control Panel (or just Control Panel). 2. Double-click Add/Remove Programs (or click Uninstall a program). 3. Select HP Photosmart Driver - HP Photosmart C6200 | Basics Guide - Page 25
country/region, and then click Contact HP for information on calling for technical support. I connected the USB cable, but I am having problems using the HP All-in-One with my computer Cause: The USB cable was connected before the software was installed. Connecting the USB cable before prompted - HP Photosmart C6200 | Basics Guide - Page 26
Chapter 4 Troubleshooting and support For more information on installing the software and connecting the USB cable, see the Setup Guide that came with the HP All-in-One. The HP All-in-One does not print Solution: If the HP All-in-One and computer are not communicating with each other, try the - HP Photosmart C6200 | Basics Guide - Page 27
remove and then install the software you installed with the HP All-in-One again. For more information on setting up the HP All-in-One and connecting it to your computer, see the Setup Guide that came with the HP All-in-One. Network troubleshooting This section addresses problems you might encounter - HP Photosmart C6200 | Basics Guide - Page 28
computer. Solution: Try temporarily disabling the VPN before proceeding with the installation. NOTE: The HP All-in-One functionality will be limited during VPN sessions. Clear paper jams If the HP All-in-One has a paper jam, check the Two-sided printing accessory. 26 Troubleshooting and support - HP Photosmart C6200 | Basics Guide - Page 29
tips help maintain HP ink cartridges and ensure consistent print quality. • Install the ink cartridge on or before the install by date, which is printed on the ink cartridge package. • Keep all ink cartridges in the original sealed packages until they are needed. • Turn off the HP All-in-One by - HP Photosmart C6200 | Basics Guide - Page 30
online support specialists • Software and driver updates for the HP All-in-One • Valuable HP All-in-One and troubleshooting information for common problems • Proactive device updates, support alerts, and HP newsgrams that are available when you register the HP All-in-One 3. Call HP support. Support - HP Photosmart C6200 | Basics Guide - Page 31
international regulatory information for the HP All-in-One are provided in this section. System requirements Software system requirements are located in the Readme file. Product specifications For product specifications, go to the HP Web site at www.hp.com/support. Paper specifications • Input tray - HP Photosmart C6200 | Basics Guide - Page 32
assigned a Regulatory Model Number. The Regulatory Model Number for your product is SDGOB-0714. This regulatory number should not be confused with the marketing name (HP Photosmart C6200 All-in-One series, etc.) or product numbers (CC985A, etc.). Technical information 30 Technical information - HP Photosmart C6200 | Basics Guide - Page 33
Warranty Warranty 31 Technical information - HP Photosmart C6200 | Basics Guide - Page 34
Chapter 5 Technical information 32 Technical information - HP Photosmart C6200 | Basics Guide - Page 35
-
 1
1 -
 2
2 -
 3
3 -
 4
4 -
 5
5 -
 6
6 -
 7
7 -
8
-
9
-
10
-
11
-
12
-
13
-
14
-
15
-
16
-
17
-
18
-
19
-
20
-
21
-
22
-
23
-
24
-
25
-
26
-
27
-
28
-
29
-
30
-
31
-
32
-
33
-
34
-
35
 |
 |

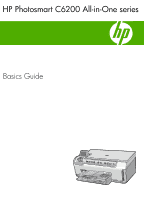
HP Photosmart C6200 All-in-One series
Basics Guide