HP Photosmart Plus All-in-One Printer - B209 User Guide - Page 84
HP Photosmart All-In-One Driver Software, HP Digital Imaging Monitor - download
 |
View all HP Photosmart Plus All-in-One Printer - B209 manuals
Add to My Manuals
Save this manual to your list of manuals |
Page 84 highlights
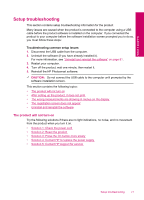
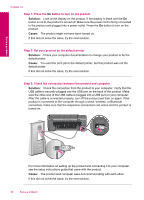
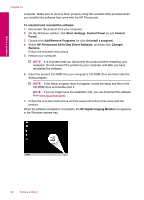
Solve a problem Chapter 12 computer. Make sure to remove them properly using the uninstall utility provided when you installed the software that came with the HP Photosmart. To uninstall and reinstall the software 1. Disconnect the product from your computer. 2. On the Windows taskbar, click Start, Settings, Control Panel (or just Control Panel). 3. Double-click Add/Remove Programs (or click Uninstall a program). 4. Select HP Photosmart All-In-One Driver Software, and then click Change/ Remove. Follow the onscreen instructions. 5. Restart your computer. NOTE: It is important that you disconnect the product before restarting your computer. Do not connect the product to your computer until after you have reinstalled the software. 6. Insert the product CD-ROM into your computer's CD-ROM drive and then start the Setup program. NOTE: If the Setup program does not appear, locate the setup.exe file on the CD-ROM drive and double-click it. NOTE: If you no longer have the installation CD, you can download the software from www.hp.com/support. 7. Follow the onscreen instructions and the setup instructions that came with the product. When the software installation is complete, the HP Digital Imaging Monitor icon appears in the Windows system tray. 82 Solve a problem
-
 1
1 -
2
-
3
-
4
-
5
-
6
-
7
-
8
-
9
-
10
-
11
-
12
-
13
-
14
-
15
-
16
-
17
-
18
-
19
-
20
-
21
-
22
-
23
-
24
-
25
-
26
-
27
-
28
-
29
-
30
-
31
-
32
-
33
-
34
-
35
-
36
-
37
-
38
-
39
-
40
-
41
-
42
-
43
-
44
-
45
-
46
-
47
-
48
-
49
-
50
-
51
-
52
-
53
-
54
-
55
-
56
-
57
-
58
-
59
-
60
-
61
-
62
-
63
-
64
-
65
-
66
-
67
-
68
-
69
-
70
-
71
-
72
-
73
-
74
-
75
-
76
-
77
-
78
-
 79
79 -
 80
80 -
 81
81 -
 82
82 -
 83
83 -
 84
84 -
 85
85 -
 86
86 -
 87
87 -
 88
88 -
 89
89 -
90
-
91
-
92
-
93
-
94
-
95
-
96
-
97
-
98
-
99
-
100
-
101
-
102
-
103
-
104
-
105
-
106
-
107
-
108
-
109
-
110
-
111
-
112
-
113
-
114
-
115
-
116
-
117
-
118
-
119
-
120
-
121
-
122
-
123
-
124
-
125
-
126
-
127
-
128
-
129
-
130
-
131
-
132
-
133
-
134
-
135
-
136
-
137
-
138
-
139
-
140
-
141
-
142
 |
 |