HP Photosmart Plus All-in-One Printer - B209 User Guide - Page 92
Scan troubleshooting, Solution 3: Select photos on the camera for printing
 |
View all HP Photosmart Plus All-in-One Printer - B209 manuals
Add to My Manuals
Save this manual to your list of manuals |
Page 92 highlights
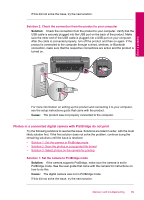
Solve a problem Chapter 12 Solution 2: Save the photos in a supported file format Solution: Make sure the digital camera is saving photos in a file format that the PictBridge transfer feature supports (Exif/JPEG, JPEG, and DPOF). Cause: The images were not in a supported format. If this did not solve the issue, try the next solution. Solution 3: Select photos on the camera for printing Solution: Before you connect the digital camera to the front USB port on the product, select some photos on the camera for printing. NOTE: Some digital cameras do not allow you to select photos until after you have established a PictBridge connection. If this is the case, connect your digital camera to the front USB port, turn on the camera and change it to PictBridge mode, and then use the camera to select the photos you want to print. Cause: You did not select any photos on the camera for printing. Scan troubleshooting Use this section to solve these scan problems: • Scanned image is incorrectly cropped • Scanned image shows dotted lines instead of text • Text format is incorrect • Text is incorrect or missing Scanned image is incorrectly cropped Solution: The autocropping feature in the software crops anything that is not part of the main image. Sometimes this might not be what you want. In that case, turn off autocropping in the software and crop the scanned image manually, or not at all. Cause: The software was set to automatically crop scanned pictures. Scanned image shows dotted lines instead of text Solution: Make a black-and-white copy of the original and then scan the copy. Cause: If you used the Text image type to scan text that you planned to edit, the scanner might not have recognized color text. The Text image type scans at 300 x 300 dpi, in black and white. If you scanned an original that has graphics or artwork surrounding the text, the scanner might not have recognized the text. 90 Solve a problem
-
 1
1 -
2
-
3
-
4
-
5
-
6
-
7
-
8
-
9
-
10
-
11
-
12
-
13
-
14
-
15
-
16
-
17
-
18
-
19
-
20
-
21
-
22
-
23
-
24
-
25
-
26
-
27
-
28
-
29
-
30
-
31
-
32
-
33
-
34
-
35
-
36
-
37
-
38
-
39
-
40
-
41
-
42
-
43
-
44
-
45
-
46
-
47
-
48
-
49
-
50
-
51
-
52
-
53
-
54
-
55
-
56
-
57
-
58
-
59
-
60
-
61
-
62
-
63
-
64
-
65
-
66
-
67
-
68
-
69
-
70
-
71
-
72
-
73
-
74
-
75
-
76
-
77
-
78
-
79
-
80
-
81
-
82
-
83
-
84
-
85
-
86
-
 87
87 -
 88
88 -
 89
89 -
 90
90 -
 91
91 -
 92
92 -
 93
93 -
 94
94 -
 95
95 -
 96
96 -
 97
97 -
98
-
99
-
100
-
101
-
102
-
103
-
104
-
105
-
106
-
107
-
108
-
109
-
110
-
111
-
112
-
113
-
114
-
115
-
116
-
117
-
118
-
119
-
120
-
121
-
122
-
123
-
124
-
125
-
126
-
127
-
128
-
129
-
130
-
131
-
132
-
133
-
134
-
135
-
136
-
137
-
138
-
139
-
140
-
141
-
142
 |
 |