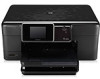
HP Photosmart Plus e-All-in-One Printer - B210 User Guide - Page 42
Tips for setting up and using a networked printer, Connection Type, Wireless, Wired, Searching - problems
 |
View all HP Photosmart Plus e-All-in-One Printer - B210 manuals
Add to My Manuals
Save this manual to your list of manuals |
Page 42 highlights
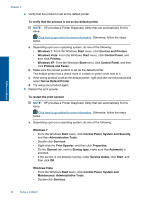
Connectivity Chapter 8 3. If a dialog box about firewalls appears, follow the instructions. If you see firewall popup messages, you must always accept or allow the pop-up messages. 4. On the Connection Type screen, select the Network option, and then click Next. If the HP Photosmart supports both wireless and wired (Ethernet) network connections, you will also be prompted to choose between Wireless and Wired. The Searching screen appears as the Setup program searches for the product on the network. If the HP Photosmart will use a temporary USB cable connection to setup a wireless connection and this is a first time install of the HP Photosmart, you will be prompted to connect the USB cable after the network search is performed. 5. On the Printer Found screen, verify that the printer description is correct and then select it. If more than one printer is found on the network, the Printers Found screen appears. Select the product you want to connect. You can identify the printer by model number, IP address, serial number or MAC address. 6. Follow the prompts to install the software. When you have finished installing the software, the product is ready for use. 7. To test your network connection, go to your computer and print a self-test report to the printer. The wireless light on the printer should be ON and steady. A BLINKING light indicates there is no network connection. If the wireless light is OFF it means the wireless radio is not ON. Printing a Wireless Network Test report from the printer's front panel can help identify any problems. Tips for setting up and using a networked printer Use the following tips to set up and use a networked printer: • When setting up the wireless networked printer, make sure your wireless router or access point is powered on. The printer searches for wireless routers, then lists the detected network names on the display. • To verify the wireless connection, check the wireless radio light in the Wireless Settings menu on the display. If the light is off, select Enable Wireless to enable the wireless connection. It also displays the IP address of the printer. • If your computer is connected to a Virtual Private Network (VPN), you need to disconnect from the VPN before you can access any other device on your network, including the printer. • Learn how to find your network security settings. Click here to go online for more information. • Learn about the Network Diagnostic Utility and other troubleshooting tips. Click here to go online for more information. • Learn how to change from a USB to wireless connection. Click here to go online for more information. • Learn how to work with your firewall and anti-virus programs during printer setup. Click here to go online for more information. 40 Connectivity
-
 1
1 -
2
-
3
-
4
-
5
-
6
-
7
-
8
-
9
-
10
-
11
-
12
-
13
-
14
-
15
-
16
-
17
-
18
-
19
-
20
-
21
-
22
-
23
-
24
-
25
-
26
-
27
-
28
-
29
-
30
-
31
-
32
-
33
-
34
-
35
-
36
-
 37
37 -
 38
38 -
 39
39 -
 40
40 -
 41
41 -
 42
42 -
 43
43 -
 44
44 -
 45
45 -
 46
46 -
 47
47 -
48
-
49
-
50
-
51
-
52
-
53
-
54
-
55
-
56
-
57
-
58
-
59
-
60
-
61
-
62
-
63
-
64
-
65
-
66
-
67
-
68
 |
 |