HP Photosmart Plus e-All-in-One Printer - B210 User Guide - Page 43
Solve a problem, Get more help, Improve print quality, Align Ink Cartridges
 |
View all HP Photosmart Plus e-All-in-One Printer - B210 manuals
Add to My Manuals
Save this manual to your list of manuals |
Page 43 highlights
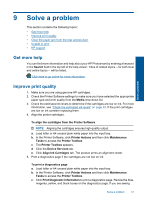
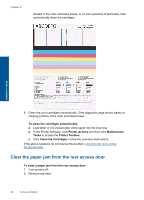
9 Solve a problem This section contains the following topics: • Get more help • Improve print quality • Clear the paper jam from the rear access door • Unable to print • HP support Get more help You can find more information and help about your HP Photosmart by entering a keyword in the Search field in the top left of the help viewer. Titles of related topics -- for both local and online topics -- will be listed. Click here to go online for more information. Solve a problem Improve print quality 1. Make sure you are using genuine HP cartridges. 2. Check the Printer Software settings to make sure you have selected the appropriate paper type and print quality from the Media drop-down list. 3. Check the estimated ink levels to determine if the cartridges are low on ink. For more information, see "Check the estimated ink levels" on page 32. If the print cartridges are low on ink consider replacing them. 4. Align the printer cartridges. To align the cartridges from the Printer Software NOTE: Aligning the cartridges ensures high-quality output. a. Load letter or A4 unused plain white paper into the input tray. b. In the Printer Software, click Printer Actions and then click Maintenance Tasks to access the Printer Toolbox. c. The Printer Toolbox appears. d. Click the Device Services tab. e. Click Align Ink Cartridges tab. The product prints an alignment sheet. 5. Print a diagnostics page if the cartridges are not low on ink. To print a diagnostics page a. Load letter or A4 unused plain white paper into the input tray. b. In the Printer Software, click Printer Actions and then click Maintenance Tasks to access the Printer Toolbox. c. Click Print Diagnostic Information to print a diagnostics page. Review the blue, magenta, yellow, and black boxes on the diagnostics page. If you are seeing Solve a problem 41
-
 1
1 -
2
-
3
-
4
-
5
-
6
-
7
-
8
-
9
-
10
-
11
-
12
-
13
-
14
-
15
-
16
-
17
-
18
-
19
-
20
-
21
-
22
-
23
-
24
-
25
-
26
-
27
-
28
-
29
-
30
-
31
-
32
-
33
-
34
-
35
-
36
-
37
-
 38
38 -
 39
39 -
 40
40 -
 41
41 -
 42
42 -
 43
43 -
 44
44 -
 45
45 -
 46
46 -
 47
47 -
 48
48 -
49
-
50
-
51
-
52
-
53
-
54
-
55
-
56
-
57
-
58
-
59
-
60
-
61
-
62
-
63
-
64
-
65
-
66
-
67
-
68
 |
 |