HP Photosmart Premium Fax e-All-in-One Printer - C410 Reference Guide
HP Photosmart Premium Fax e-All-in-One Printer - C410 Manual
 |
View all HP Photosmart Premium Fax e-All-in-One Printer - C410 manuals
Add to My Manuals
Save this manual to your list of manuals |
HP Photosmart Premium Fax e-All-in-One Printer - C410 manual content summary:
- HP Photosmart Premium Fax e-All-in-One Printer - C410 | Reference Guide - Page 1
PHOTOSMART PREMIUM FAX e-ALL-IN-ONE C410 series Start setup here... 1 Verify box contents Inside... Setup troubleshooting 3 Get to know your HP Photosmart 4 Features and tips 6 Get more info 8 Specs 8 Networked printer setup and use 9 Fixing connectivity issues 10 English * * * * - HP Photosmart Premium Fax e-All-in-One Printer - C410 | Reference Guide - Page 2
Wizard Be sure to follow the instructions on the display as it guides you through setting up and connecting the HP Photosmart, including inserting ink cartridges and setting up a wireless network connection. For computers without a CD/DVD drive, go to www.hp.com/support to download and install the - HP Photosmart Premium Fax e-All-in-One Printer - C410 | Reference Guide - Page 3
If you have completed all the above steps, but are still having a problem, contact HP support for service. Go to www.hp.com/support. English If you are unable to print... Windows Make sure that your HP Photosmart is set as the default printer and not offline. To do this: •• On the Windows taskbar - HP Photosmart Premium Fax e-All-in-One Printer - C410 | Reference Guide - Page 4
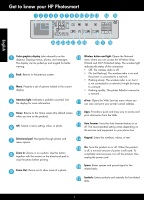
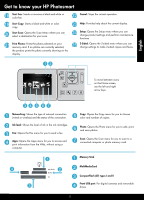
your HP Photosmart OK display. Attention light: Indicates a problem occurred. See the display for printer failed to connect to a network. ePrint: Opens the Web Services menu where you can view and print your printer on the services and equipment on your phone line. Keypad: Enters fax numbers, values - HP Photosmart Premium Fax e-All-in-One Printer - C410 | Reference Guide - Page 5
Get to know your HP Photosmart Start Fax: Sends or receives a black-and-white or color fax. Start Copy: Starts a black-and- . Ink level: Shows the level of ink in the ink cartridges. Fax: Opens the Fax menu for you to send a fax. Apps: Opens the Apps menu for you to access and print information - HP Photosmart Premium Fax e-All-in-One Printer - C410 | Reference Guide - Page 6
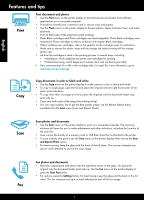
for instructions. Make servicing, which keeps print nozzles clear and ink flowing smoothly •• Also, some residual ink is left in the cartridge after it is used. For more information, go to: www.hp.com/go/inkusage. Copy Copy documents in color or black and white •• Use the Copy menu on the printer - HP Photosmart Premium Fax e-All-in-One Printer - C410 | Reference Guide - Page 7
Internet. •• Press the Wireless button on the HP Photosmart front panel. (Do this even if you have an Ethernet connection.) •• Select the Web Services menu from the printer display. From here, you can turn the service on or off, display the printer email address, and print an information page. Apps - HP Photosmart Premium Fax e-All-in-One Printer - C410 | Reference Guide - Page 8
HP Photosmart software. •• Onscreen Help includes instructions on product features and troubleshooting. It also provides product specifications, legal notices, environmental, regulatory, and support HP > Photosmart Prem C410 series > Help. •• Mac OS X v10.4: Click Help > Mac Help, Library > HP - HP Photosmart Premium Fax e-All-in-One Printer - C410 | Reference Guide - Page 9
: 1. Click Start, click All Programs, click HP, click Photosmart Prem C410 series, then click USB to Wireless. Keep your USB cable connected until prompted to disconnect it. 2. Follow the instructions on the displayed screens. •• Click Next to move from one screen to the next. •• Click Help to - HP Photosmart Premium Fax e-All-in-One Printer - C410 | Reference Guide - Page 10
You may have a router problem. •• Try restarting both the printer and the router by turning off the power on each. Then, turn them on again. Your computer may not be connected to your network. •• Make sure that the computer is connect to the same network to which the HP Photosmart is connected. Your - HP Photosmart Premium Fax e-All-in-One Printer - C410 | Reference Guide - Page 11
to the customer or any HP support contract with the customer. However, if printer failure or damage is attributable to the use of a non-HP or refilled cartridge or an expired ink cartridge, HP will charge its standard time and materials charges to service the printer for the particular failure or - HP Photosmart Premium Fax e-All-in-One Printer - C410 | Reference Guide - Page 12
12 English - HP Photosmart Premium Fax e-All-in-One Printer - C410 | Reference Guide - Page 13
PHOTOSMART PREMIUM FAX e-ALL-IN-ONE série C410 Commencez la configuration ici... 1 Vérifiez le contenu de l'emballage À l'intérieur... Dépannage concernant l'installation 15 Apprenez à connaître votre appareil HP Photosmart 16 Fonctionnalités et conseils 18 Obtenir des informations complé - HP Photosmart Premium Fax e-All-in-One Printer - C410 | Reference Guide - Page 14
et l'adaptateur. 5 Suivez l'Assistant de configuration Assurez-vous de suivre les instructions affichées à l'écran, car elles contiennent des informations sur la configuration et la connexion de l'appareil HP Photosmart, notamment sur l'insertion de cartouches d'encre et la configuration d'une - HP Photosmart Premium Fax e-All-in-One Printer - C410 | Reference Guide - Page 15
support HP pour obtenir une assistance. Consultez le site www.hp.com/support. Windows Assurez-vous que votre appareil HP Photosmart Imprimantes (Vista) •• Imprimantes et Fax (XP) Recherchez votre imprimante pour vé le lecteur de CD, puis suivez les instructions à l'écran pour installer le logiciel. - HP Photosmart Premium Fax e-All-in-One Printer - C410 | Reference Guide - Page 16
Apprenez à connaître votre appareil HP Photosmart OK 1 2 abc 3 def 4 ghi 5 jkl 6 mno 7 pqrs 8 tuv 9 wxyz * 0 sactive la fonction de réponse automatique. Le paramètre recommandé varie en fonction des services et équipements connectés à votre ligne téléphonique. Clavier : permet de saisir des num - HP Photosmart Premium Fax e-All-in-One Printer - C410 | Reference Guide - Page 17
Apprenez à connaître votre appareil HP Photosmart Démarrer la télécopie : permet d'envoyer ou recevoir une télécopie couleur ou en noir et blanc. Démarrer la copie : permet de démarrer une copie couleur ou - HP Photosmart Premium Fax e-All-in-One Printer - C410 | Reference Guide - Page 18
reportez-vous au graphique sur leur emballage pour connaître les instructions. Veillez à retirer l'emballage en plastique et la languette orange ès utilisation. Pour des informations complémentaires, reportez-vous au site : www.hp.com/go/inkusage. Copier Copie des documents en couleur ou en noir et - HP Photosmart Premium Fax e-All-in-One Printer - C410 | Reference Guide - Page 19
être connectée à Internet. •• Appuyez sur le bouton Sans fil du panneau avant de l'imprimante HP Photosmart. (Procédez ainsi même si vous disposez d'une connexion Ethernet.) •• Sélectionnez le menu Services Web sur l'écran de l'imprimante. À partir de ce menu, vous pouvez activer ou désactiver le - HP Photosmart Premium Fax e-All-in-One Printer - C410 | Reference Guide - Page 20
moi, qui sont installés avec le logiciel HP Photosmart. •• L'aide en ligne contient des instructions relatives aux fonctionnalités et au dépannage produit. Sous Windows, cliquez sur Démarrer > Tous les programmes > HP > Photosmart Prem série C410 > Lisez-moi. Pour Mac, ouvrez le CD du logiciel sur - HP Photosmart Premium Fax e-All-in-One Printer - C410 | Reference Guide - Page 21
HP, choisissez Photosmart Prem série C410, puis USB à sans fil. Le câble USB doit rester connecté jusqu'à ce que vous soyez invité à le déconnecter. 2. Suivez les instructions cliquez sur Préférences système, sélectionnez Imprimantes et fax, puis cliquez sur le bouton +. Sélectionnez votre imprimante - HP Photosmart Premium Fax e-All-in-One Printer - C410 | Reference Guide - Page 22
seau sans fil pour vérifier les informations portant sur le diagnostic et la configuration. Pour ce faire : 1. Sur le panneau avant de l'imprimante HP Photosmart, appuyez sur le bouton Sans fil pour afficher le menu Sans fil sur l'écran de l'imprimante. 2. Sélectionnez Exécutez test réseau sans fil - HP Photosmart Premium Fax e-All-in-One Printer - C410 | Reference Guide - Page 23
ée HP est valable uniquement en cas d'impossibilité d'exécuter les instructions de programmation. HP ne de la garantie ni d'un contrat de support HP. Toutefois, si la panne ou les HP est valable dans tout pays dans lequel le produit HP couvert est distribué par HP. Des contrats apportant des services - HP Photosmart Premium Fax e-All-in-One Printer - C410 | Reference Guide - Page 24
24 Français
-
 1
1 -
 2
2 -
 3
3 -
 4
4 -
 5
5 -
 6
6 -
 7
7 -
8
-
9
-
10
-
11
-
12
-
13
-
14
-
15
-
16
-
17
-
18
-
19
-
20
-
21
-
22
-
23
-
24
 |
 |
2
1
*
*
*
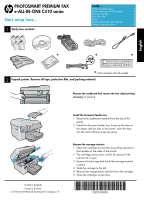
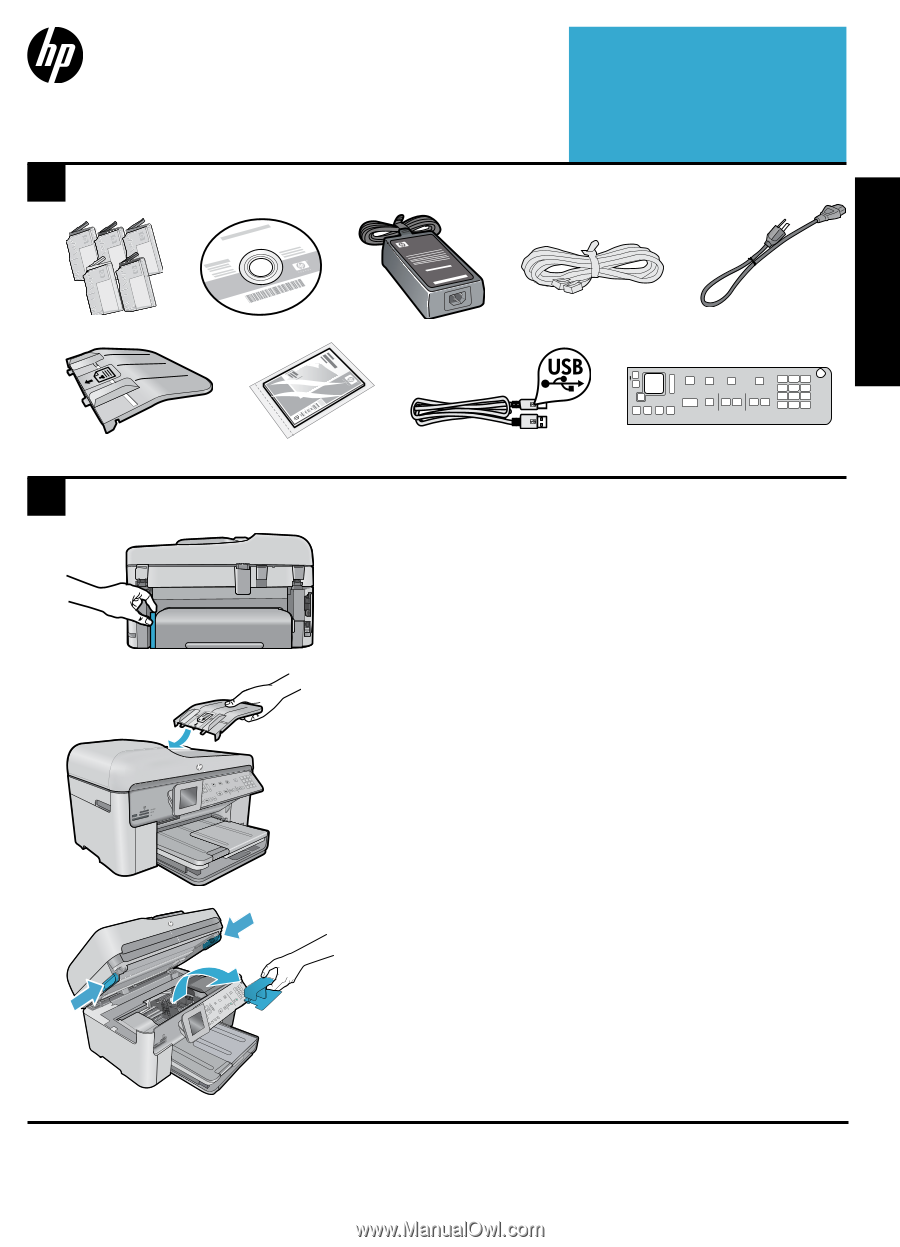
Unpack printer. Remove all tape, protective film, and packing material.
Verify box contents
*
Not included with all models
PHOTOSMART PREMIUM FAX
e-ALL-IN-ONE C410 series
Start setup here...
Inside...
Setup troubleshooting
3
Get to know your HP Photosmart
4
Features and tips
6
Get more info
8
Specs
8
Networked printer setup and use
9
Fixing connectivity issues
10
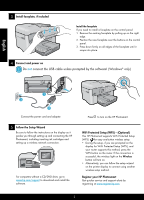
Install the document feeder tray
1. Remove the cardboard restraint from the top of the
printer.
2. Install the document feeder tray, lining up the tabs on
the edges with the slots in the printer. Insert the tabs
into the slots until they snap into place.
Remove the carriage restraint
1. Open the cartridge access door by pulling upward on
the handles on the sides of the printer.
•
The cartridge access door cannot be opened if the
scanner lid is open.
2. Remove the blue tape that holds the carriage restraint
in place.
3. Slide the carriage to the left.
4. Remove the orange plastic restraint from the carriage.
5. Close the cartridge access door.
Remove the cardboard that secures the two-sided printing
accessory
(if present)
English
© 2010 Hewlett-Packard Development Company, L.P.
Printed in [French]
Printed in [English]
*CQ521-90085*
*CQ521-90085*
CQ521-90085