HP Photosmart Premium Fax e-All-in-One Printer - C410 User Guide - Page 136
Scan troubleshooting, Solution 4: Check the connection from the product to your computer
 |
View all HP Photosmart Premium Fax e-All-in-One Printer - C410 manuals
Add to My Manuals
Save this manual to your list of manuals |
Page 136 highlights
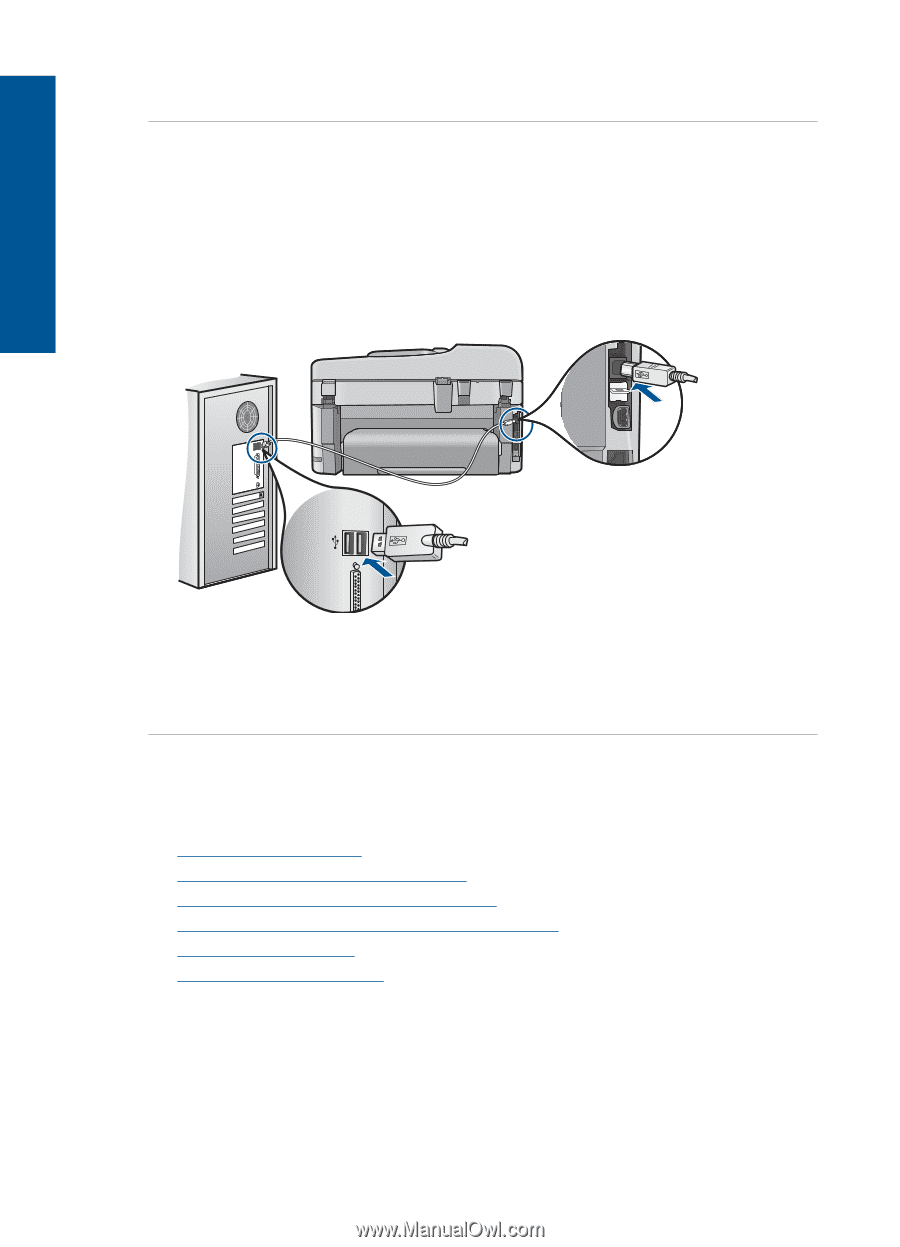
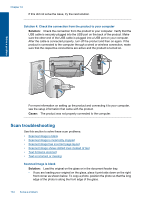
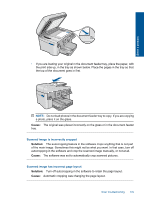
Chapter 12 If this did not solve the issue, try the next solution. Solution 4: Check the connection from the product to your computer Solution: Check the connection from the product to your computer. Verify that the USB cable is securely plugged into the USB port on the back of the product. Make sure the other end of the USB cable is plugged into a USB port on your computer. After the cable is connected properly, turn off the product and then on again. If the product is connected to the computer through a wired or wireless connection, make sure that the respective connections are active and the product is turned on. Solve a problem For more information on setting up the product and connecting it to your computer, see the setup information that came with the product. Cause: The product was not properly connected to the computer. Scan troubleshooting Use this section to solve these scan problems: • Scanned image is blank • Scanned image is incorrectly cropped • Scanned image has incorrect page layout • Scanned image shows dotted lines instead of text • Text format is incorrect • Text is incorrect or missing Scanned image is blank Solution: Load the original on the glass or in the document feeder tray. • If you are loading your original on the glass, place it print side down on the right front corner as shown below. To copy a photo, position the photo so that the long edge of the photo is along the front edge of the glass. 134 Solve a problem
-
 1
1 -
2
-
3
-
4
-
5
-
6
-
7
-
8
-
9
-
10
-
11
-
12
-
13
-
14
-
15
-
16
-
17
-
18
-
19
-
20
-
21
-
22
-
23
-
24
-
25
-
26
-
27
-
28
-
29
-
30
-
31
-
32
-
33
-
34
-
35
-
36
-
37
-
38
-
39
-
40
-
41
-
42
-
43
-
44
-
45
-
46
-
47
-
48
-
49
-
50
-
51
-
52
-
53
-
54
-
55
-
56
-
57
-
58
-
59
-
60
-
61
-
62
-
63
-
64
-
65
-
66
-
67
-
68
-
69
-
70
-
71
-
72
-
73
-
74
-
75
-
76
-
77
-
78
-
79
-
80
-
81
-
82
-
83
-
84
-
85
-
86
-
87
-
88
-
89
-
90
-
91
-
92
-
93
-
94
-
95
-
96
-
97
-
98
-
99
-
100
-
101
-
102
-
103
-
104
-
105
-
106
-
107
-
108
-
109
-
110
-
111
-
112
-
113
-
114
-
115
-
116
-
117
-
118
-
119
-
120
-
121
-
122
-
123
-
124
-
125
-
126
-
127
-
128
-
129
-
130
-
 131
131 -
 132
132 -
 133
133 -
 134
134 -
 135
135 -
 136
136 -
 137
137 -
 138
138 -
 139
139 -
 140
140 -
 141
141 -
142
-
143
-
144
-
145
-
146
-
147
-
148
-
149
-
150
-
151
-
152
-
153
-
154
-
155
-
156
-
157
-
158
-
159
-
160
-
161
-
162
-
163
-
164
-
165
-
166
-
167
-
168
-
169
-
170
-
171
-
172
-
173
-
174
-
175
-
176
-
177
-
178
-
179
-
180
-
181
-
182
-
183
-
184
-
185
-
186
-
187
-
188
-
189
-
190
-
191
-
192
-
193
-
194
-
195
-
196
-
197
-
198
-
199
-
200
-
201
-
202
-
203
-
204
-
205
-
206
-
207
-
208
-
209
-
210
-
211
-
212
-
213
-
214
-
215
-
216
-
217
-
218
-
219
-
220
-
221
-
222
-
223
-
224
-
225
-
226
-
227
-
228
-
229
-
230
-
231
-
232
-
233
-
234
-
235
-
236
-
237
-
238
-
239
-
240
-
241
-
242
-
243
-
244
-
245
-
246
-
247
-
248
-
249
-
250
-
251
-
252
-
253
-
254
-
255
-
256
-
257
-
258
-
259
-
260
-
261
-
262
-
263
-
264
 |
 |