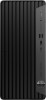
HP Pro Tower 400 G9 PCI Desktop PC User Guide
HP Pro Tower 400 G9 PCI Desktop PC Manual
 |
View all HP Pro Tower 400 G9 PCI Desktop PC manuals
Add to My Manuals
Save this manual to your list of manuals |
HP Pro Tower 400 G9 PCI Desktop PC manual content summary:
- HP Pro Tower 400 G9 PCI Desktop PC | User Guide - Page 1
User Guide SUMMARY This guide provides information about components, network connection, power management, security, backing up, and more. - HP Pro Tower 400 G9 PCI Desktop PC | User Guide - Page 2
com/SmodeFAQ. To access the latest user guides, go to http://www.hp.com/support, and follow the instructions to find your product. Then select Manuals. Software terms By installing, copying, downloading, or otherwise using any software product preinstalled on this computer, you agree to be bound by - HP Pro Tower 400 G9 PCI Desktop PC | User Guide - Page 3
About this guide This guide provides basic information for using and upgrading this product. WARNING! Indicates a hazardous situation that, if not avoided, could result in serious injury or death. CAUTION: - HP Pro Tower 400 G9 PCI Desktop PC | User Guide - Page 4
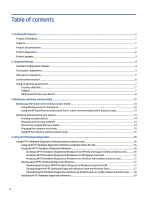
Table of contents 1 Locating HP resources ...1 Product information ...1 Support ...1 Product documentation...2 Product diagnostics ...2 Product updates...3 2 Computer features ...4 Standard configuration features ...4 Front panel components ...4 Rear panel components...5 Serial number location ...6 - HP Pro Tower 400 G9 PCI Desktop PC | User Guide - Page 5
HP PC Hardware Diagnostics UEFI version 20 Downloading Remote HP PC Hardware Diagnostics UEFI by product name or number 20 Customizing Remote HP PC Hardware Diagnostics UEFI settings 20 5 Computer ...29 Other disability resources...30 HP links ...30 Contacting support ...30 Index ...31 v - HP Pro Tower 400 G9 PCI Desktop PC | User Guide - Page 6
on the inside of the chassis. Additional information is located in the computer Maintenance and Service Guide on the web at http://www.hp.com/support. Follow the instructions to find your product, and then select Manuals. Serial number, Agency/Environmental, and operating system labels The serial - HP Pro Tower 400 G9 PCI Desktop PC | User Guide - Page 7
the latest online documentation, go to http://www.hp.com/support and follow the instructions to find your product. Then select Manuals. The documentation includes this user guide and the Maintenance and Service Guide. Product notifications Technical specifications Bulletins and Notices Subscriber - HP Pro Tower 400 G9 PCI Desktop PC | User Guide - Page 8
code definitions See the computer Maintenance and Service Guide at http://www.hp.com/support. Follow the instructions to find your product, and then select Manuals. POST error codes See the computer Maintenance and Service Guide at http://www.hp.com/support. Follow the instructions to find your - HP Pro Tower 400 G9 PCI Desktop PC | User Guide - Page 9
, read this section. Features vary depending on the model. For support assistance and to learn more about the hardware and software installed on your computer model, run the HP Support Assistant utility. Front panel components To identify the front panel components, use this illustration - HP Pro Tower 400 G9 PCI Desktop PC | User Guide - Page 10
headsets, or OMTPstyle headsets. NOTE: The light on the power button is normally white when the power is on. If the light blinks red, the computer displays a diagnostic code to indicate a problem. See the Maintenance and Service Guide to interpret the code. Rear panel components To identify the - HP Pro Tower 400 G9 PCI Desktop PC | User Guide - Page 11
Audio-out jack for powered audio devices* 7 2 port (select products only) 10 Power connector 5 RJ-45 (network) jack can turn on the computer or wake it from Hibernation if you have might have additional ports available from HP. When a graphics card is computer has a unique serial - HP Pro Tower 400 G9 PCI Desktop PC | User Guide - Page 12
Using an optional security lock You can use different types of locks (purchased separately) to secure the computer. Security cable lock You can secure the computer with a security cable lock. Padlock You can secure the computer with a padlock. Using an optional security lock 7 - HP Pro Tower 400 G9 PCI Desktop PC | User Guide - Page 13
Business PC Security Lock V2 You can secure all of the devices at your workstation using the HP PC Security Lock V2. 1. Attach the security cable fastener to a desktop using the appropriate screws for your environment (1), and then snap the cover onto the base of the cable fastener (2). Screws are - HP Pro Tower 400 G9 PCI Desktop PC | User Guide - Page 14
2. Loop the security cable around a stationary object. 3. Slide the security cable through the security cable fastener. HP Business PC Security Lock V2 9 - HP Pro Tower 400 G9 PCI Desktop PC | User Guide - Page 15
the security slot on the rear of the monitor (1), close the scissor hands together to secure the lock in place (2), and then slide the cable guide through the center of the monitor lock (3). 5. Slide the security cable through the security - HP Pro Tower 400 G9 PCI Desktop PC | User Guide - Page 16
accessory cable fastener to a desktop using the appropriate screw for your environment (1), and then place the accessory cables into the base of the fastener (2). The screw is not provided. 7. Slide the security cable through the holes in the accessory cable fastener. HP Business PC Security Lock V2 - HP Pro Tower 400 G9 PCI Desktop PC | User Guide - Page 17
. Use the key provided to disengage the lock. When you have completed all steps, all of the devices at your workstation are secured. 12 Chapter 2 Computer features - HP Pro Tower 400 G9 PCI Desktop PC | User Guide - Page 18
hp.com/support, select your country or region, and then follow the on-screen instructions. IMPORTANT: HP recommends that you follow the Restoring and recovery methods on page 14 to restore your computer before you obtain and use the HP the desktop cannot load. Backing up, restoring, and recovering 13 - HP Pro Tower 400 G9 PCI Desktop PC | User Guide - Page 19
to obtain recovery discs. Go to http://www.hp.com/support, select your country or region, and then follow the on-screen instructions. To recover your system: ▲ Insert the HP Recovery media, and then restart the computer. NOTE: HP recommends that you follow the Restoring and recovery methods on - HP Pro Tower 400 G9 PCI Desktop PC | User Guide - Page 20
● Platform-specific device drivers ● Software applications, in the case of a custom image To access the latest documentation for HP Sure Recover, go to http://www.hp.com/support. Follow the on-screen instructions to find your product and locate your documentation. Changing the computer boot order 15 - HP Pro Tower 400 G9 PCI Desktop PC | User Guide - Page 21
it from HP Help and Support. 1. Select the Start button, and then select HP Help and Support. 2. Select HP PC Hardware Diagnostics Windows. 3. When the tool opens, select the type of diagnostic test that you want to run, and then follow the on-screen instructions. 16 Chapter 4 Using HP PC Hardware - HP Pro Tower 400 G9 PCI Desktop PC | User Guide - Page 22
1. Select the Search icon (select products only) from the taskbar, type support, and then select HP Support Assistant. - or - Select the question mark icon (select products only) in the taskbar. 2. Select Troubleshooting and fixes (select products only) or Fixes & Diagnostics. 3. Select Diagnostics - HP Pro Tower 400 G9 PCI Desktop PC | User Guide - Page 23
product name or number. 1. Go to http://www.hp.com/support. 2. Select Software and Drivers, select your type instructions. Using HP PC Hardware Diagnostics UEFI HP PC Hardware Diagnostics UEFI (Unified Extensible Firmware Interface) allows you to run diagnostic tests to determine whether the computer - HP Pro Tower 400 G9 PCI Desktop PC | User Guide - Page 24
screen. The HP Customer Support - Service Center page appears with your failure ID and product number automatically filled in. Follow the on-screen instructions. - or - Contact support, and provide the failure ID code. NOTE: To start diagnostics on a convertible computer, your computer must be in - HP Pro Tower 400 G9 PCI Desktop PC | User Guide - Page 25
by using the product name or number. 1. Go to http://www.hp.com/support. 2. Enter the product name or number, select your computer, and then select your operating system. 3. In the Diagnostics section, follow the on-screen instructions to select and download the specific UEFI Diagnostics version for - HP Pro Tower 400 G9 PCI Desktop PC | User Guide - Page 26
Diagnostics. ● Set the location for downloading the diagnostic tools. This feature provides access to the tools from the HP website or from a server that has been preconfigured for use. Your computer does not require the traditional local storage (such as a hard drive or USB flash drive) to run - HP Pro Tower 400 G9 PCI Desktop PC | User Guide - Page 27
down, directly against the front of the desktop unit because this also restricts airflow. ● Never operate the computer with the access panel or any of Install or enable power management functions of the operating system or other software, including sleep states. ● Turn off the computer before you do - HP Pro Tower 400 G9 PCI Desktop PC | User Guide - Page 28
computer. 1. Wear disposable gloves made of latex (or nitrile gloves, if you are latex-sensitive) when cleaning the surfaces. 2. Turn off your device and unplug the power getting moisture in any openings. If liquid makes its way inside your HP product, it can cause damage to the product. Do not spray - HP Pro Tower 400 G9 PCI Desktop PC | User Guide - Page 29
. If liquid makes its way inside your HP product, it can cause damage to the product computer and external devices. 4. Disconnect the power cord from the AC outlet, and then from the computer. 5. Disconnect the system components and external devices from their power sources and then from the computer - HP Pro Tower 400 G9 PCI Desktop PC | User Guide - Page 30
, damage to a drive, or loss of information, observe these precautions: ● If removal or installation instructions direct you to unplug the computer, first be sure that it is properly grounded. ● Keep components in their electrostatic-safe containers until you are ready to install them. ● Avoid - HP Pro Tower 400 G9 PCI Desktop PC | User Guide - Page 31
it is reflected in everything HP does. HP strives to create an inclusive environment focused on connecting people to the power of technology throughout the world seven key objectives to guide HP actions. All HP managers and employees are expected to support these objectives and their implementation - HP Pro Tower 400 G9 PCI Desktop PC | User Guide - Page 32
supports HP's accessibility goal of designing, producing, and marketing products and services HP Aging & Accessibility: Go to http://www.hp.com, type Accessibility in the search box. Select Office of Aging and Accessibility. ● HP computers: For Windows products, go to http://www.hp.com/support - HP Pro Tower 400 G9 PCI Desktop PC | User Guide - Page 33
services, PCs and printers with certain communications and video playback features, their associated user documentation, and their customer support and operating systems, web-based information and applications, computers, telecommunications products, video and multimedia, and self-contained - HP Pro Tower 400 G9 PCI Desktop PC | User Guide - Page 34
exhaustive list. These organizations are provided for informational purposes only. HP assumes no responsibility for information or contacts you encounter on the University of Wisconsin - Madison, Trace Center ● University of Minnesota computer accommodations program Legislation and regulations 29 - HP Pro Tower 400 G9 PCI Desktop PC | User Guide - Page 35
that relates to disabilities and age-related limitations. HP comfort and safety guide HP public sector sales Contacting support HP offers technical support and assistance with accessibility options for customers with disabilities. NOTE: Support is in English only. ● Customers who are deaf - HP Pro Tower 400 G9 PCI Desktop PC | User Guide - Page 36
dirt and debris 23 computer operating guidelines 22 customer support, accessibility 30 D diagnostics 2 DisplayPort monitor connector 6 documentation 2 E electrostatic discharge 25 F front panel components 4 H hard drive activity light 5 HDMI monitor connector 6 HP Assistive Policy 26 HP PC Hardware
-
 1
1 -
 2
2 -
 3
3 -
 4
4 -
 5
5 -
 6
6 -
 7
7 -
8
-
9
-
10
-
11
-
12
-
13
-
14
-
15
-
16
-
17
-
18
-
19
-
20
-
21
-
22
-
23
-
24
-
25
-
26
-
27
-
28
-
29
-
30
-
31
-
32
-
33
-
34
-
35
-
36
 |
 |

User Guide
SUMMARY
This guide provides information about components, network connection, power management, security, backing up,
and more.