HP ProBook 4440s HP Notebook Reference Guide - Page 55
Using HP 3D DriveGuard software, Using optical drives (select models only)
 |
View all HP ProBook 4440s manuals
Add to My Manuals
Save this manual to your list of manuals |
Page 55 highlights
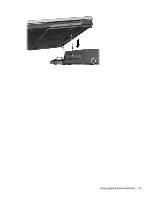
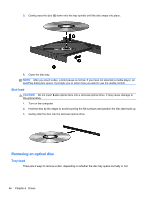
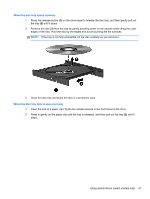
Using HP 3D DriveGuard software The HP 3D DriveGuard software enables you to perform the following tasks: ● Enable and disable HP 3D DriveGuard. NOTE: Depending on your user privileges, you may be unable to enable or disable HP 3D DriveGuard. Privileges for non-administrator users can be changed by members of an administrator group. ● Determine whether a drive in the system is supported. To open the software and change settings, follow these steps: 1. Double-click the icon in the notification area, at the far right of the taskbar. - or - Right-click the icon in the notification area, and then select Settings. 2. Click the appropriate button to change settings. 3. Click OK. Using optical drives (select models only) Optical drives include the following: ● CD ● DVD ● Blu-ray (BD) Identifying the installed optical drive ▲ Select Start > Computer. A list of all the devices installed in your computer, including your optical drive, is displayed. Inserting an optical disc Tray-load 1. Turn on the computer. 2. Press the release button (1) on the drive bezel to release the disc tray. 3. Pull out the tray (2). 4. Hold the disc by the edges to avoid touching the flat surfaces and position the disc label-side up over the tray spindle. NOTE: If the tray is not fully accessible, tilt the disc carefully to position it over the spindle. Using optical drives (select models only) 45
-
 1
1 -
2
-
3
-
4
-
5
-
6
-
7
-
8
-
9
-
10
-
11
-
12
-
13
-
14
-
15
-
16
-
17
-
18
-
19
-
20
-
21
-
22
-
23
-
24
-
25
-
26
-
27
-
28
-
29
-
30
-
31
-
32
-
33
-
34
-
35
-
36
-
37
-
38
-
39
-
40
-
41
-
42
-
43
-
44
-
45
-
46
-
47
-
48
-
49
-
 50
50 -
 51
51 -
 52
52 -
 53
53 -
 54
54 -
 55
55 -
 56
56 -
 57
57 -
 58
58 -
 59
59 -
 60
60 -
61
-
62
-
63
-
64
-
65
-
66
-
67
-
68
-
69
-
70
-
71
-
72
-
73
-
74
-
75
-
76
-
77
-
78
-
79
-
80
-
81
-
82
-
83
-
84
-
85
-
86
-
87
-
88
-
89
-
90
-
91
-
92
 |
 |