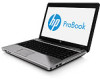
HP ProBook 4441s HP Notebook User Guide - Linux
HP ProBook 4441s Manual
 |
View all HP ProBook 4441s manuals
Add to My Manuals
Save this manual to your list of manuals |
HP ProBook 4441s manual content summary:
- HP ProBook 4441s | HP Notebook User Guide - Linux - Page 1
HP Notebook User Guide - HP ProBook 4441s | HP Notebook User Guide - Linux - Page 2
is a trademark owned by its proprietor and used by Hewlett-Packard Company under license. SD Logo is a trademark of its proprietor. The information contained herein is subject to change without notice. The only warranties for HP products and services are set forth in the express warranty statements - HP ProBook 4441s | HP Notebook User Guide - Linux - Page 3
the computer, do not place the computer directly on your lap or obstruct the computer air vents. Use the computer only on a hard, flat surface. Do not allow another hard surface, such as an adjoining optional printer, or a soft surface, such as pillows or rugs or clothing, to block airflow. Also, do - HP ProBook 4441s | HP Notebook User Guide - Linux - Page 4
iv Safety warning notice - HP ProBook 4441s | HP Notebook User Guide - Linux - Page 5
TouchPad ...4 Lights ...5 Buttons, speakers, and fingerprint reader (select models only 7 Keys ...10 Front ...12 Right ...13 Left ...15 Display ...17 Bottom ...19 Identifying the bottom parts of the computer 20 3 Networking ...22 Using an Internet service provider (ISP 23 Identifying wireless and - HP ProBook 4441s | HP Notebook User Guide - Linux - Page 6
and pointing devices ...29 Using the keyboard ...29 Identifying the hot keys ...29 Using keypads ...30 Using the embedded numeric the current power management settings 42 Changing the current power management settings 42 Using battery power ...42 Displaying the remaining battery charge 43 vi - HP ProBook 4441s | HP Notebook User Guide - Linux - Page 7
the battery ...47 Using external AC power ...47 Testing an AC adapter ...48 7 Drives ...49 Handling drives ...49 Using the optional security screw ...50 Removing or replacing the service door 50 Removing the service door 51 Replacing the service door 51 Replacing or upgrading the hard drive 53 - HP ProBook 4441s | HP Notebook User Guide - Linux - Page 8
62 Removing a USB device ...62 Using optional external devices ...63 Using optional external drives 63 9 Memory modules ...64 10 Security ...67 Protecting the computer ...67 Using passwords ...68 Setting passwords in the operating system 68 Setting passwords in Computer Setup 68 Managing a BIOS - HP ProBook 4441s | HP Notebook User Guide - Linux - Page 9
and support ...86 Troubleshooting ...86 The computer is unable to start up 86 The computer screen is blank 86 Software is functioning abnormally 86 The computer is on but not responding 87 The computer is unusually warm 87 An external device is not working 87 The wireless network connection - HP ProBook 4441s | HP Notebook User Guide - Linux - Page 10
Index ...97 x - HP ProBook 4441s | HP Notebook User Guide - Linux - Page 11
be updated with the latest versions. When you register, you can choose to receive automatic notifications when updates become available. The automatic notifications for operating system updates are available for 90 days. You can also go to http://www.hp.com/support to download updates from - HP ProBook 4441s | HP Notebook User Guide - Linux - Page 12
To access the notices, double-click the HP Documents icon located on the desktop. ● Battery disposal information Safety & Comfort Guide ● Proper workstation setup, posture, health, and work habits To access this guide, double-click the HP Documents ● Electrical and mechanical safety information - HP ProBook 4441s | HP Notebook User Guide - Linux - Page 13
printed format, you may request a printed copy from http://www.hp.com/go/orderdocuments or write to: ● North America: Hewlett-Packard, MS POD, 11311 Chinden Blvd, Boise, ID 83714, USA ● Europe, Middle East, Africa: Hewlett-Packard, POD, Via G. Di Vittorio, 9, 20063, Cernusco s/Naviglio (MI), Italy - HP ProBook 4441s | HP Notebook User Guide - Linux - Page 14
button (4) Right TouchPad button Description Turns the TouchPad on and off. Moves the pointer and selects or activates items on the screen. Functions like the left button on an external mouse. Functions like the right button on an external mouse. 4 Chapter 2 Getting to know your computer - HP ProBook 4441s | HP Notebook User Guide - Linux - Page 15
. ● Off: The computer is off, in the Suspend state, or in Hibernation. ● White: An integrated wireless device, such as a wireless local area network (WLAN) device and/or a Bluetooth® device, is on. ● Amber: All wireless devices are off. ● Amber: The TouchPad is off. ● Off: The TouchPad is on. Top 5 - HP ProBook 4441s | HP Notebook User Guide - Linux - Page 16
Off: The computer is off, in the Suspend state, or in Hibernation. ● White: An integrated wireless device, such as a wireless local area network (WLAN) device and/or a Bluetooth® device, is on. ● Amber: All wireless devices are off. ● Amber: The TouchPad is off. ● Off: The TouchPad is on. 6 Chapter - HP ProBook 4441s | HP Notebook User Guide - Linux - Page 17
Buttons, speakers, and fingerprint reader (select models only) NOTE: Refer to the illustration that most closely . To learn more about your power settings: 1. Select Computer > Control Center. 2. In the left pane, click System, and then click Power Management in the right pane. Produce sound. - HP ProBook 4441s | HP Notebook User Guide - Linux - Page 18
does not establish a wireless connection. NOTE: A wireless connection may be established if one has been previously configured. (5) Fingerprint reader (select models only) Allows a fingerprint logon to the operating system, instead of a password logon. 8 Chapter 2 Getting to know your computer - HP ProBook 4441s | HP Notebook User Guide - Linux - Page 19
about your power settings: 1. Select Computer > Control Center. 2. In the left pane, click System, and then click Power Management in the has been previously configured. (5) Fingerprint reader (select models only) Allows a fingerprint logon to the operating system, instead of a password logon - HP ProBook 4441s | HP Notebook User Guide - Linux - Page 20
used system functions when pressed in combination with a function key. Displays the operating system menu. Execute frequently used system functions key Displays a shortcut menu for items beneath the cursor. Turns the embedded numeric keypad on and off when pressed in combination with the fn key. 10 - HP ProBook 4441s | HP Notebook User Guide - Linux - Page 21
Integrated numeric keypad Description Executes frequently used system functions when pressed in combination with a function key. Displays the operating system menu. Execute frequently used system functions when pressed in combination with the fn key. Displays a shortcut menu for items beneath the - HP ProBook 4441s | HP Notebook User Guide - Linux - Page 22
hard drive is being accessed. ● Amber: HP 3D DriveGuard has temporarily parked the hard drive. Supports the following digital card formats: ● Memory Stick PRO ● Memory the Regulatory, Safety, and Environmental Notices. NOTE: When a device is connected to the jack, the computer speakers are disabled. - HP ProBook 4441s | HP Notebook User Guide - Linux - Page 23
optional USB device. USB 2.0 port Connects an optional USB device. Optical drive (select battery is charged from 90 to 99 percent. ● Blinking amber: A battery that is the only available power source has reached a low battery level. When the battery reaches a critical battery level, the battery - HP ProBook 4441s | HP Notebook User Guide - Linux - Page 24
(2) Description Connect optional USB devices. Optical drive (select models only) Reads an optical disc. NOTE: On select models, the optical drive also writes to an optical disc. Optical drive light (select models only) Lights when the optical drive is active. Optical drive eject button (select - HP ProBook 4441s | HP Notebook User Guide - Linux - Page 25
cable slot (2) Vent (3) External monitor port (4) RJ-45 (network) jack (5) HDMI port (6) USB 3.0 ports (2) Description Attaches an an external VGA monitor or projector. Connects a network cable. Connects an optional video or audio device, such as a high-definition television, or any - HP ProBook 4441s | HP Notebook User Guide - Linux - Page 26
battery that is the only available power source has reached a low battery level. When the battery reaches a critical battery level, the battery light begins blinking rapidly. ● Off: The battery or projector. Connects a network cable. Connects an optional video or audio device, such as a high- - HP ProBook 4441s | HP Notebook User Guide - Linux - Page 27
wireless local area networks (WLAN). (2) Internal microphones (1 or 2 depending on Record sound. model) (3) Webcam light (select models only) On: The webcam is in use. (4) Webcam (select models only) Records video and captures still photographs. (5) Internal display switch Turns off - HP ProBook 4441s | HP Notebook User Guide - Linux - Page 28
Send and receive wireless signals to communicate with wireless local area networks (WLAN). (2) Internal microphones (1 or 2 depending on Record (5) Internal display switch Turns off the display or initiates Suspend if the display is closed while the power is on. NOTE: The display switch is - HP ProBook 4441s | HP Notebook User Guide - Linux - Page 29
from the battery bay, releases the service door from the computer by sliding the release latches a second time. Contains the battery. Protects the hard drive bay, the wireless LAN (WLAN) module slot, and the memory module slots. CAUTION: To prevent an unresponsive system, replace the wireless - HP ProBook 4441s | HP Notebook User Guide - Linux - Page 30
Identifying the bottom parts of the computer NOTE: Refer to the illustration that most closely matches your computer. The service door has been removed in these illustrations. Components (1) Description Memory modules 20 Chapter 2 Getting to know your computer - HP ProBook 4441s | HP Notebook User Guide - Linux - Page 31
Components (2) (3) Description Hard drive WLAN module (select models only) Identifying the bottom parts of the computer 21 - HP ProBook 4441s | HP Notebook User Guide - Linux - Page 32
may support one or both of the following types of Internet access: ● Wireless-For mobile Internet access, you can use a wireless connection. Refer to Connecting to an existing WLAN on page 24 or Setting up a new WLAN on page 25. ● Wired-You can access the Internet by connecting to a wired network - HP ProBook 4441s | HP Notebook User Guide - Linux - Page 33
Using the wireless button Use the wireless button to turn both the wireless network controller and the Bluetooth controller off or on simultaneously. They can be controlled individually through Control Center or Computer Setup. NOTE: Refer to Getting to know your computer on page 4 for information - HP ProBook 4441s | HP Notebook User Guide - Linux - Page 34
or a wireless access point. NOTE: When creating a wireless connection or allowing access to users in a network, you are prompted for the root password. Connecting to an existing WLAN 1. Be sure that the WLAN device is on. NOTE: Refer to Getting to know your computer on page 4 for information on - HP ProBook 4441s | HP Notebook User Guide - Linux - Page 35
basic Internet surfing. Wireless radio signals travel outside the network, so other WLAN devices can pick up unprotected signals. You can use the both software and hardware. Some networks use a combination of both types. ● Wireless encryption-Your computer supports three encryption protocols: ◦ Wi - HP ProBook 4441s | HP Notebook User Guide - Linux - Page 36
NOTE: HP recommends that you select WPA2, which is the most advanced of WPA) and Wi-Fi Protected Access II (WPA2) use security standards to encrypt and decrypt data transmitted over the network. Both WPA and WPA2 dynamically generate a new key for every packet, and they also generate a different set - HP ProBook 4441s | HP Notebook User Guide - Linux - Page 37
that allows you to set up a personal area network (PAN) of Bluetooth devices. For information on configuring and using Bluetooth devices, refer to the Bluetooth software Help. Connecting to a wired network Connecting to a local area network (LAN) (select models only) Connecting to a local area - HP ProBook 4441s | HP Notebook User Guide - Linux - Page 38
2. Plug the other end of the cable into a network wall jack (2) or a router (not illustrated). WARNING! To reduce the risk of electric shock, fire, or damage to the equipment, do not plug a modem or telephone cable into the RJ-45 (network) jack. 28 Chapter 3 Networking - HP ProBook 4441s | HP Notebook User Guide - Linux - Page 39
Hibernation and the information stored in memory is saved to the hard drive. fn+f2 Decreases the screen brightness level. fn+f3 Increases the screen brightness level. fn+f4 fn+f5 fn+f6 Switches the screen image among display devices connected to the system. For example, if a monitor is - HP ProBook 4441s | HP Notebook User Guide - Linux - Page 40
also supports an optional external numeric keypad or an optional external keyboard that includes The embedded numeric keypad will not function while an external keyboard or numeric keypad is connected to the computer. When the keyboard or numeric keypad is connected to the computer. 30 Chapter - HP ProBook 4441s | HP Notebook User Guide - Linux - Page 41
temporarily alternate the functions of keys on the embedded numeric keypad between their standard keyboard functions and their keypad functions: ● To use the navigational function of a an external keypad as you work: ▲ Press the num lk key on the external keypad, not on the computer. Using the - HP ProBook 4441s | HP Notebook User Guide - Linux - Page 42
on an external mouse. NOTE: In addition to the pointing devices included with your computer, you can use an external USB mouse (purchased separately) by on. The following table shows and describes the TouchPad display icons. TouchPad light Amber Icon Description Indicates that the TouchPad - HP ProBook 4441s | HP Notebook User Guide - Linux - Page 43
are not supported in all programs. To view information about each gesture: 1. Select Computer > More Applications. 2. In the left pane, click System, and then click the TouchPad icon in the right pane. 3. On the Device Settings tab, select the device in the window that is displayed, and then - HP ProBook 4441s | HP Notebook User Guide - Linux - Page 44
motion. NOTE: Scrolling speed is controlled by finger speed. Pinching/Zooming device preferences To customize settings for pointing devices, such as button configuration, click speed, and pointer options: 1. Select Computer > Control Center. 2. In the left pane, click Hardware, and then click Mouse - HP ProBook 4441s | HP Notebook User Guide - Linux - Page 45
a variety of audio features: ● Play music. ● Record sound. ● Download music from the Internet. ● Create multimedia presentations. ● Transmit sound and audio CDs using the installed optical drive (select models only) or on an optional external optical drive (purchased separately). Using the audio - HP ProBook 4441s | HP Notebook User Guide - Linux - Page 46
controlled through the operating system and some programs. NOTE: Refer to Getting to know your computer on page 4 and Keyboard and pointing devices by moving the Input volume slider to the desired setting. NOTE: For best results when recording, speak directly into the microphone and record sound in a - HP ProBook 4441s | HP Notebook User Guide - Linux - Page 47
port. Press fn+f4 to switch the image between the display devices connected to the computer. NOTE: Pressing fn+f4 allows you to switch between settings. You can toggle between a laptop panel, an external display in combination with the laptop panel, or one of the external monitors. You also can - HP ProBook 4441s | HP Notebook User Guide - Linux - Page 48
rotation if desired. If the display requires mirroring, click the Mirror Screens check box. NOTE: Click System > ATI Catalyst Control Center (as Superuser). 2. Enter your root password. 3. Select Display Manager from the right pane. 4. Click the Detect connected displays button. 5. Your display - HP ProBook 4441s | HP Notebook User Guide - Linux - Page 49
screen can be simultaneously displayed on the HDMI device. To connect a video or audio device to the HDMI port: 1. Connect one end of the HDMI cable to the HDMI port on the computer. 2. Connect the other end of the cable to the video device, and then refer to the device manufacturer's instructions - HP ProBook 4441s | HP Notebook User Guide - Linux - Page 50
down. The shutdown command closes all open programs, including the operating system, and then turns off the display and computer. Shut down the computer under any of the following conditions: ● When you need to replace the battery or access components inside the computer ● When you are connecting an - HP ProBook 4441s | HP Notebook User Guide - Linux - Page 51
is initiated, your work is saved to a hibernation file on the hard drive and the computer turns work returns to the screen where you stopped working. Initiating and exiting Hibernation The system is set at the factory to initiate Hibernation after a period of inactivity when running on battery - HP ProBook 4441s | HP Notebook User Guide - Linux - Page 52
, use only the battery provided with the computer, a replacement battery provided by HP, or a compatible battery purchased from HP. Computer battery life varies, depending on power management settings, programs running on the computer, display brightness, external devices connected to the computer - HP ProBook 4441s | HP Notebook User Guide - Linux - Page 53
To prevent loss of information, save your work and initiate Hibernation or shut down the computer through the operating system before removing the battery. 1. Slide the battery release latches (1) to release the battery. NOTE: You can slide the battery release latches simultaneously or one at a time - HP ProBook 4441s | HP Notebook User Guide - Linux - Page 54
for 2 weeks or more, or is much warmer or cooler than room temperature. To prolong battery life and optimize the accuracy of battery charge displays, follow these recommendations: ● If you are charging a new battery, charge it fully before turning on the computer. NOTE: If the computer is on while - HP ProBook 4441s | HP Notebook User Guide - Linux - Page 55
work and initiate Hibernation or shut down the computer before removing the battery. Managing low battery levels The information in this section describes the alerts and system responses set at the factory. Some low-battery alerts and system responses can be changed using Power Management in Control - HP ProBook 4441s | HP Notebook User Guide - Linux - Page 56
● AC adapter ● Optional docking or expansion device ● Optional power adapter purchased as an accessory from HP Resolving a low battery level when a charged battery is available 1. Turn off the computer or initiate Hibernation. 2. Replace the discharged battery with a charged battery. 3. Turn on the - HP ProBook 4441s | HP Notebook User Guide - Linux - Page 57
the Setup Instructions poster provided in the computer box. External AC power is supplied through an approved AC adapter or an optional docking or expansion device. WARNING! To reduce potential safety issues, use only the AC adapter provided with the computer, a replacement AC adapter provided by HP - HP ProBook 4441s | HP Notebook User Guide - Linux - Page 58
turn on. ● The display does not turn on. ● The power lights are off. To test the AC adapter: 1. Shut down the computer. 2. Remove the battery from the computer. 3. should be replaced. Contact technical support for information on obtaining a replacement AC power adapter. 48 Chapter 6 Power management - HP ProBook 4441s | HP Notebook User Guide - Linux - Page 59
shut it down through the operating system. ● Do not use excessive force when inserting a drive into a drive bay. ● Do not type on the keyboard or move the computer while an optical drive is writing to a disc. The write process is sensitive to vibration. ● When the battery is the only source of power - HP ProBook 4441s | HP Notebook User Guide - Linux - Page 60
the battery bay (1) and insert it into the service door (2) to lock the service door in place. Removing or replacing the service door CAUTION: To prevent information loss or an unresponsive system: Save your work and shut down the computer before adding or replacing a memory module or hard drive. If - HP ProBook 4441s | HP Notebook User Guide - Linux - Page 61
lift it (4) away from the computer. Replacing the service door Replace the service door after accessing the memory module slot, hard drive, regulatory label, and other components. To replace the service door: 1. Tilt the service door down to align the tabs on the service door with the latches on the - HP ProBook 4441s | HP Notebook User Guide - Linux - Page 62
about the security screw, refer to Using the optional security screw on page 50. 3. Replace the battery. (See Inserting or removing the battery on page 43). 4. Turn the computer right-side up, and then reconnect AC power and external devices to the computer. 5. Turn on the computer. 52 Chapter - HP ProBook 4441s | HP Notebook User Guide - Linux - Page 63
operating system. Removing the hard drive 1. Save your work and shut down the computer. 2. Disconnect AC power and external devices connected to the computer. 3. Remove the battery. (See Inserting or removing the battery on page 43.) 4. Remove the service door. (See Removing or replacing the service - HP ProBook 4441s | HP Notebook User Guide - Linux - Page 64
6. Pull the plastic tab on the hard drive (2) towards the side of the computer to disengage the hard drive from the connector, and then lift the hard drive out of the hard drive bay. NOTE: Refer to the illustration that most closely matches your computer. Some hard drives may be wrapped in a plastic - HP ProBook 4441s | HP Notebook User Guide - Linux - Page 65
Installing a hard drive 1. Insert the hard drive into the hard drive bay. 2. Pull the plastic tab on the hard drive (1) towards the center of the computer to engage the hard drive with the connector. Replacing or upgrading the hard drive 55 - HP ProBook 4441s | HP Notebook User Guide - Linux - Page 66
3. Replace the four hard drive screws (2). NOTE: Refer to the illustration that most closely matches your computer. 4. Replace the service door. (See Removing or replacing the service door on page 50.) 5. Replace the battery. (See Inserting or removing the battery on page 43.) 56 Chapter 7 Drives - HP ProBook 4441s | HP Notebook User Guide - Linux - Page 67
Audio & Video in the left pane. A list of all the devices installed in your computer, including your optical drive, is displayed. Inserting an optical disc Tray-load 1. Turn on the computer. 2. Press the eject button (1) on the drive bezel to release the disc tray. 3. Pull out the tray (2). 4. Hold - HP ProBook 4441s | HP Notebook User Guide - Linux - Page 68
to remove a disc, depending on whether the disc tray opens normally or not. When the disc tray opens normally 1. Press the release button (1) on the drive bezel to release the disc tray, and then gently pull out the tray (2) until it stops. 2. Remove the disc (3) from the tray by gently pressing - HP ProBook 4441s | HP Notebook User Guide - Linux - Page 69
to open 1. Insert the end of a paper clip (1) into the release access in the front bezel of the drive. 2. Press in gently on the paper clip until the tray is released, and then pull out the tray (2) the disc tray and place the disc in a protective case. Using optical drives (select models only) 59 - HP ProBook 4441s | HP Notebook User Guide - Linux - Page 70
and devices Using with other computers. To determine which digital card formats that are supported on your computer, refer to Getting to know your computer on page To reduce the risk of loss of data or an unresponsive system, use the following procedure to safely remove the digital card. Save - HP ProBook 4441s | HP Notebook User Guide - Linux - Page 71
as a USB keyboard, mouse, drive, printer, scanner, or hub. Devices can be connected to the system. Some USB devices may require additional support software, which is usually included with the device. For more information about device-specific software, refer to the manufacturer's instructions. The - HP ProBook 4441s | HP Notebook User Guide - Linux - Page 72
the Eject icon next to the name of the device in the Places list on the left pane of File Browser. 3. Remove the device. NOTE: You can remove a USB mouse or USB keyboard by unplugging the device from the computer. USB storage devices must be disconnected from the computer using the above procedure - HP ProBook 4441s | HP Notebook User Guide - Linux - Page 73
information. A USB drive can be added by connecting the drive to a USB port on the computer. USB drives include the following types: ● 1.44-megabyte diskette drive ● External hard drive (a hard drive with an adapter attached) ● External optical drive (CD and DVD) ● MultiBay device Using optional - HP ProBook 4441s | HP Notebook User Guide - Linux - Page 74
and external devices connected to the computer. 3. Turn the computer upside down on a flat surface. 4. Remove the battery. (See Inserting or removing the battery on page 43.) 5. Remove the service door. (See Removing or replacing the service door on page 50.) 6. If you are replacing a memory module - HP ProBook 4441s | HP Notebook User Guide - Linux - Page 75
module (2), and gently pull the module out of the memory module slot. To protect a memory module after removal, place it in an electrostatic-safe container. 7. Insert a new memory module: CAUTION: To prevent damage to the memory module, hold the memory module by the edges only. Do not touch the - HP ProBook 4441s | HP Notebook User Guide - Linux - Page 76
the service door. (See Removing or replacing the service door on page 50.) 9. Replace the battery. (See Inserting or removing the battery on page 43.) 10. Turn the computer right-side up, and then reconnect AC power and external devices to the computer. 11. Turn on the computer. 66 Chapter 9 Memory - HP ProBook 4441s | HP Notebook User Guide - Linux - Page 77
10 Security Protecting the computer NOTE: Security hard drive DriveLock password in Computer Setup* Unauthorized startup from an optical drive, diskette drive, or internal network adapter Unauthorized access to data Boot options feature in Computer Setup* ● Firewall software ● Operating system - HP ProBook 4441s | HP Notebook User Guide - Linux - Page 78
Setup and DriveLock passwords are set in Computer Setup and are managed by the system BIOS. ● If you forget both the DriveLock user password and the DriveLock master password set in Computer Setup, the hard drive the optional embedded security chip to support this security feature. *For details - HP ProBook 4441s | HP Notebook User Guide - Linux - Page 79
the "Press the ESC key for Startup Menu" message is displayed in the lower-left corner of the screen, press esc. When the Startup Menu is displayed, press f10. 2. Use a pointing device or the arrow keys to select Security > Setup BIOS Administrator password, and then press enter. ● To set a BIOS - HP ProBook 4441s | HP Notebook User Guide - Linux - Page 80
Menu" message is displayed at the bottom of the screen. 2. Press f10 to enter Computer Setup. 3. Use a pointing device or the arrow keys to select Security > DriveLock Password, and then press follow the on-screen instructions. 4. To confirm DriveLock protection on the drive you have selected - HP ProBook 4441s | HP Notebook User Guide - Linux - Page 81
password will be used to unlock the drive. NOTE: You must have a BIOS displayed at the bottom of the screen. 2. Press f10 to enter Computer Setup. 3. Use a pointing device or the arrow keys to select Security > Automatic DriveLock, and then follow the on-screen instructions. Using Computer Setup - HP ProBook 4441s | HP Notebook User Guide - Linux - Page 82
Network-based firewalls-Installed between your DSL or cable modem and your home network to protect all the computers on the network. When a firewall is installed on a system, all data sent to and from the system a network, or block authorized e-mail attachments. To temporarily resolve the problem, - HP ProBook 4441s | HP Notebook User Guide - Linux - Page 83
Installing an optional security cable NOTE: A security cable is designed to act as a deterrent, but it may not prevent the computer from being mishandled or stolen. NOTE: The security cable slot on your computer may look different from the illustration in this section. Refer to Getting to know your - HP ProBook 4441s | HP Notebook User Guide - Linux - Page 84
on-screen instructions to enroll your fingerprint. NOTE: After your fingerprint is enrolled, you can swipe your finger on the fingerprint reader when you turn on the computer, unlock the computer, or resume from the Suspend or Hibernation state, instead of typing a password. 74 Chapter 10 Security - HP ProBook 4441s | HP Notebook User Guide - Linux - Page 85
optical drive and restart the computer. 3. As the computer is restarting, press f9 to open the Computer Setup boot option menu. 4. Select the Notebook Upgrade Bay option. 5. Using the arrow keys, select Yes when prompted: Do you want to start the System-Restore? 6. Follow the on-screen instructions - HP ProBook 4441s | HP Notebook User Guide - Linux - Page 86
computer from the hard drive partition with the primary operating system or from the recovery partition, and you did not create a system recovery disc, you backup. You can manually back up your information to an optional external drive, a network drive, or discs. Back up your system at the following - HP ProBook 4441s | HP Notebook User Guide - Linux - Page 87
all the input and output devices on the system (such as disk drives, display, keyboard, mouse, and printer). Computer Setup includes settings for the types of peripherals installed, the startup sequence of the computer, and the amount of system and extended memory. NOTE: Use extreme care when - HP ProBook 4441s | HP Notebook User Guide - Linux - Page 88
the on-screen instructions. - or - Use the tab key and the arrow keys to select File > Save Changes and Exit, and then press enter. Your changes go into effect when the computer restarts. Restoring factory settings in Computer Setup NOTE: Restoring defaults will not change the hard drive mode. To - HP ProBook 4441s | HP Notebook User Guide - Linux - Page 89
displayed by starting Computer Setup. 1. Start Computer Setup. 2. Use a pointing device or the arrow keys to select File > System Information. 3. To exit Computer Setup without saving your changes, click the Exit icon in the lower-left corner of the screen, and then follow the on-screen instructions - HP ProBook 4441s | HP Notebook User Guide - Linux - Page 90
HP Customer Support to report the issue and purchase a replacement battery. ● System Tune-Up-This group of additional tests checks your computer to make sure that the main components are functioning correctly. System Tune-Up runs longer and more comprehensive tests on memory modules, hard drive - HP ProBook 4441s | HP Notebook User Guide - Linux - Page 91
of the boot devices and drive bay locations listed may not be supported on your computer. ● Notebook upgrade bay ● Optical drive ● Notebook hard drive ● USB diskette drive ● USB CD-ROM ● USB hard drive ● Notebook Ethernet ● Secure Digital (SD) Memory Card ● Docking station upgrade bay ● External - HP ProBook 4441s | HP Notebook User Guide - Linux - Page 92
message is displayed at the bottom of the screen. 2. Press f10 to enter Computer Setup. 3. To enable bootable media in USB drives or in drives inserted into an optional docking device (select models only), use a pointing device or the arrow keys to select System Configuration > Device Configurations - HP ProBook 4441s | HP Notebook User Guide - Linux - Page 93
to an optional docking device (select models only) that contains a hard drive, this hard drive will be shown in the boot order as a USB hard drive. If the system attempts to boot from this USB hard drive and fails, it will not attempt to boot to the hard drive in the hard drive bay. Instead, it - HP ProBook 4441s | HP Notebook User Guide - Linux - Page 94
on or restart the computer, and then press esc while the "Press the ESC key for Startup Menu" message is displayed at the bottom of the screen. 2. Press f10 to enter Computer Setup. 3. Use a pointing device or the arrow keys to select the Legacy Boot Order list, and then press enter. 4. To move the - HP ProBook 4441s | HP Notebook User Guide - Linux - Page 95
displayed at the bottom of the screen. 2. Press f10 to enter Computer Setup. 3. Use a pointing device or the arrow keys to select System displayed.) 5. To save your changes and exit Computer Setup, click the Save icon in the lower-left corner of the screen, and then follow the on-screen instructions - HP ProBook 4441s | HP Notebook User Guide - Linux - Page 96
, the image can be displayed on the computer screen or the external display, or on both devices simultaneously. When you press fn+f4 repeatedly, the image alternates among the computer display, one or more external displays, and simultaneous display on all devices. Software is functioning abnormally - HP ProBook 4441s | HP Notebook User Guide - Linux - Page 97
power and remove the battery. The computer is drivers are installed and updated. The wireless network connection is not working If a wireless network connection is not working as expected, follow these suggestions: ● To enable or disable a wireless or wired network device, right-click the Network - HP ProBook 4441s | HP Notebook User Guide - Linux - Page 98
CD or DVD 1. Insert the end of a paper clip (1) into the release access in the front bezel of the drive. 2. Press in gently on the paper clip until the disc tray is released, and then pull out the tray the disc tray and place the disc in a protective case. 88 Appendix A Troubleshooting and support - HP ProBook 4441s | HP Notebook User Guide - Linux - Page 99
The computer does not detect the optical drive If your operating system does not detect an installed device, the device driver software may be missing or corrupted. 1. Remove any discs from the optical drive. 2. Click Computer and then click System Monitor. 3. On the Hardware tab, identify the - HP ProBook 4441s | HP Notebook User Guide - Linux - Page 100
the source disc to your hard drive before trying to burn the contents to a new disc, and then burn from your hard drive. Contacting customer support If the information provided in this guide does not address your questions, you can contact HP Customer Support at: http://www.hp.com/go/contactHP NOTE - HP ProBook 4441s | HP Notebook User Guide - Linux - Page 101
information you may need when you troubleshoot system problems or travel internationally with the computer: support. The serial number label is affixed inside the battery bay. ● Regulatory label-Provides regulatory information about the computer. The regulatory label is affixed inside the service - HP ProBook 4441s | HP Notebook User Guide - Linux - Page 102
B Cleaning your computer Cleaning products Use the following products to safely clean and disinfect your computer: ● Dimethyl benzyl ammonium chloride 0.3 percent maximum concentration (For example: germicidal disposable wipes. These wipes come in a variety of brand names.) ● Alcohol-free glass - HP ProBook 4441s | HP Notebook User Guide - Linux - Page 103
devices. CAUTION: Do not spray cleaning agents or liquids directly on any computer or tablet PC surface. Liquids dripped on the surface can permanently damage internal components. Cleaning the display Gently wipe the display dust, lint, and particles from the keyboard, use a can of compressed air - HP ProBook 4441s | HP Notebook User Guide - Linux - Page 104
with an AC adapter or a DC power source supplied and approved by HP for use with this computer. The computer can operate on DC power V dc @ 4.74 A - 90 W NOTE: This product is designed for IT power systems in Norway with phase-to-phase voltage not exceeding 265 V rms. NOTE: The computer operating - HP ProBook 4441s | HP Notebook User Guide - Linux - Page 105
) Operating Nonoperating Maximum altitude (unpressurized) Operating Nonoperating Metric 5°C to 35°C -20°C to 60°C 10% to 90% 5% to 95% -15 m to 3,048 m -15 m to 12,192 m U.S. 41°F to 95°F -4°F to 140°F 10% to 90% 5% to 95% -50 ft to 10,000 ft -50 ft to 40,000 ft Operating environment 95 - HP ProBook 4441s | HP Notebook User Guide - Linux - Page 106
damage to the computer, damage to a drive, or loss of information, observe these precautions: ● If removal or installation instructions direct you to unplug the computer, electricity or assistance with component removal or installation, contact Customer Support. 96 Appendix D Electrostatic discharge - HP ProBook 4441s | HP Notebook User Guide - Linux - Page 107
63 handling 49 hard 63 optical 63 E electrostatic discharge 96 embedded numeric keypad keys, identifying 10 embedded numeric keypad, identifying 30 entering a BIOS administrator password 69 external devices 63 external drive 63 external monitor port 15, 16, 37 F fingerprint reader 74 identifying - HP ProBook 4441s | HP Notebook User Guide - Linux - Page 108
number 91 wireless certification 91 WLAN 91 latches battery release 19 service door release 19 legacy support, USB 77 lights AC adapter 13, 16 battery 13, 16 caps lock 5, 6 hard drive 12 power 5, 6 webcam 17, 18 wireless 5, 6 local area network (LAN) cable required 27 connecting cable 27 logical - HP ProBook 4441s | HP Notebook User Guide - Linux - Page 109
tray 88 optical drive detection 89 troubleshooting, external display 89 turning off the computer 40 U unresponsive system 40 USB 3.0 port 13 USB 3.0 ports 15, 16 USB cable, connecting 62 USB devices connecting 62 description 61 removing 62 USB hubs 61 USB legacy support 77 USB ports, identifying - HP ProBook 4441s | HP Notebook User Guide - Linux - Page 110
-
 1
1 -
 2
2 -
 3
3 -
 4
4 -
 5
5 -
 6
6 -
 7
7 -
8
-
9
-
10
-
11
-
12
-
13
-
14
-
15
-
16
-
17
-
18
-
19
-
20
-
21
-
22
-
23
-
24
-
25
-
26
-
27
-
28
-
29
-
30
-
31
-
32
-
33
-
34
-
35
-
36
-
37
-
38
-
39
-
40
-
41
-
42
-
43
-
44
-
45
-
46
-
47
-
48
-
49
-
50
-
51
-
52
-
53
-
54
-
55
-
56
-
57
-
58
-
59
-
60
-
61
-
62
-
63
-
64
-
65
-
66
-
67
-
68
-
69
-
70
-
71
-
72
-
73
-
74
-
75
-
76
-
77
-
78
-
79
-
80
-
81
-
82
-
83
-
84
-
85
-
86
-
87
-
88
-
89
-
90
-
91
-
92
-
93
-
94
-
95
-
96
-
97
-
98
-
99
-
100
-
101
-
102
-
103
-
104
-
105
-
106
-
107
-
108
-
109
-
110
 |
 |

HP Notebook
User Guide