HP ProLiant 2500 Compaq ProLiant 2500 Family of Servers Maintenance and Servic - Page 67
the Interim Data, Interim Data Recovery
 |
View all HP ProLiant 2500 manuals
Add to My Manuals
Save this manual to your list of manuals |
Page 67 highlights
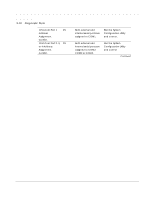
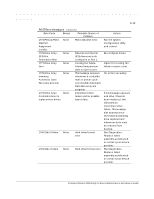
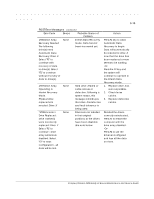
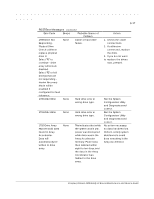
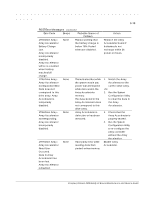
3-15 POST Error Messages Continued Error Code Beeps Probable Source of Problem 1786-Drive Array None Interim Data Recovery Recovery Needed mode. Data has not The following been recovered yet. drive(s) need Automatic Data Recovery: Drive X. Select "F1" to continue with recovery of data to drive(s). Select "F2" to continue without recovery of data to drive(s). 1787-Drive Array Operating in Interim Recovery Mode. Physical drive replacement needed: Drive X None *1788-Incorrect Drive Replaced: Drive X Drive(s) were incorrectly replaced: Drive Y Select "F1" to continue - drive array will remain disabled. Select "F2" to reset configuration - all data will be lost. None Hard drive X failed or cable is loose or defective. Following a system restart, this message reminds you that drive X is defective and fault tolerance is being used. Drives are not installed in their original positions, so the drives have been disabled. See note below. Action Press F1 key to allow Automatic Data Recovery to begin. Data will automatically be restored to drive X now that the drive has been replaced or now seems to be working. -OrPress the F2 key and the system will continue to operate in the Interim Data Recovery mode. 1. Replace drive X as soon as possible. 2. Check loose cables. 3. Replace defective cables. Reinstall the drives correctly as indicated. Press F1 to restart the computer with the drive array disabled. -OrPress F2 to use the drives as configured and lose all the data on them. Compaq ProLiant 2500 Family of Servers Maintenance and Service Guide
-
 1
1 -
2
-
3
-
4
-
5
-
6
-
7
-
8
-
9
-
10
-
11
-
12
-
13
-
14
-
15
-
16
-
17
-
18
-
19
-
20
-
21
-
22
-
23
-
24
-
25
-
26
-
27
-
28
-
29
-
30
-
31
-
32
-
33
-
34
-
35
-
36
-
37
-
38
-
39
-
40
-
41
-
42
-
43
-
44
-
45
-
46
-
47
-
48
-
49
-
50
-
51
-
52
-
53
-
54
-
55
-
56
-
57
-
58
-
59
-
60
-
61
-
 62
62 -
 63
63 -
 64
64 -
 65
65 -
 66
66 -
 67
67 -
 68
68 -
 69
69 -
 70
70 -
 71
71 -
 72
72 -
73
-
74
-
75
-
76
-
77
-
78
-
79
-
80
-
81
-
82
-
83
-
84
-
85
-
86
-
87
-
88
-
89
-
90
-
91
-
92
-
93
-
94
-
95
-
96
-
97
-
98
-
99
-
100
-
101
-
102
-
103
-
104
-
105
-
106
-
107
-
108
-
109
-
110
-
111
-
112
-
113
-
114
-
115
-
116
-
117
-
118
-
119
-
120
-
121
-
122
-
123
-
124
-
125
-
126
-
127
-
128
-
129
-
130
-
131
-
132
-
133
-
134
-
135
-
136
-
137
-
138
-
139
-
140
 |
 |