HP ProLiant 2500 Compaq ProLiant 2500 Family of Servers Maintenance and Servic - Page 74
Diagnostics DIAGS, Delete the power-on password, if set.
 |
View all HP ProLiant 2500 manuals
Add to My Manuals
Save this manual to your list of manuals |
Page 74 highlights
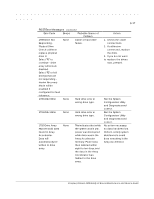
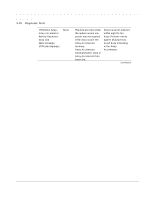
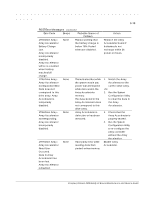
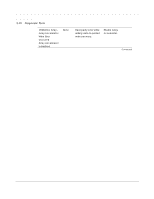
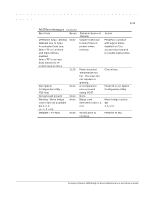
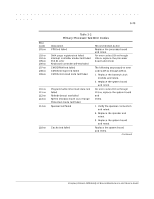
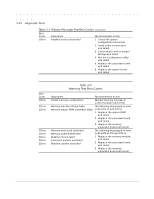
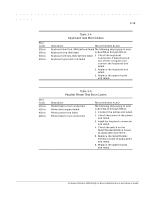
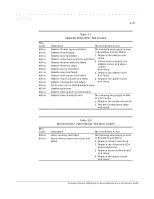
3-22 Diagnostic Tools Diagnostics (DIAGS) Diagnostic error codes occur if the system recognizes a problem while running the Diagnostics program. These error codes help identify possible defective subassemblies. Tables 3-2 through 3-17 list possible error codes, a description of the error condition, and the action required to resolve the error condition. In each case, the Recommended Action column lists the steps necessary to correct the problem. After completing each step, run the Diagnostics program to verify whether the error condition has been corrected. If the error code reappears, perform the next step, then run the Diagnostics program again. Follow this procedure until the Diagnostics program no longer detects an error condition. If you encounter an error condition, complete the following steps before starting problem isolation procedures: 1. Ensure that there is proper ventilation. The computer should have approximately 12 inches (30.5 cm) clearance at the front and back of the system unit. 2. Turn off the computer and peripheral devices. 3. Disconnect any peripheral devices other than the monitor and keyboard. Do not disconnect the printer if you want to test it or use it to log error messages. 4. Delete the power-on password, if set. You will know that the power-on password is set when a key icon appears on the screen when POST completes. If this occurs, you must enter the password to continue. To delete the password, type the current password and press the Enter key. 5. If you do not have access to the password, you must disable the power-on password by using the Password Disable switch on the system board. 6. When instructed by Diagnostics, install a loopback plug (Part Number 142054-001). 7. Run the latest version of Diagnostics.
-
 1
1 -
2
-
3
-
4
-
5
-
6
-
7
-
8
-
9
-
10
-
11
-
12
-
13
-
14
-
15
-
16
-
17
-
18
-
19
-
20
-
21
-
22
-
23
-
24
-
25
-
26
-
27
-
28
-
29
-
30
-
31
-
32
-
33
-
34
-
35
-
36
-
37
-
38
-
39
-
40
-
41
-
42
-
43
-
44
-
45
-
46
-
47
-
48
-
49
-
50
-
51
-
52
-
53
-
54
-
55
-
56
-
57
-
58
-
59
-
60
-
61
-
62
-
63
-
64
-
65
-
66
-
67
-
68
-
 69
69 -
 70
70 -
 71
71 -
 72
72 -
 73
73 -
 74
74 -
 75
75 -
 76
76 -
 77
77 -
 78
78 -
 79
79 -
80
-
81
-
82
-
83
-
84
-
85
-
86
-
87
-
88
-
89
-
90
-
91
-
92
-
93
-
94
-
95
-
96
-
97
-
98
-
99
-
100
-
101
-
102
-
103
-
104
-
105
-
106
-
107
-
108
-
109
-
110
-
111
-
112
-
113
-
114
-
115
-
116
-
117
-
118
-
119
-
120
-
121
-
122
-
123
-
124
-
125
-
126
-
127
-
128
-
129
-
130
-
131
-
132
-
133
-
134
-
135
-
136
-
137
-
138
-
139
-
140
 |
 |