HP Q8061A User Guide
HP Q8061A Manual
 |
View all HP Q8061A manuals
Add to My Manuals
Save this manual to your list of manuals |
HP Q8061A manual content summary:
- HP Q8061A | User Guide - Page 1
HP Officejet 6300 All-in-One series User Guide - HP Q8061A | User Guide - Page 2
HP Officejet 6300 All-in-One series User Guide - HP Q8061A | User Guide - Page 3
hazard 1. Read and understand all instructions in the Setup Guide. 2. Use only a grounded electrical Troubleshooting help. 9. No operator-serviceable parts inside. Refer servicing to qualified service personnel. 10. Use in a well-ventilated area. 11. Use only with the power adapter supplied by HP - HP Q8061A | User Guide - Page 4
Sources of information 13 Use the onscreen Help 14 3 Finish setting up the HP All-in-One 21 Set your preferences 21 Connection information 22 Connect to a network 29 Fax 88 Print photos using a proof sheet 88 10 Maintain the HP All-in-One 91 Clean the HP All-in-One 91 User Guide 1 - HP Q8061A | User Guide - Page 5
the Readme file 103 Setup troubleshooting 104 Operational troubleshooting 127 12 Order supplies 133 Order paper, or other media 133 Order print cartridges 133 Order accessories 134 Order other supplies 134 13 HP warranty and support 137 Warranty ...137 Get support and other information from - HP Q8061A | User Guide - Page 6
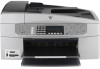
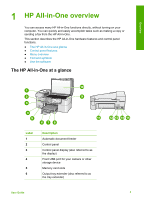
quickly and easily accomplish tasks such as making a copy or sending a fax from the HP All-in-One. This section describes the HP All-in-One hardware features and control panel functions. ● The HP All-in-One at a glance ● Control panel features ● Menu overview ● Text and symbols ● Use the software - HP Q8061A | User Guide - Page 7
off. The On button is lit when the HP All-in-One is on. The light blinks while performing a job. When the HP All-in-One is off, a minimal amount of power is still supplied to the device. To completely disconnect the power supply to the HP All-in-One, turn the device off, and then unplug the - HP Q8061A | User Guide - Page 8
Start Fax Color: Starts a color fax. One-touch speed dial buttons: Access the first Sheet: Prints a proof sheet when a memory card has been inserted in a memory card slot. A proof sheet proof sheet, then print those photos by scanning the proof sheet. HP Allin-One is sold. The button name is one of - HP Q8061A | User Guide - Page 9
service to use this feature. Auto Answer: When this button is lit, the HP All-in-One automatically answers incoming phone calls. When off, the HP All-in-One HP All-in-One display. ● Setup Menu ● Help Menu ● Fax Menu ● Copy Menu ● Scan To menu ● Photo Menu ● Proof Sheet when the HP bt450, Printer and - HP Q8061A | User Guide - Page 10
Error Messages 3. Print Cartridges 4. Load Originals and Load Paper 5. General Troubleshooting 6. Network Troubleshooting 7. Use Fax Features 8. Use Scan Features 9. Get Support 0. Product Overview on your computer, and might include one or more of the applications in the following example. User - HP Q8061A | User Guide - Page 11
a storage device in an index sheet format. ● Print selected photos easily from a memory card or a storage device. Text and symbols You can use the control panel keypad to enter text and symbols when you set up speed dial entries and the fax header information. 8 HP Officejet 6300 All-in-One series - HP Q8061A | User Guide - Page 12
the symbol and respond accordingly. For example, if you enter a dash in the fax number, the HP All-in-One will pause before dialing the remainder of the number. A pause is useful if you need to access an or phone number sequence, fax header information, and speed dial entries. User Guide 9 - HP Q8061A | User Guide - Page 13
your computer when you set up the HP All-in-One. For further information, see the Setup Guide that came with your device. Note Windows HP Photosmart Software entry point is the HP Solution Center. If you have a Mac, the HP Photosmart Mac Software entry point is the 10 HP Officejet 6300 All-in-One - HP Q8061A | User Guide - Page 14
the HP Photosmart Studio task bar, click Devices. The HP Device Manager window appears. 3. In the Select Device area, click the icon for the HP All-in-One. From here, you can scan, make copies, and perform maintenance procedures such as checking the ink levels for the print cartridges. User Guide - HP Q8061A | User Guide - Page 15
Chapter 1 Overview 12 HP Officejet 6300 All-in-One series - HP Q8061A | User Guide - Page 16
-in-One. If you have problems during setup, see Troubleshooting in the last section of the Setup Guide, or see Troubleshooting information in this User Guide. User Guide This User Guide contains information on how to use your HP All-inOne, including troubleshooting tips and step-by-step instructions - HP Q8061A | User Guide - Page 17
the HP All-in-One. Explore the onscreen Help that came with your device for information on all the features that the HP All-in-One supports. Note The onscreen Help also provides troubleshooting topics to assist you in resolving any issues you might encounter with the HP All-in-One. 14 HP Officejet - HP Q8061A | User Guide - Page 18
the specific information you need. To access the HP Photosmart Software Help on a Windows computer 1. In the HP Solution Center, click the tab for the HP All-in-One. 2. In the Device Support area, click Onscreen Guide or Troubleshooting. - If you click Onscreen Guide, a pop-up menu appears. You can - HP Q8061A | User Guide - Page 19
HP All-in-One, open the 6300 series Help book near the bottom of the list. - For troubleshooting information about the HP All-in-One, open the Troubleshooting and support book, and then open the 6300 series Troubleshooting the phrase "borderless print". 16 HP Officejet 6300 All-in-One series - HP Q8061A | User Guide - Page 20
of the Help window displays the Help topic you select from one of the tabs on the left. Help topics include descriptive text, step-bystep instructions, and illustrations, if applicable. ● Topics often include links button to return to the main page in the HP Photosmart Software Help. User Guide 17 - HP Q8061A | User Guide - Page 21
information you need. To access the HP Photosmart Mac Help ➔ On the Help menu in the HP Photosmart Studio, choose HP Photosmart Mac Help. The HP Photosmart Mac Help appears. The following diagram highlights features for finding your way around the Help. 18 HP Officejet 6300 All-in-One series - HP Q8061A | User Guide - Page 22
on tasks and features available from the control panel of the HP All-in-One, double-click the 6300 series Help section. ● For troubleshooting information about the HP All-in-One, double-click the 6300 series Troubleshooting section. ● The other sections listed on the Contents pane provide - HP Q8061A | User Guide - Page 23
topics that you have already viewed, or you can click the Home button to access other sections of the HP Photosmart Mac Help. Find more information 1 Back / Forward 2 Home 3 Search area The Help toolbar row in the results table. The selected topic appears. 20 HP Officejet 6300 All-in-One series - HP Q8061A | User Guide - Page 24
you have completed the steps in your Setup Guide, refer to this section to help you finish setting up the HP All-in-One. This section contains important setup-related information for time are transmitted, along with your name and fax number, as part of the fax header. Finish setup User Guide 21 - HP Q8061A | User Guide - Page 25
a USB cable ● Connect using Ethernet ● Connect using the HP bt450, Printer and PC Adapter with Bluetooth® Wireless Technology ● Set Bluetooth security for the HP All-in-One ● Use a Bluetooth® connection to print from your computer ● Use printer sharing Finish setup 22 HP Officejet 6300 All-in - HP Q8061A | User Guide - Page 26
five computers connected to an HP All-in-One using a hub or router. All features are supported, including Webscan. Follow the instructions in the Setup Guide, and then see Connect to a network in this User Guide for further instructions. HP bt450, Printer and PC Adapter with Bluetooth® Wireless - HP Q8061A | User Guide - Page 27
the instructions that came with your Bluetooth device. To change the device name of the HP All-in-One from the default a. Press Setup. b. Press 9, and then press 2. This selects Bluetooth and then selects Device Name. Note The HP All-in-One ships with the predefined name of "Officejet 6300 Series - HP Q8061A | User Guide - Page 28
the HP All-in-One to print. 3. Press OK to exit the Setup menu. Set Bluetooth security for the HP All-in-One You can enable printer security settings through the Bluetooth menu on the HP requires authentication. Passkey authentication is now set for the HP All-in-One. Finish setup User Guide 25 - HP Q8061A | User Guide - Page 29
an HP bt450, Printer and PC Adapter with Bluetooth® Wireless Technology to the HP All-in-One. Windows users You must have Windows XP and either the Microsoft Bluetooth® Protocol Stack or the Widcomm Bluetooth® Protocol Stack installed in order to connect the HP All-in-One. It 26 HP Officejet 6300 - HP Q8061A | User Guide - Page 30
6. Click Next, and then select A Bluetooth Printer. 7. Follow the onscreen instructions to finish the installation. 8. Print as you would to any printer. To install and print using the Widcomm stack 1. Make sure that you have installed the HP All-in-One software on the computer. Note The purpose of - HP Q8061A | User Guide - Page 31
print features. You must perform other functions from the host computer or from the control panel on the HP All-in-One. To enable printer sharing on a Windows computer ➔ Refer to the user guide that came with your computer or see the Windows onscreen Help. Finish setup 28 HP Officejet 6300 All-in - HP Q8061A | User Guide - Page 32
& Network area, click Sharing. c. From the Services tab, click Printer Sharing. 2. On the host computer, do the printer with other computers, and then select the printer to share. Connect to a network This section describes how to connect the HP All-in-One to a network and troubleshoot problems - HP Q8061A | User Guide - Page 33
to access HP Photosmart Share directly from the HP All-in-One. Connect the HP All-in-One to the network An Ethernet port is provided on the back of the HP All-in-One. To connect the HP All-in-One to the network 1. Remove the yellow plug from the back of the HP All-in-One. 30 HP Officejet 6300 All - HP Q8061A | User Guide - Page 34
. To install the Windows HP All-in-One software 1. Quit all applications running on your computer, and any firewall or virus detection software. 2. Insert the Windows CD that came with the HP All-in-One into the CD-ROM drive on your computer and follow the onscreen instructions. User Guide 31 - HP Q8061A | User Guide - Page 35
appears as the Setup program searches for the HP All-inOne on the network. 5. On the Printer Found screen, verify that the printer description is correct. If more than one printer is found on the network, the Printers Found screen appears. Select the HP All-in-One you want to connect. To see the - HP Q8061A | User Guide - Page 36
all the steps in the Setup Guide, use the instructions in this section to complete your fax setup. Please keep your Setup Guide for later use. In this section, you will learn how to set up the HP All-in-One so that faxing works successfully with equipment and services you might already have on the - HP Q8061A | User Guide - Page 37
the phone line by using the "2-EXT" port on the back of the HP All-in-One. Note If you have a parallel-type phone system, HP recommends you use the 2-wire phone cord supplied with the HP All-in-One to connect the HP All-in-One to the telephone wall jack. Countries/regions with a parallel-type phone - HP Q8061A | User Guide - Page 38
services (if any) share the same phone line with the HP All-in-One HP All-in-One DSL) service through up the HP All-in-One with DSL. services digital network (ISDN) system? If you answered Yes, proceed directly to Case C: Set up the HP All-in-One service one phone line. When you subscribe to this service - HP Q8061A | User Guide - Page 39
cord supplied in the box to connect one end to your telephone wall jack and the other end to the port labeled 1-LINE on the back of the HP All-in-One. If you use another phone cord, you might experience problems sending and receiving faxes. Finish setup 36 HP Officejet 6300 All-in-One series - HP Q8061A | User Guide - Page 40
calls received) (no voice calls received) DSL service (You answered Yes to question 1 only.) Case B: Set up the HP All- Case B: Set up the HP All- in-One with DSL in-One with DSL PBX or ISDN system (You answered voice/fax line with answering machine Not applicable. Finish setup User Guide 37 - HP Q8061A | User Guide - Page 41
dial- Case K: Shared voice/fax up modem, and voice mail line with computer dial-up service modem and voice mail (You answered Yes to questions 4, 5, and 7 only.) Recommended on this phone line, set up the HP All-in-One as described in this section. Finish setup 38 HP Officejet 6300 All-in - HP Q8061A | User Guide - Page 42
. Then it will begin emitting fax reception tones to the sending fax machine and receive the fax. Case B: Set up the HP All-in-One with DSL If you have a DSL service through your telephone company, use the instructions in this section to connect a DSL filter between the telephone wall jack and the - HP Q8061A | User Guide - Page 43
of the HP All-in-One. Note If you do not use the supplied cord to connect from the telephone wall jack to the HP All-in-One, you one port for telephone and Group 3 fax and another port for multiple purposes. If you have problems when connected to the fax/phone port of your ISDN 40 HP Officejet - HP Q8061A | User Guide - Page 44
to the "1-LINE" port To set up the HP All-in-One with a distinctive ring service 1. Using the phone cord supplied in the box with the HP All-in-One, connect one end to your telephone wall jack, then connect the other end to the port labeled 1LINE on the back of the HP All-in-One. User Guide 41 - HP Q8061A | User Guide - Page 45
mail) on this phone line, set up the HP All-in-One as described in this section. Finish setup Back view of the HP All-in-One 1 Telephone wall jack 2 Use the phone cord supplied in the box with the HP All-in-One to connect to the "1-LINE" port 3 Telephone (optional) 42 HP Officejet 6300 All-in - HP Q8061A | User Guide - Page 46
might plug your phone directly on top of the HP All-in-One cable which has a wall plug attached to it. If you pick up the phone before the HP All-in-One answers the call and hear fax tones from a sending fax machine, you will need to answer the fax call manually. User Guide 43 - HP Q8061A | User Guide - Page 47
, contact your telephone company to subscribe to a distinctive ring service, or to obtain a separate phone line for faxing. Finish setup Back view of the HP All-in-One 1 Telephone wall jack 2 Use the phone cord supplied in the box with the HP All-in-One to connect to the "1-LINE" port To set up - HP Q8061A | User Guide - Page 48
HP All-in-One, you will not be able to use both your modem and the HP All-in-One simultaneously. For example, you cannot use the HP All-in-One for 2-EXT on the back of the HP All-in-One. 3. Using the phone cord supplied in the box with the HP All-in-One, connect one end to your telephone wall jack, - HP Q8061A | User Guide - Page 49
an e-mail or access the Internet. There are two different ways to set up the HP All-in-One with your computer based on the number of phone ports on your computer. Before you If your computer has two phone ports, set up the HP All-in-One as described below. Finish setup 46 HP Officejet 6300 All-in - HP Q8061A | User Guide - Page 50
supplied in the box with the HP All-in-One to connect to the "1- LINE" port To set up the HP All-in-One 2-EXT on the back of the HP All-in- One. 2. Find the phone cord that connects HP All-in-One. Note If you do not use the supplied cord to connect from the telephone wall jack to the HP All-in-One - HP Q8061A | User Guide - Page 51
Back view of the HP All-in-One 1 Telephone wall jack 2 "IN" port on your answering machine 3 "OUT" port on your answering machine 4 Telephone (optional) 5 Answering machine 6 Use the phone cord supplied in the box with the HP All-in-One to connect to the "1-LINE" port 48 HP Officejet 6300 All-in - HP Q8061A | User Guide - Page 52
HP All-in-One. Note If you do not connect your answering machine directly to the HP Allin-One HP All-in-One. 3. Using the phone cord supplied in the box with the HP All-in-One, connect one telephone to the HP All-in-One. You can use on the HP All-in-One to the maximum number of rings supported by your - HP Q8061A | User Guide - Page 53
of the HP All-in-One 1 Telephone wall jack 2 "IN" phone port on your computer 3 "OUT" phone port on your computer 4 Telephone (optional) 5 Answering machine 6 Computer with modem 7 Use the phone cord supplied in the box with the HP All-in-One to connect to the "1- LINE" port 50 HP Officejet 6300 - HP Q8061A | User Guide - Page 54
HP All-in- One. HP All-in-One. HP All-in-One. Note If you do not connect your answering machine directly to the HP Allin-One HP All-in-One. 4. Using the phone cord supplied in the box with the HP All-in-One, connect one HP All-in-One HP All-in-One HP All-in-One to the maximum number of rings supported - HP Q8061A | User Guide - Page 55
HP All-in-One as described in this section. Note You cannot receive faxes automatically if you have a voice mail service at the same phone number you use for fax calls. You must receive faxes manually ports, set up the HP All-in-One as described below. Finish setup 52 HP Officejet 6300 All-in - HP Q8061A | User Guide - Page 56
supplied in the box with the HP All-in-One to connect to the "1- LINE" port To set up the HP All-in-One 2-EXT on the back of the HP All-in- One. 2. Find the phone cord that connects HP All-in-One. Note If you do not use the supplied cord to connect from the telephone wall jack to the HP All-in-One - HP Q8061A | User Guide - Page 57
not. ● Turn on the Auto Answer setting if you want the HP All-in-One to answer faxes automatically. The HP All-in-One will answer all incoming calls and faxes. ● Turn off the Auto Answer setting if you want to receive faxes manually. You must be available to respond in person to the incoming - HP Q8061A | User Guide - Page 58
. If the test fails, review the report for information on how to fix the problem and rerun the test. To test your fax setup from the control panel 1. Set up the HP All-in-One for faxing according to your particular home or office setup instructions. 2. Insert the print cartridges and load full-size - HP Q8061A | User Guide - Page 59
Run Fax Test. The HP All-in-One displays the status of the test on the display and prints a report. 5. Review the report. - If the test passes and you are still having problems faxing, check the fax the numeric keypad, and then press OK. Finish setup 56 HP Officejet 6300 All-in-One series - HP Q8061A | User Guide - Page 60
HP All-in-One, including letter or A4 paper, photo paper, transparencies, and envelopes. By default, the HP Allin-One setting, you can manually set the paper into the HP All-in-One. ● maximum of 35 sheets of plain paper. HP All-in-One detected the pages you loaded. Load originals and load paper User - HP Q8061A | User Guide - Page 61
then lift the lid on the HP All-in-One. 2. Load your original print side down in the right front corner of the glass. Tip For more help on loading an original, refer to the engraved guides along the edge of the glass. 58 HP Officejet 6300 All-in-One series Load originals and load paper - HP Q8061A | User Guide - Page 62
these papers. ● Extremely smooth, shiny, or coated papers not specifically designed for the HP All-in-One. They can jam the HP All-in-One or repel the ink. ● Multi-part forms, such as duplicate and triplicate forms. They can wrinkle or get stuck, and the ink is more likely to smear. User Guide 59 - HP Q8061A | User Guide - Page 63
of paper Load full-size paper You can load many types of letter, A4, or legal paper into the input tray of the HP Allin-One. To load full-size paper 1. Remove the output tray. Load originals and load paper 2. Slide the paper-width guide to its outermost position. 60 HP Officejet 6300 All-in - HP Q8061A | User Guide - Page 64
down. Slide the stack of paper forward until it stops. Caution Make sure that the HP All-in-One is idle and silent when you load paper into the input tray. If the HP All-in-One is servicing the print cartridges or otherwise engaged in a task, the paper stop inside the device might not be - HP Q8061A | User Guide - Page 65
paper. 4. Slide the paper-width guide inward against the photo paper until it stops. Do not overload the input tray; make sure the stack of paper fits within the input tray and is no higher than the top of the paper-width guide. 62 HP Officejet 6300 All-in-One series Load originals and load - HP Q8061A | User Guide - Page 66
input tray and is no higher than the top of the paper-width guide. Load originals and load paper 5. Replace the output tray. Load envelopes You can load one or more envelopes into the input tray of the HP All-in-One. Do not use shiny or embossed envelopes or envelopes that have clasps or - HP Q8061A | User Guide - Page 67
tray and is not higher than the top of the paper-width guide. 5. Replace the output tray. Load other types of paper The following papers require and then manually feed one sheet at a time into the input tray with the blue stripe facing up. 64 HP Officejet 6300 All-in-One series Load originals - HP Q8061A | User Guide - Page 68
more than two years old. Labels on older sheets might peel off when the paper is pulled through the HP All-in-One, causing subsequent paper jams. 2. Fan the ● Adjust the paper-width guide in the input tray to fit snugly against all paper. Make sure the paper-width guide does not bend the paper in - HP Q8061A | User Guide - Page 69
Chapter 4 Load originals and load paper 66 HP Officejet 6300 All-in-One series - HP Q8061A | User Guide - Page 70
you are printing from or by HP ColorSmart technology. You need to change the settings manually only when you change print in your software application, click Print. 3. Make sure the HP All-in-One is the selected printer. 4. If you need to change settings, click the button printing. User Guide 67 - HP Q8061A | User Guide - Page 71
All-in-One is the selected printer. 3. Make changes to the print settings, and click Print to print the job. Stop a print job Although you can stop a print job from either the HP All-in-One or the computer, HP recommends you stop it from the HP All-in-One for best results. 68 HP Officejet 6300 All - HP Q8061A | User Guide - Page 72
To stop a print job from the HP All-in-One ➔ Press Cancel on the control panel. If the print job does not stop, press Cancel again. It can take a few moments for printing to be cancelled. Print User Guide 69 - HP Q8061A | User Guide - Page 73
Chapter 5 Print 70 HP Officejet 6300 All-in-One series - HP Q8061A | User Guide - Page 74
sure you have set up the HP All-in-One properly for faxing. You might have already done this as part of the initial setup, by , you can send a blackand-white or color fax from the HP All-in-One. You can also send a fax manually from an attached phone. This allows you to speak with the User Guide 71 - HP Q8061A | User Guide - Page 75
HP Allin-One. Note Do not use the keypad on the control panel of the HP All-in-One when manually sending a fax. You must use the keypad on your phone to dial the recipient's number. 3. If the recipient answers the telephone, you can engage in a conversation before sending your fax. 72 HP Officejet - HP Q8061A | User Guide - Page 76
do not enter your calling card PIN fast enough, the HP All-in-One might start sending fax tones too soon and cause your PIN not to be recognized by the calling card service. If this is the case, you can create a your original is loaded on the glass, and then press 1 to select Yes. User Guide 73 - HP Q8061A | User Guide - Page 77
HP All-in-One. If you have disabled the Automatic Reduction feature, the HP All-inOne prints the fax on two pages. ● Receive a fax manually ● Set up backup fax reception ● Reprint received faxes from memory Note If you installed a photo print cartridge for printing photos, you might want to replace - HP Q8061A | User Guide - Page 78
to allow you to answer the incoming call before the HP All-in-One answers. Or, turn off the Auto Answer setting so that the HP All-in-One does not automatically answer incoming calls. 4. If you are currently on the phone with the sender, instruct the sender to press Start on their fax machine - HP Q8061A | User Guide - Page 79
of the faxes you have received, print the Fax Log. The Fax Log is not deleted when the HP All-in-One is turned off. To set backup fax reception from the control panel 1. Press Setup. 2. Press 5, 5. This selects Tools and then selects Reprint Faxes in Memory. 76 HP Officejet 6300 All-in-One series - HP Q8061A | User Guide - Page 80
HP All-in-One by the HP All-in-One. manually print system reports as you need them; these reports provide useful system information about the HP All-in-One. By default, the HP All-in-One is set to print a report only if there is a problem instructions HP All-in-One Press to select one of the following - HP Q8061A | User Guide - Page 81
stop faxing, press Cancel again. The HP All-in-One prints any pages it has already started printing and then cancels the remainder of the fax. This can take a few moments. To cancel a number you are dialing ➔ Press Cancel to cancel a number you are currently dialing. 78 HP Officejet 6300 All-in - HP Q8061A | User Guide - Page 82
copy of the color original. Change the copy settings You can customize the copy settings of the HP All-in-One to handle nearly any task. When you change copy settings, the changes are for the current copy following options are available: - Number of Copies - Copy Paper Size Copy User Guide 79 - HP Q8061A | User Guide - Page 83
engraved guides along the edge of the glass. Copy 3. Press Start Copy Black or Start Copy Color. The HP All-in-One makes a 10 x 15 cm (4 x 6 inch) borderless copy of your original photo. Note You can remove the tab from the copy of your photo once the ink has completely dried. 80 HP Officejet - HP Q8061A | User Guide - Page 84
Tip If the output is not borderless set the paper type to Premium Photo, and then try making the copy again. Stop copying To stop copying ➔ Press Cancel on the control panel. Copy User Guide 81 - HP Q8061A | User Guide - Page 85
Chapter 7 Copy 82 HP Officejet 6300 All-in-One series - HP Q8061A | User Guide - Page 86
the HP Photosmart Software (Windows) or HP Photosmart Mac Software (Mac) to scan images, including panorama images. Using this software, you can also edit, print, and even share your scanned images. For more information, see the onscreen Help that came with the HP All-in-One. Scan User Guide 83 - HP Q8061A | User Guide - Page 87
Scan To. - If the HP All-in-One is directly connected to a computer HP All-in-One is network-connected, the Scan Menu appears on the display. Continue to the next step. 3. If the HP All-in-One is connected to one connected to the HP All-in-One appears on the The HP All-in-One sends the scan to - HP Q8061A | User Guide - Page 88
-One supports the memory cards described below. Each type of memory card can only be inserted in the appropriate slot for that card. ● Top slot: xD-Picture Card ● Second slot from top: Memory Stick, Magic Gate Memory Stick, Memory Stick Duo (with user-supplied adapter), Memory Stick Pro User Guide - HP Q8061A | User Guide - Page 89
mode or does not support PictBridge, you can guide that came with your camera for detailed information on printing directly from the camera using PictBridge. To print photos from a camera with PictBridge 1. Connect your camera to the front USB port on the HP All-in-One using the USB cable supplied - HP Q8061A | User Guide - Page 90
port. The HP All-in-One treats cameras in ● Print photos on the HP All-in-One ● Send photos and videos panel on the HP All-in-One to select photos and the appropriate slot on the HP All-in-One, or connect a storage device From the control panel on the HP All-in-One, you can only access the following - HP Q8061A | User Guide - Page 91
Do one of sheet the HP All-in-One, HP All-in-One , you can only access the following types of image files: JPEG, TIFF, MPEG-1, AVI, and Quicktime. To print other types of files, transfer the files from your memory card or storage device to your computer and use the HP sheet A proof sheet proof sheet, - HP Q8061A | User Guide - Page 92
in detail in the procedures below. ● Print a proof sheet of the images on your memory card or storage device ● Complete the proof sheet ● Scan the proof sheet To print a proof sheet 1. Insert a memory card into the appropriate slot on the HP All-in-One, or connect a storage device to the front USB - HP Q8061A | User Guide - Page 93
or connected to the HP Allin-One when you scan that proof sheet. 3. In the Photo area, press Proof Sheet. The Proof Sheet Menu appears. 4. Press until Scan Proof Sheet appears, then press OK. The HP All-in-One scans the proof sheet and prints the selected photos. 90 HP Officejet 6300 All-in - HP Q8061A | User Guide - Page 94
clear. You will also need to replace, align, or clean your print cartridges from time to time. This section provides instructions for keeping the HP All-in-One in top working condition. Perform these prevent spotting. 4. Plug in the power cord, and then turn on the HP All-in-One. User Guide 91 - HP Q8061A | User Guide - Page 95
strip inside the automatic document feeder 1. Turn off the HP All-in-One, and unplug the power cord. Note Depending how long the HP All-in-One is unplugged, the date and time might be erased. You There is a glass strip under the automatic document feeder. 92 HP Officejet 6300 All-in-One series - HP Q8061A | User Guide - Page 96
the backing thoroughly with a damp cloth to remove any residual alcohol. Caution Be careful not to spill alcohol on the glass or exterior of the HP All-in-One, as this might damage the device. User Guide 93 - HP Q8061A | User Guide - Page 97
print cartridge in the left slot. If the color bars do not appear as black, cyan, magenta and yellow, you might need to clean the print cartridges. If the problem is not resolved by cleaning the print cartridges, you might need to replace the print cartridges. 94 HP Officejet 6300 All-in-One - HP Q8061A | User Guide - Page 98
Do not touch the copper-colored contacts or the ink nozzles. Note Handle the print cartridges carefully. Dropping or jarring cartridges can cause temporary printing problems, or even permanent damage. Replace the print cartridges Follow these instructions when the ink level is low. User Guide 95 - HP Q8061A | User Guide - Page 99
see the back cover of this guide. Tip You can also use these instructions to replace the black print cartridge with a photo print cartridge for printing high-quality color photos. To replace the print cartridges 1. Make sure the HP All-in-One is on. Caution If the HP All-in-One is off when you open - HP Q8061A | User Guide - Page 100
to install the photo print cartridge, store the black print cartridge in the print cartridge protector or an airtight plastic container. If you are removing the print cartridge because it is low or out of ink, recycle the print cartridge. The HP Inkjet Supplies Recycling Program is available in - HP Q8061A | User Guide - Page 101
. Recycle or discard the print cartridge alignment sheet. 12. Press OK. Align the print cartridges The HP All-in-One prompts you to align cartridges every time you install or replace a print cartridge. You can also align the print cartridges at any time from the control 98 HP Officejet 6300 All-in - HP Q8061A | User Guide - Page 102
Tools and then selects Clean Print Cartridge. The HP All-in-One prints a page that you can recycle or discard. If copy or print quality still seems poor after you clean the print cartridges, try cleaning the print cartridge contacts before replacing the affected print cartridge. User Guide 99 - HP Q8061A | User Guide - Page 103
the slot. Note Do not remove both print cartridges at the same time. Remove and clean each print cartridge one at a time. Do not leave a print cartridge outside the HP All-in-One for more than 30 minutes. 4. Inspect the print cartridge contacts for ink and debris buildup. 5. Dip a clean foam rubber - HP Q8061A | User Guide - Page 104
(do not clean) 8. Slide the print cartridge back into the slot. Push the print cartridge forward until it clicks into place. 9. Repeat if necessary for the other print cartridge. 10. Gently close the print cartridge door and plug the power cord into the back of the HP All-in-One. User Guide 101 - HP Q8061A | User Guide - Page 105
Chapter 10 Maintain the HP All-in-One 102 HP Officejet 6300 All-in-One series - HP Q8061A | User Guide - Page 106
of information are also available for helping you troubleshoot issues you might have with the HP All-in-One or HP Photosmart Software. See Find more information. If you are unable to solve the problem using the onscreen Help or HP websites, call HP Support using the number for your country/region - HP Q8061A | User Guide - Page 107
software, and fax setup. Hardware setup troubleshooting Use this section to solve any problems you might encounter while setting up the HP All-in-One hardware. The HP All-in-One will not turn on Cause The HP All-in-One is not properly connected to a power supply. Solution ● Make sure the power cord - HP Q8061A | User Guide - Page 108
You can connect to any USB port on the back of your computer. Troubleshooting For more information on installing the software and connecting the USB cable, see the Setup Guide that came with the HP All-in-One. I received a message on the display to attach the control panel faceplate Solution This - HP Q8061A | User Guide - Page 109
Chapter 11 Troubleshooting For more information on attaching the control panel faceplate, see the Setup Guide that came with the HP All-in-One. The display sensor or print cartridge. Contact HP Support. Go to www.hp.com/support. If prompted, choose your 106 HP Officejet 6300 All-in-One series - HP Q8061A | User Guide - Page 110
/region, and then click Contact HP for information on calling for technical support. The HP All-in-One does not print Solution If the HP All-in-One is network-connected, see the onscreen Help for information on troubleshooting network communication problems. If the HP All-in-One and computer are USB - HP Q8061A | User Guide - Page 111
cable works. If you experience problems, the USB cable might need to be replaced. Also verify that the cable Troubleshooting ● If you are connecting the HP All-in-One through a USB hub, make sure the hub is turned on. If the hub is on, try connecting directly to your computer. ● Check other printers - HP Q8061A | User Guide - Page 112
below for a possible solution. If you encounter a hardware problem during setup, see Hardware setup troubleshooting. During a normal installation of the HP All-in-One software, the following events occur: 1. The HP All-in-One software CD-ROM runs automatically. 2. The software installs. 3. Files - HP Q8061A | User Guide - Page 113
you can start it manually. To start the HP Photosmart Essential software, see the Setup Guide that came with the HP All-in-One HP All-inOne power cord, and then plug it in again. 2. Verify that the USB cable and power cord are plugged in. Troubleshooting 110 HP Officejet 6300 All-in-One - HP Q8061A | User Guide - Page 114
Troubleshooting a Windows computer, open the HP Solution Center and check for simply delete the HP All-in-One application files from your HP All-in-One. For more information, see Uninstall and reinstall the software. Some of the buttons are missing in the HP delete the HP All-in-One application files - HP Q8061A | User Guide - Page 115
the HP Solution Center, see Some of the buttons are missing in the HP Solution Center (Windows). Troubleshooting HP All-in-One. 3. On the Windows taskbar, click Start, Programs or All Programs, HP, OfficeJet All-In-One 6300 series, Uninstall. 4. Follow the onscreen instructions. 112 HP Officejet - HP Q8061A | User Guide - Page 116
after you have reinstalled the software. 6. Insert the HP All-in-One CD-ROM into your computer's CD-ROM drive and then start the Setup program. 7. Follow the onscreen instructions and the instructions provided in the Setup Guide that came with the HP All-in-One. Troubleshooting User Guide 113 - HP Q8061A | User Guide - Page 117
CD-ROM and then double-click HP All-in-One Installer. 7. Follow the onscreen instructions and the instructions provided in the Setup Guide that came with the HP All-in-One. Network setup troubleshooting This section addresses network setup problems you might encounter after establishing the network - HP Q8061A | User Guide - Page 118
on. Solution Turn on the HP All-in-One. Fax setup troubleshooting This section contains fax setup troubleshooting information for the HP All-in-One. If the HP All-in-One is not set up properly for faxing, you might experience problems when sending faxes, receiving faxes, or both. User Guide 115 - HP Q8061A | User Guide - Page 119
see which part of the test failed, and then review the appropriate problems faxing, contact HP Support. Go to www.hp.com/support. If prompted, choose your country/region, and then click Contact HP for information on calling for technical support. Troubleshooting 116 HP Officejet 6300 All-in-One - HP Q8061A | User Guide - Page 120
the back of the HP All-in-One. Note If you use the 2-EXT port to connect to the telephone wall jack, you will not be able to send or receive faxes. The 2-EXT port should only be used to connect other equipment, such as an answering machine or a telephone. Troubleshooting User Guide 117 - HP Q8061A | User Guide - Page 121
cord supplied in the box with the HP All-in- One to connect to the telephone wall jack. One end of the phone cord should be connected to the port labeled 1-LINE on the back of the HP All-in-One and the other end to your telephone wall jack, as shown below. Troubleshooting 118 HP Officejet 6300 - HP Q8061A | User Guide - Page 122
Troubleshooting 1 Telephone wall jack 2 Use the phone cord supplied in the box with the HP All-in-One to connect to the "1-LINE" port If the supplied phone cord is not long enough, you can extend it. For information, see The phone cord that came with my HP All-in-One is not long enough. ● Check the - HP Q8061A | User Guide - Page 123
out if other equipment is causing a problem, disconnect everything from the phone line, and then run the test again. - If the Fax Line Condition Test passes without the other equipment, then one or more pieces of the equipment is causing problems; try Troubleshooting 120 HP Officejet 6300 All-in - HP Q8061A | User Guide - Page 124
time, until you identify which piece of equipment is causing the problem. - If the Fax Line Condition Test fails without the other equipment, connect the HP All-in-One to a working phone line and continue reviewing the troubleshooting information in this section. ● If you are using a phone splitter - HP Q8061A | User Guide - Page 125
Troubleshooting 1 Telephone wall jack 2 Use the phone cord supplied in the box with the HP All-in-One to connect to the "1-LINE" port If the supplied onscreen Help. If the problem persists, contact your telephone company. ● If you are using a digital subscriber line (DSL) service, make sure that - HP Q8061A | User Guide - Page 126
, USA, Venezuela, and Vietnam. ● Make sure the telephone you use to initiate the fax call is connected directly to the HP All-in-One. To send a fax manually, the telephone must be connected directly to the port labeled 2-EXT on the HP All-in-One, as shown below. Troubleshooting User Guide 123 - HP Q8061A | User Guide - Page 127
Chapter 11 Troubleshooting 1 Telephone wall jack 2 Use the phone cord supplied in the box with the HP All-in-One to connect to the "1-LINE" port 3 Telephone ● If you are sending a fax manually from your phone that is connected directly to the HP All-in-One, you must use the keypad on the telephone - HP Q8061A | User Guide - Page 128
HP All-in-One one at a time and receiving a fax each time, until you identify which equipment is causing the problem. ● If you have a special ring pattern for your fax phone number (using a distinctive ring service through your telephone company), make sure that the Troubleshooting User Guide - HP Q8061A | User Guide - Page 129
monitor the line. If the HP All-in-One detects fax tones, the HP All-in-One will receive the fax. If the call is a voice call, the answering machine will record the incoming message. For more information, see Set the number of rings before answering. Troubleshooting 126 HP Officejet 6300 All-in - HP Q8061A | User Guide - Page 130
wall jack 2 Coupler 3 Use the phone cord supplied in the box with the HP All-in-One to connect to the "1-LINE" port Operational troubleshooting This section contains information on paper and print cartridge troubleshooting. The troubleshooting section in the onscreen Help contains more complete - HP Q8061A | User Guide - Page 131
-in-One, more paper jams are likely to occur. 3. Replace the rear door. Gently push the door forward until it snaps into place. 4. Press OK to continue the current job. To clear a paper jam in the automatic document feeder 1. Lift the cover of the automatic document feeder. 128 HP Officejet 6300 - HP Q8061A | User Guide - Page 132
of paper from the HP All-in-One, more paper jams are likely to occur. 3. If you do not see any paper jammed in the rollers, lift the automatic document feeder mechanism. Troubleshooting 4. Check for any paper might need to be cleaned. Pencil lead, wax, or ink can build up on the rollers and User - HP Q8061A | User Guide - Page 133
easy access to the rollers (2) and separator pad (3), as shown below. Troubleshooting 1 Automatic document feeder cover 2 Rollers 3 Separator pad 3. Lightly dampen a clean lint-free cloth with distilled water, then squeeze any excess liquid from the cloth. 130 HP Officejet 6300 All-in-One series - HP Q8061A | User Guide - Page 134
If you are experiencing problems with printing, you might have a problem with one of the print cartridges. To troubleshoot print cartridges 1. Remove the black print cartridge from the slot on the right. Do not touch the ink nozzles or the copper-colored contacts. Check for possible damage - HP Q8061A | User Guide - Page 135
Chapter 11 Troubleshooting 132 HP Officejet 6300 All-in-One series - HP Q8061A | User Guide - Page 136
tab, and then click Service this device. 2. Click the Estimated Ink Levels tab. 3. Click Print Cartridge Ordering Information. The print cartridge reorder numbers appear. 4. Click Order Online. HP sends detailed printer information, including model number, serial number, and ink supply levels, to an - HP Q8061A | User Guide - Page 137
), or Bluetoothenabled Windows or Mac computer. Order other supplies To order other supplies, such as HP All-in-One software, a copy of the User Guide, a Setup Guide, or other customer-replaceable parts, call the phone number for your country/region. Order supplies 134 HP Officejet 6300 All-in - HP Q8061A | User Guide - Page 138
+27 (0)11 8061030 1-800-HP-INVENT (1-800-474-6836) To order supplies in other countries/regions not listed in the table, go to www.hp.com/ support. If prompted, choose your country/region, and then click Contact HP for information on calling for technical support. Order supplies User Guide 135 - HP Q8061A | User Guide - Page 139
Chapter 12 Order supplies 136 HP Officejet 6300 All-in-One series - HP Q8061A | User Guide - Page 140
are unable to find the answer you need in the printed or onscreen documentation supplied with your product, you can contact one of the HP support services listed in the following section. Some support services are available only in the U.S. and Canada, while others are available in many countries - HP Q8061A | User Guide - Page 141
or modification; b. Software, media, parts, or supplies not provided or supported by HP; c. Operation outside the product's specifications; d. Unauthorized modification or misuse. 4. For HP printer products, the use of a non-HP ink cartridge or a refilled ink cartridge does not affect either the - HP Q8061A | User Guide - Page 142
calling for technical support. Check the HP website for updated information or troubleshooting tips for the HP All-in-One . 4. If you are still experiencing problems and need to speak with an HP Customer Support Representative, do the following: a. Have the specific name of the HP All-in-One, as it - HP Q8061A | User Guide - Page 143
ask your dealer or call HP at the phone number provided in this guide. As part of our constant efforts to improve our phone support service, we advise you to check our website on a regular basis for new information regarding service features and delivery. 140 HP Officejet 6300 All-in-One series - HP Q8061A | User Guide - Page 144
800-709-7751 Canada (Mississauga (905) 206-4663 Area) Canada 1-800-474-6836 Central America & www.hp.com/support The Caribbean Chile 800-360-999 86-10-68687980 800-810-3888 Colombia (Bogota) 571-606-9191 Colombia 0004-054-177 58-212-278-8666 0-800-474-68368 +84 88234530 User Guide 141 - HP Q8061A | User Guide - Page 145
and support Chapter 13 HP Quick Exchange Service (Japan) HP Quick Exchange Service 0570-000511 :03-3335 -9800 : 9:00 5:00 10:00 5:00 11 3 : For instructions on how to pack your device for exchange, see Pack the HP All-in-One. Call HP Korea customer support Prepare the HP All-in-One for - HP Q8061A | User Guide - Page 146
then manually slide the print carriage to the far right side to remove the print cartridges. 4. Place the print cartridges in an airtight plastic container so they will not dry out, and put them aside. Do not send them with the HP All-in-One unless the HP customer support call agent instructs you - HP Q8061A | User Guide - Page 147
Setup Guide that came with the HP All-in-One for instructions on how to attach your control panel faceplate. The replacement HP All-in-One might come with instructions for setting up your device. Pack the HP All-in-One Complete the following steps once you have removed the print cartridges, removed - HP Q8061A | User Guide - Page 148
HP warranty and support If you do not have the original packaging materials, please 3. Include the following items in the box: - A complete description of symptoms for service personnel (samples of print quality problems are helpful). - A copy of the sales slip or other proof of purchase to - HP Q8061A | User Guide - Page 149
Chapter 13 HP warranty and support 146 HP Officejet 6300 All-in-One series - HP Q8061A | User Guide - Page 150
and international regulatory information for the HP All-in-One are provided in this section. System * Output tray capacity is affected by the type of paper and the amount of ink you are using. HP recommends emptying the output tray frequently. Paper sizes Type Paper Envelopes Size Letter: 216 x - HP Q8061A | User Guide - Page 151
28 inches) Print specifications ● Resolution: 1200 x 1200 dpi black, 4800 optimized dpi color or 6 ink ● Method: drop-on-demand thermal inkjet ● Language: Lightweight Imaging Device Interface Language (LIDIL) ● document ● Duty cycle: 3000 pages per month 148 HP Officejet 6300 All-in-One series - HP Q8061A | User Guide - Page 152
● Maximum recommended memory card size: 1 GB (solid state only) Note Approaching any of the recommended maximums on a memory card might cause the performance of the HP All-in-One to be slower than expected. Supported memory card types ● CompactFlash ● Memory Stick User Guide 149 - HP Q8061A | User Guide - Page 153
and Secure Multimedia Card, are supported with the use of an adapter. See the instructions that came with your memory card longer and uses more memory. ● Manual fax send and receive. ● Automatic busy redial up to five state power consumption: 8.5 W 150 HP Officejet 6300 All-in-One series - HP Q8061A | User Guide - Page 154
. Go to www.hp.com/support. Memory specifications Memory specifications: up to 10 MB ROM, 64 MB DDR Environmental product stewardship program This section provides information on protecting the environment; ozone production; energy consumption; paper use; plastics; material safety data sheets; and - HP Q8061A | User Guide - Page 155
Plastic parts over 25 grams are marked according to international standards that enhance the ability to identify plastics for recycling purposes at the end of the product's life. Material safety data sheets Material safety data sheets (MSDS) can be obtained from the HP website at: www.hp.com - HP Q8061A | User Guide - Page 156
your number is called. Too many devices on one line might result in failure to ring in service. If you experience trouble with this equipment, please contact the manufacturer, or look elsewhere in this manual for a Class B digital device, pursuant to part 15 of the FCC Rules. Operation is subject - HP Q8061A | User Guide - Page 157
not installed and used in accordance with the instructions, might cause harmful interference to radio communications. : How to Identify and Resolve Radio-TV Interference Problems. This booklet is available from the U.S. Government Part 68 test results. 154 HP Officejet 6300 All-in-One series - HP Q8061A | User Guide - Page 158
Company if additional product support is necessary. This In the event of problems, you should contact your In the unlikely event of problems with loop disconnect dialing, it the German telephone network This HP fax product is designed to the HP Allin-One into the wall socket (TAE 6) code N. This HP fax - HP Q8061A | User Guide - Page 159
to users in Korea Declaration of conformity (European Economic Area) The Declaration of Conformity in this document complies with ISO/IEC Guide 22 and EN 45014. It identifies the product, manufacturer's name and address, and applicable specifications recognized in the European community. Technical - HP Q8061A | User Guide - Page 160
HP Officejet 6300 All-in-One series declaration of conformity Technical information User Guide 157 - HP Q8061A | User Guide - Page 161
Chapter 14 Technical information 158 HP Officejet 6300 All-in-One series - HP Q8061A | User Guide - Page 162
troubleshoot 121 confirmation reports, fax 77 connect wired network (Ethernet) 29 connection problems fax 121, 123, 124, 126 HP All-in-One does not turn on 104 connection types supported Bluetooth adapter 24 Ethernet 23 printer specifications 151 inkjet supplies recycling 152 User Guide 159 - HP Q8061A | User Guide - Page 163
setup test 116 header, fax 56 help button 5 menu 6 other resources 13 use onscreen Help 14 HP Solution Center, missing icons 111 I images scan 83 ink cartridges. See print cartridges install software, troubleshoot 103 ISDN line, set up with fax 40 J jams, paper 65, 109 K keypad 5, 8 L labels load 64 - HP Q8061A | User Guide - Page 164
found screen, Windows 32 printer sharing Mac 28 proof sheet button 5 menu 8 print 88 Q quality 5 R Readme file 103 receive fax auto answer mode 54 automatically 74 manually 74 rings to answer 54 troubleshoot problems 121 recycle HP All-in-One 152 print cartridges 152 redial/pause 4 reduce/enlarge - HP Q8061A | User Guide - Page 165
troubleshoot blocked carriage 109 fax 115 fax problems 123, 124, 126 hardware installation 104 incorrect measurements 106 jams, paper 65, 109 language, display 106 network setup 114 operational tasks 127 paper 127 print cartridges 106, 131 printer 23 V videos 162 HP Officejet 6300 All-in-One series - HP Q8061A | User Guide - Page 166
Index print selected 88 select 87 voice mail set up with fax 44, 52 volume, adjust 22 W wall jack test, fax 117 warranty 137 wireless router 30 X xD memory card 85 User Guide 163 - HP Q8061A | User Guide - Page 167
164 HP Officejet 6300 All-in-One series
-
 1
1 -
 2
2 -
 3
3 -
 4
4 -
 5
5 -
 6
6 -
 7
7 -
8
-
9
-
10
-
11
-
12
-
13
-
14
-
15
-
16
-
17
-
18
-
19
-
20
-
21
-
22
-
23
-
24
-
25
-
26
-
27
-
28
-
29
-
30
-
31
-
32
-
33
-
34
-
35
-
36
-
37
-
38
-
39
-
40
-
41
-
42
-
43
-
44
-
45
-
46
-
47
-
48
-
49
-
50
-
51
-
52
-
53
-
54
-
55
-
56
-
57
-
58
-
59
-
60
-
61
-
62
-
63
-
64
-
65
-
66
-
67
-
68
-
69
-
70
-
71
-
72
-
73
-
74
-
75
-
76
-
77
-
78
-
79
-
80
-
81
-
82
-
83
-
84
-
85
-
86
-
87
-
88
-
89
-
90
-
91
-
92
-
93
-
94
-
95
-
96
-
97
-
98
-
99
-
100
-
101
-
102
-
103
-
104
-
105
-
106
-
107
-
108
-
109
-
110
-
111
-
112
-
113
-
114
-
115
-
116
-
117
-
118
-
119
-
120
-
121
-
122
-
123
-
124
-
125
-
126
-
127
-
128
-
129
-
130
-
131
-
132
-
133
-
134
-
135
-
136
-
137
-
138
-
139
-
140
-
141
-
142
-
143
-
144
-
145
-
146
-
147
-
148
-
149
-
150
-
151
-
152
-
153
-
154
-
155
-
156
-
157
-
158
-
159
-
160
-
161
-
162
-
163
-
164
-
165
-
166
-
167
 |
 |
HP Officejet 6300 All-in-One series
User Guide