HP R12000XR HP UPS R7000 Installation Instructions
HP R12000XR Manual
 |
View all HP R12000XR manuals
Add to My Manuals
Save this manual to your list of manuals |
HP R12000XR manual content summary:
- HP R12000XR | HP UPS R7000 Installation Instructions - Page 1
HP UPS R7000 Installation Instructions Part Number 637910-001 - HP R12000XR | HP UPS R7000 Installation Instructions - Page 2
see the HP UPS R7000 User Guide on the HP website (http://www.hp.com/support/UPSR7000_Manuals). Precautions Save these instructions. This document contains important safety instructions that should be followed during installation, operation, and maintenance of the UPS and batteries. WARNING: A risk - HP R12000XR | HP UPS R7000 Installation Instructions - Page 3
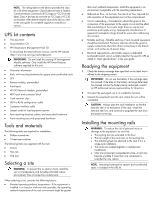
the class of the device, refer to the user guide for complete regulatory compliance notices. UPS kit contents • This document • Documentation CD • HP Infrastructure Management Pack CD To download the latest software version, see the HP website (http://www.hp.com/go/rackandpower). IMPORTANT: Do not - HP R12000XR | HP UPS R7000 Installation Instructions - Page 4
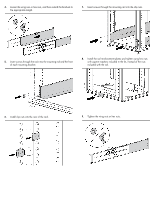
. 5. Insert screws through the rack into the mounting rail and the front of each mounting bracket. 8. Install the rail reinforcement plates and tighten using hex nuts with captive washers included in the kit, instead of the nuts included with the rail. 6. Install clip nuts into the rear of the - HP R12000XR | HP UPS R7000 Installation Instructions - Page 5
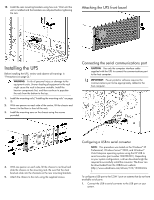
bottom to the top. 1. Install the mounting rails ("Installing the mounting rails" on page 3). 2. With one person on host computer. IMPORTANT: Power protector software requires the communications port to be appropriately systems using the HP USB to serial converter (part number 304098-001). Depending - HP R12000XR | HP UPS R7000 Installation Instructions - Page 6
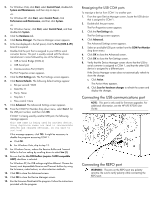
screen. 15. Run the firmware Flash batch file program. Follow the instructions provided with the program. Reassigning Select an available USB port number from the COM Port Number drop down menu. 6. Click for firmware upgrades. For additional information, see the HP UPS R7000 User Guide. Connecting - HP R12000XR | HP UPS R7000 Installation Instructions - Page 7
UPS Network Module also uses the network connection to communicate to the configured HP Power Protector - Clients and to facilitate SNMP-based monitoring. To configure the REPO port, see "REPO port" in the user guide. For information about verifying the REPO connection, see "Verifying the REPO port connection - HP R12000XR | HP UPS R7000 Installation Instructions - Page 8
" in the user guide for the maximum on using power management software. • Connect an batteries With the UPS in Standby mode, allow the batteries to charge before putting the UPS into service. IMPORTANT: Charge the batteries for at least 24 hours before supplying backup power to devices. The batteries - HP R12000XR | HP UPS R7000 Installation Instructions - Page 9
securing the power cords Configuring the UPS Network Module NOTE: For more information about the UPS Network Module, see the HP Infrastructure Management Pack software CD and documentation for complete details. Before configuring the UPS Network Module, be sure that the network cable is connected - HP R12000XR | HP UPS R7000 Installation Instructions - Page 10
modify the network settings. c. Follow the on-screen instructions to enter the static IP parameters. A Done message HP UPS Network Module web interface to configure the UPS Network Module. For more information, see the HP UPS Network Module User Guide on the HP website (http://www.hp.com/support - HP R12000XR | HP UPS R7000 Installation Instructions - Page 11
- HP R12000XR | HP UPS R7000 Installation Instructions - Page 12
and services. Nothing herein should be construed as constituting an additional warranty. HP shall not be liable for technical or editorial errors or omissions contained herein. Microsoft®, Windows®, and Windows Server® are U.S. registered trademarks of Microsoft Corporation. Part Number: 637910
-
 1
1 -
 2
2 -
 3
3 -
 4
4 -
 5
5 -
 6
6 -
 7
7 -
8
-
9
-
10
-
11
-
12
 |
 |

HP UPS R7000
Installation Instructions
Part Number 637910-001