HP StorageWorks Modular Smart Array 1000 HP StorageWorks Power Supply/Blower M
HP StorageWorks Modular Smart Array 1000 Manual
 |
View all HP StorageWorks Modular Smart Array 1000 manuals
Add to My Manuals
Save this manual to your list of manuals |
HP StorageWorks Modular Smart Array 1000 manual content summary:
- HP StorageWorks Modular Smart Array 1000 | HP StorageWorks Power Supply/Blower M - Page 1
Replacement Instructions hp StorageWorks Power Supply/Blower Modular Smart Array These instructions specifically pertain to the MSA1000 product family. The part may also be used in other HP products. Please refer to documentation for your specific product for detailed replacement instructions. If - HP StorageWorks Modular Smart Array 1000 | HP StorageWorks Power Supply/Blower M - Page 2
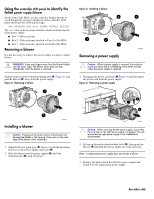
LCD panel to identify the failed power supply/blower On the front of the MSA, use the controller display buttons to scroll through the messages displayed on the controller LCD panel and locate the following message: 409 STORAGE BOX # POWER SUPPLY FAILED The value in the message identifies - HP StorageWorks Modular Smart Array 1000 | HP StorageWorks Power Supply/Blower M - Page 3
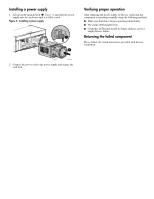
using the following methods: ■ Make sure the blower begins operating immediately. ■ The status LED should be On. ■ Controller LCD panel should no longer indicate a power supply/blower failure. Returning the failed component Please follow the return instructions provided with the new component.
-
 1
1 -
 2
2 -
 3
3
 |
 |

hp
StorageWorks
Power Supply/Blower
Modular Smart Array
Power Supply/Blower Replacement Instructions
First Edition (April 2004)
Part Number: EK–CSRPS–AA. A01
If the product in which this part is being replaced is still under HP
warranty, then the replacement part(s) referred to in these Replacement
Instructions is provided under the terms and conditions of the
Hewlett-Packard Company Limited Warranty for that product.
A copy of
this Limited Warranty may be viewed at:
If this is a trade sale part (product out of warranty), then the replacement
part(s) referred to in these Replacement Instructions is provided under HP's
express limited warranty statement, which may be viewed at:
2330100.doc
The replacement part takes on either the Limited Warranty Period of the
part being replaced or a ninety-day period that begins upon installation
of the replacement part, whichever is greater.
The information contained on these replacement instructions is subject to
change without notice.
The only warranty for this replacement product is
as noted above.
Nothing in these replacement instructions should be
construed as constituting an additional warranty.
The information
provided in these replacement instructions is provided "AS IS" and HP is
not liable for technical or editorial errors or omissions contained herein.
©
Copyright 2004 Hewlett-Packard Development Company, L.P.
Please note that this document is protected by federal copyright law and
that no part of this document may be copied, reproduced or translated
without the prior written consent of Hewlett-Packard Development
Company, L.P.
Replacement
Instructions
These instructions specifically pertain to the
MSA1000 product family. The part may also be
used in other HP products. Please refer to
documentation for your specific product for
detailed replacement instructions.
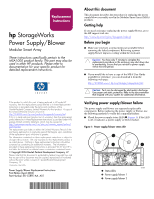
About this document
This document describes the procedure for replacing the power
supply/blower assembly used in the Modular Smart Array (MSA)
products.
Getting help
If you need assistance replacing the power supply/blower, go to
the HP support web site:
Before you begin
■
Make sure you have a replacement part available before
removing the failed component. Removing a power
supply/blower impacts cooling within the enclosure.
Caution:
You have only 7 minutes to complete the
replacement procedure or the enclosure may shut down due
to overheating. Ensure that you reinstall a power supply
within this time period.
■
If you would like to have a copy of the MSA User Guide
available for reference, you can download it from the
following web page:
Caution:
Parts can be damaged by electrostatic discharge.
Use proper anti-static protection. Refer to the documentation
that shipped with your system for additional information.
Verifying power supply/blower failure
The power supply and blower are separately replaceable
components. Before replacing the power supply or blower, use
the following methods to verify the component failure:
■
Check the power supply status LED (
1
,
Figure 1
). If the LED
is off, it indicates a power supply or blower failure.
Figure 1:
Power supply/blower status LED
1
Status LEDs
2
Power supply/blower 1
3
Power supply/blower 2
1
0006b
2
3
Printed in the USA.
EK- CSRPS- AA. A0 1