HP Superdome SX2000 Installation Guide, Sixth Edition - HP Integrity Superdome - Page 63
Power Cycling After Using JET, Offline Diagnostic Environment, Attaching the Rear Kick Plates - user guide
 |
View all HP Superdome SX2000 manuals
Add to My Manuals
Save this manual to your list of manuals |
Page 63 highlights
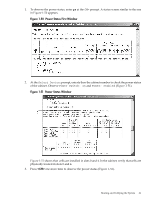
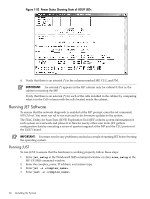
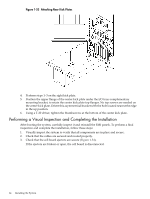
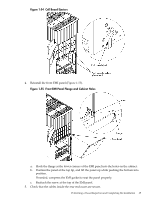
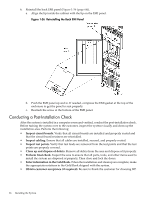
See the JET User Guide, JUST Users Guide, and other related documentation for testing located in: • \opt\scansw\docs\stt directory on the Windows® Support Management Station • /opt/scansw/docs/stt directory on the HP-UX Support Management Station IMPORTANT: After scan testing successfully completes, reset the complex by cycling the AC power. Power Cycling After Using JET After using JET, you must recycle the system power because the offline diagnostic can deallocate the CPUs. To remove the 48 V power, run the MP pe command. Then cycle the ac breakers on the rear of the cabinets. Leave power off for about 30 seconds to allow the backplane CSRs to reset. IMPORTANT: If the complex has any IOX cabinets with IDs 8 or 9, you must power cycle these cabinets in the proper sequence. Offline Diagnostic Environment Now that scan has been run, you can run all the appropriate diagnostics for this system. See the offline diagnostic environment (ODE) documentation for instructions. Attaching the Rear Kick Plates Kick plates protect cables from accidentally being disconnected or damaged and add an attractive cosmetic touch to the cabinet. You must attach three metal kick plates to the bottom rear of the cabinet. To install the kick plates, follow these steps: 1. Hold the left kick plate in position and attach a clip nut (0590-2318) on the cabinet column next to the hole in the flange at the top of the kick plate (Figure 1-53). 2. Using a screw (0515-0671) and a T-25 driver, attach the flange on the kick plate to the nut clip. 3. Using a T-10 driver and a screw, attach the bottom of the kick plate to the center hole in the leveling foot. Offline Diagnostic Environment 63
-
 1
1 -
2
-
3
-
4
-
5
-
6
-
7
-
8
-
9
-
10
-
11
-
12
-
13
-
14
-
15
-
16
-
17
-
18
-
19
-
20
-
21
-
22
-
23
-
24
-
25
-
26
-
27
-
28
-
29
-
30
-
31
-
32
-
33
-
34
-
35
-
36
-
37
-
38
-
39
-
40
-
41
-
42
-
43
-
44
-
45
-
46
-
47
-
48
-
49
-
50
-
51
-
52
-
53
-
54
-
55
-
56
-
57
-
 58
58 -
 59
59 -
 60
60 -
 61
61 -
 62
62 -
 63
63 -
 64
64 -
 65
65 -
 66
66 -
 67
67 -
 68
68
 |
 |