HP T1120 Hp Designjet T1120 SD-MFP - Quick Reference Guide: English
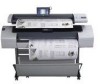
HP T1120 - DesignJet SD-MFP Color Inkjet Printer Manual
 |
UPC - 884420612513
View all HP T1120 manuals
Add to My Manuals
Save this manual to your list of manuals |
HP T1120 manual content summary:
- HP T1120 | Hp Designjet T1120 SD-MFP - Quick Reference Guide: English - Page 1
EN HP Designjet T1120 SD-MFP Quick reference guide - HP T1120 | Hp Designjet T1120 SD-MFP - Quick Reference Guide: English - Page 2
can find legal and warranty information on the CD. Further information is available at HP's support Web site (http://www.hp.com/go/knowledge_center/). Legal notices The information contained herein is subject to change without notice. The only warranties for HP Products and services are set forth in - HP T1120 | Hp Designjet T1120 SD-MFP - Quick Reference Guide: English - Page 3
1 Introduction Using this guide 1 Scanner software 2 Scanner ...3 Documentation and help 3 2 Basic operations Turn the scanner on or off 4 scanner 27 Calibrate the touch screen pointer 29 Replace the scanner glass plate 29 4 Troubleshooting The system reports an error 30 There is a paper jam - HP T1120 | Hp Designjet T1120 SD-MFP - Quick Reference Guide: English - Page 4
The system software is in the wrong language 36 Install new system software 37 Index ...39 iv ENWW - HP T1120 | Hp Designjet T1120 SD-MFP - Quick Reference Guide: English - Page 5
4. Troubleshooting: This chapter helps you to solve problems that may occur while scanning. 5. Index: In addition to the table of contents, there is an alphabetical index to help you to find topics quickly. Warnings and cautions Symbols are used in this manual to ensure the proper use of the printer - HP T1120 | Hp Designjet T1120 SD-MFP - Quick Reference Guide: English - Page 6
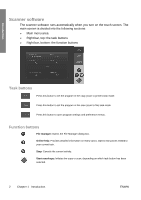
scanner software runs automatically when you turn on the touch screen. The main screen is divided into the following sections: ● Main menu area ● Right bar, top: the task buttons ● Right bar, bottom: the function buttons Task buttons Press this button to set the program in the copy (scan to printer - HP T1120 | Hp Designjet T1120 SD-MFP - Quick Reference Guide: English - Page 7
, Options). The online help window's Home button will take you to a table of contents with links to online help sections and topics. In many dialogs you will find a Context-sensitive Help button that will open instructions specifically related to the current dialog and its options. ENWW Scanner 3 - HP T1120 | Hp Designjet T1120 SD-MFP - Quick Reference Guide: English - Page 8
, screen and software) can be turned on or off by pressing the power button on the scanner operation panel. NOTE: The printer has a separate power on/off button. Normally this button is always left turned on and is not pressed in connection with restarting the system. Turn - HP T1120 | Hp Designjet T1120 SD-MFP - Quick Reference Guide: English - Page 9
the insertion slot until you feel it contact the rollers. 4. The scanner will automatically grab the original and move it into start-scan position. Eject document ● Press the Paper Backward button to eject the original back to the scanner feeding bed (towards you). ENWW Load and eject documents 5 - HP T1120 | Hp Designjet T1120 SD-MFP - Quick Reference Guide: English - Page 10
Basic operations ● Press the Paper Forward button if you wish to eject the original out the back of the scanner. Set a destination folder for scans The instructions below describe how to set up and select a destination folder in which you will save your scan-to-file output. Destinations are folders - HP T1120 | Hp Designjet T1120 SD-MFP - Quick Reference Guide: English - Page 11
Basic operations Select a destination Select a destination from the list of destinations previously created and saved on the system. If there are no destinations available, or you want to use a destination that is not on the list, you will have to add a new destination. Press the USB destination if - HP T1120 | Hp Designjet T1120 SD-MFP - Quick Reference Guide: English - Page 12
Copy a document Follow the steps below to make a copy (scan to print). 1. Insert and feed your document into the scanner, with the side to be scanned facing upwards. 2. Make sure the printer is turned on and the intended media is loaded. NOTE: To copy, you need a media profile for the loaded media. - HP T1120 | Hp Designjet T1120 SD-MFP - Quick Reference Guide: English - Page 13
● Set the output quality on page 17 Scan to a file Follow the steps below to scan to file. 1. Insert and feed your document into the scanner with the side to be scanned facing upwards. 2. Press the Scan button to access the scan to file settings and buttons. The Scan dialog is - HP T1120 | Hp Designjet T1120 SD-MFP - Quick Reference Guide: English - Page 14
to all documents. If you are scanning to file, your files will automatically be named with increasing numbers. 1. Lay your originals face up, near the scanner so they are easily reached. 2. Make your scan or copy settings. These will apply for all the originals in the batch. 3. Press the Batch Mode - HP T1120 | Hp Designjet T1120 SD-MFP - Quick Reference Guide: English - Page 15
dialog's Cancel button to abort batch mode. NOTE: Previewing is disabled when in Batch Mode. NOTE: To ensure fast loading in batch mode, the scanner will automatically eject each original after it is scanned. The setting in Options > Basic Options > Rewind after scan will determine the direction. If - HP T1120 | Hp Designjet T1120 SD-MFP - Quick Reference Guide: English - Page 16
as topographic maps, road maps or other document types that contain fill areas and a high level of detail. Applies image processing to sharpen details. 24-bit color scan. Gray Map Suitable for grayscale maps such as topographic maps, road maps or other document types that contain fill areas and - HP T1120 | Hp Designjet T1120 SD-MFP - Quick Reference Guide: English - Page 17
3. You can fine-tune the Original Type settings (optional): Press the More button to expand the Original Type dialog and make adjustment options relevant to the selected Original Type. Press OK when done. Basic operations 4. Press the Context-sensitive Help button for additional information about - HP T1120 | Hp Designjet T1120 SD-MFP - Quick Reference Guide: English - Page 18
check that the scanner has detected the size correctly. ● Use a standard or custom size: The dialog contains a list of standard sizes and custom sizes saved on the system. Scroll through the list and select the size you want to use. To create a new custom size, follow the instructions below. ● Set - HP T1120 | Hp Designjet T1120 SD-MFP - Quick Reference Guide: English - Page 19
Preview copies and scans You can preview your copies and scans before committing them to the printer or file system. With previewing you can: ● Make image adjustments that are relevant for your selected Original Type, such as brightness and sharpening, and view - HP T1120 | Hp Designjet T1120 SD-MFP - Quick Reference Guide: English - Page 20
cropping. The borders positions are defined by the current Original size setting. Image panning tools: Use these arrows to center the captured image in the window. Frame center handle (blue circle): Use this to drag the whole size frame and reposition it on the captured image. Press the Start Scan - HP T1120 | Hp Designjet T1120 SD-MFP - Quick Reference Guide: English - Page 21
Set the output quality Set quality when scanning to file You apply quality settings to scanning (scan to file) in terms of the scan resolution measured in dots per inch (dpi). 1. Press the Scan button and then the Quality button to open the Quality(dpi) dialog. 2. Use the scroll bar to view - HP T1120 | Hp Designjet T1120 SD-MFP - Quick Reference Guide: English - Page 22
tied to a quality setting (Fast, Normal, Best) are defined in the printer. 1. Press the Copy button and then the Quality button to open the print from the list. ● Fast is for making a quick draft with minimum use of ink. ● Normal is good for most copy jobs that require an average quality level. ● - HP T1120 | Hp Designjet T1120 SD-MFP - Quick Reference Guide: English - Page 23
profile Your system supports color matching between scanner, printer and media type paper) used with your printer. In most cases, color matching and media profiles are administrated by the system and their application is transparent for the user. Right after you load new media on your printer - HP T1120 | Hp Designjet T1120 SD-MFP - Quick Reference Guide: English - Page 24
Current media which is the media setting made on the printer's main menu. The Media profile value may show: ● for creating a new media profile and for updating an existing one. Follow the wizard's instructions on your screen. The process will require that you print a system-stored color patch sheet - HP T1120 | Hp Designjet T1120 SD-MFP - Quick Reference Guide: English - Page 25
Basic operations View, move, rename or delete scanned files Your system's scan destinations, on the LAN and on your USB drive, will contain image files that you will need to access and manage. Access to your image files takes place through the File Manager dialog. Open the File Manager Press the - HP T1120 | Hp Designjet T1120 SD-MFP - Quick Reference Guide: English - Page 26
between checking and un-checking the boxes to the left of all the file names in the current folder being viewed. ● View: Opens a separate window with a larger view of the image file currently displayed. System setup and options Basic options Basic operations Set date and time Local date and time - HP T1120 | Hp Designjet T1120 SD-MFP - Quick Reference Guide: English - Page 27
series to display. Rewind after scan 1. Press Options > Basic Options. 2. Select/tick the Rewind after scan option if you want the document to return to the paper feed area after it is scanned so that you can eject it backwards by pressing the paper backward button on the scanner's panel. Leave - HP T1120 | Hp Designjet T1120 SD-MFP - Quick Reference Guide: English - Page 28
. Otherwise, enter the IP address, subnet mask and default gateway manually. Save settings Press Options > Advanced Options > Save Settings. This new system software on page 37. ● Service is an option for service technicians and not within the scope of this guide. 24 Chapter 2 Basic operations ENWW - HP T1120 | Hp Designjet T1120 SD-MFP - Quick Reference Guide: English - Page 29
3 Maintenance Clean the glass plate and the scanning area 1. Turn off the scanner and disconnect the power cable. 2. Flip the touch screen backwards. Maintenance ENWW Clean the glass plate and the scanning area 25 - HP T1120 | Hp Designjet T1120 SD-MFP - Quick Reference Guide: English - Page 30
until you feel them unlock, and pull the lid backwards towards your body. Open the scanner lid all the way back. 4. Gently wipe the glass plate and the three rows of benzene or fluids that contain these chemicals. Do not spray liquids directly onto the scanner glass plate or anywhere else in the - HP T1120 | Hp Designjet T1120 SD-MFP - Quick Reference Guide: English - Page 31
the touch screen to its normal position. Maintenance Calibrate the scanner HP recommends that you calibrate the scanner if your output is not optimal and cleaning the scan area does not remedy the problem. Calibration will renew the scanner's original color and BW precision. ENWW Calibrate the - HP T1120 | Hp Designjet T1120 SD-MFP - Quick Reference Guide: English - Page 32
calibration when the power LED on the scanner's panel lights green. 3. Press Options > Calibrate Scanner to start the Scanner Calibration Wizard. 4. The Scanner Calibration Wizard guides you through the procedure for scanner calibration. To calibrate the scanner, you need the maintenance sheet that - HP T1120 | Hp Designjet T1120 SD-MFP - Quick Reference Guide: English - Page 33
the scanner glass plate Over time, the condition of the glass plate can deteriorate. Small scratches on the glass surface can reduce image quality. Call HP Support to order a new glass plate. Step-by-step instructions on replacing the glass plate are supplied with the new glass plate. Maintenance - HP T1120 | Hp Designjet T1120 SD-MFP - Quick Reference Guide: English - Page 34
solution, look for a description of the error and remedy in the troubleshooting sections of this quick guide, or in the system's online-help. Follow the instructions provided. Most scan-quality errors can be resolved by cleaning and calibrating the scanner. If your error is not resolved in that way - HP T1120 | Hp Designjet T1120 SD-MFP - Quick Reference Guide: English - Page 35
the Paper Forward key. If the document will not respond to these keys, remove it manually in the following way. 1. Flip the touch screen backwards. 2. Simultaneously slide the lid release buttons towards the scanner's center until you feel them unlock. Troubleshooting ENWW There is a paper jam 31 - HP T1120 | Hp Designjet T1120 SD-MFP - Quick Reference Guide: English - Page 36
. 5. Return the touch screen to its normal position. Troubleshooting When the scanner is ready again, reload the document to scan. Streaks scanner's very high precision and capture of fine detail means that even tiny dust particles can be noticed. Cleaning the document usually remedies the problem - HP T1120 | Hp Designjet T1120 SD-MFP - Quick Reference Guide: English - Page 37
on page 27. If the problem still persists, you may need to replace the glass: see Replace the scanner glass plate on page 29. Lines in the scanned image appear on the LAN. See System setup and options on page 22. Troubleshooting ENWW Lines in the scanned image appear too thin or discontinuous 33 - HP T1120 | Hp Designjet T1120 SD-MFP - Quick Reference Guide: English - Page 38
. Be sure to align the center of the original with the scanner's center arrow marking. A media profile cannot be generated If the Create Media Profile wizard stops running or reports errors: 1. Ensure that the scanner and the printer are both turned on and ready for normal operation. 2. Ensure that - HP T1120 | Hp Designjet T1120 SD-MFP - Quick Reference Guide: English - Page 39
. 3. Press Options > Printer Options > Update Profile and follow screen cannot be accessed, follow the instructions below to activate the Software Update scanner with the On/Off switch at the back of the scanner. c. Turn on the scanner with the On/Off switch at the back of the scanner. Troubleshooting - HP T1120 | Hp Designjet T1120 SD-MFP - Quick Reference Guide: English - Page 40
the software. Follow the instructions below: 1. Choose the system software. 7. Accept the HP license agreement. 8. Your system scanner operation button and confirm. The system will load and initialize all its parameters. Do not turn off the scanner Troubleshooting 36 Chapter 4 Troubleshooting - HP T1120 | Hp Designjet T1120 SD-MFP - Quick Reference Guide: English - Page 41
On a USB flash memory ● Through a network PC: Internet download, CD-ROM, other To install a new software version from a USB flash memory 1. Press Options > HP license agreement. 11. Your system will complete the installation process and start up your scan and copy program interface. Troubleshooting - HP T1120 | Hp Designjet T1120 SD-MFP - Quick Reference Guide: English - Page 42
from an inserted CDROM, or downloaded from the Internet. 3. Open network accessed Upgrading Scanner Software interface. 4. Use HP license agreement. 14. Your system will complete the installation process and start up your scan and copy program interface. Troubleshooting 38 Chapter 4 Troubleshooting - HP T1120 | Hp Designjet T1120 SD-MFP - Quick Reference Guide: English - Page 43
6 document batch copy 10 batch scan 10 copy 8 eject 5 jammed in scanner 30 load 5 scan 9 size 13 E eject document 5 error messages 30 F factory default settings 24 file manager 21 function buttons 2 ENWW G glass plate clean 25 replace 29 H help 3 I image adjustments 15 image cropped 34 inactivity - HP T1120 | Hp Designjet T1120 SD-MFP - Quick Reference Guide: English - Page 44
quality 17 Q quality, print 17 R recover software 35 restart 4 rewind after scan 23 S save settings 24 scan area 13 scan document 9 scanner components 3 scanning area, clean 25 size image 13 paper 23 software 2 software recovery 35 software update 35, 37 streaks in scanned image 32 system setup 22 - HP T1120 | Hp Designjet T1120 SD-MFP - Quick Reference Guide: English - Page 45
- HP T1120 | Hp Designjet T1120 SD-MFP - Quick Reference Guide: English - Page 46
- HP T1120 | Hp Designjet T1120 SD-MFP - Quick Reference Guide: English - Page 47
- HP T1120 | Hp Designjet T1120 SD-MFP - Quick Reference Guide: English - Page 48
© 2009 Hewlett-Packard Company Inkjet Commercial Division Avenida Graells 501 · 08174 Sant Cugat del Vallès Barcelona · Spain All rights reserved Printed in Germany · Imprimé en Allemagne · Stampato in Germania
-
 1
1 -
 2
2 -
 3
3 -
 4
4 -
 5
5 -
 6
6 -
 7
7 -
8
-
9
-
10
-
11
-
12
-
13
-
14
-
15
-
16
-
17
-
18
-
19
-
20
-
21
-
22
-
23
-
24
-
25
-
26
-
27
-
28
-
29
-
30
-
31
-
32
-
33
-
34
-
35
-
36
-
37
-
38
-
39
-
40
-
41
-
42
-
43
-
44
-
45
-
46
-
47
-
48
 |
 |

HP Designjet T1120 SD-MFP
Quick reference guide
EN