HP TouchSmart 310-1000 Upgrading and Servicing
HP TouchSmart 310-1000 - Desktop PC Manual
 |
View all HP TouchSmart 310-1000 manuals
Add to My Manuals
Save this manual to your list of manuals |
HP TouchSmart 310-1000 manual content summary:
- HP TouchSmart 310-1000 | Upgrading and Servicing - Page 1
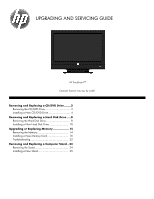
AND SERVICING GUIDE HP TouchSmart310 Computer features may vary by model. Removing and Replacing a CD/DVD Drive ........2 Removing the CD/DVD Drive 2 Installing a New CD/DVD Drive 4 Removing and Replacing a Hard Disk Drive .....8 Removing the Hard Disk Drive 8 Installing a New Hard Disk Drive 10 - HP TouchSmart 310-1000 | Upgrading and Servicing - Page 2
ii 628371-001 - - HP TouchSmart 310-1000 | Upgrading and Servicing - Page 3
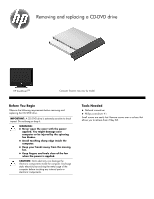
Removing and replacing a CD-DVD drive HP TouchSmart310 Computer features may vary by model. Before You Begin Observe the following requirements before removing and replacing the CD/DVD drive. IMPORTANT: A CD/DVD drive is extremely sensitive to shock impact. Do not bang or drop it. WARNING: - HP TouchSmart 310-1000 | Upgrading and Servicing - Page 4
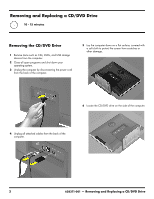
the computer. 5 Lay the computer down on a flat surface, covered with a soft cloth to protect the screen from scratches or other damage. 6 Locate the CD/DVD drive on the side of the computer. 4 Unplug all attached cables from the back of the computer. 2 628371-001 - Removing and Replacing a CD - HP TouchSmart 310-1000 | Upgrading and Servicing - Page 5
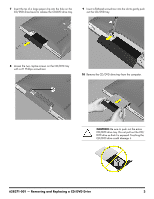
the two captive screws on the CD/DVD tray with a #1 Phillips screwdriver. 10 Remove the CD/DVD drive tray from the computer. CAUTION: Be sure to push out the entire CD/DVD drive tray. Do not pull out the CD/ DVD drive so that it is exposed. Touching the CD/DVD drive could damage it. 628371-001 - HP TouchSmart 310-1000 | Upgrading and Servicing - Page 6
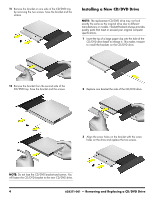
by removing the two screws. Save the bracket and the screws. Installing a New CD/DVD Drive NOTE: The replacement CD/DVD drive may not look exactly the same as the original drive due to different manufacturers or models. Hewlett-Packard always provides quality parts that meet or exceed your original - HP TouchSmart 310-1000 | Upgrading and Servicing - Page 7
further. 5 Align the screw holes on the bracket with the screw holes on the drive and replace the two screws. 8 Tighten the two captive screws. 6 Slide the CD/DVD drive assembly partially into the computer. 9 Push the CD/DVD drive all the way in until the bezel on the tray is flush with the side - HP TouchSmart 310-1000 | Upgrading and Servicing - Page 8
10 Place the computer in an upright position. 12 Plug the power cord into the back of the computer. 11 Reconnect all the cables. 13 Press the power button to turn on the computer. 6 628371-001 - Removing and Replacing a CD/DVD Drive - HP TouchSmart 310-1000 | Upgrading and Servicing - Page 9
Removing and replacing a Hard Disk Drive HP TouchSmart310 Computer features may vary by model. Before You Begin Observe the following requirements before removing and replacing the hard disk drive. IMPORTANT: A hard disk drive is extremely sensitive to shock impact. Do not bang or drop it. Do not - HP TouchSmart 310-1000 | Upgrading and Servicing - Page 10
15-20 MINUTES Removing the Hard Disk Drive 1 Remove items such as CDs, DVDs, and USB storage devices from the computer. 2 Close all open programs and shut down your operating system. 3 the computer that attaches the stand cover to the stand. 8 628371-001 - Removing and Replacing a Hard Disk Drive - HP TouchSmart 310-1000 | Upgrading and Servicing - Page 11
screw is not removed. 11 Use a #1 Phillips screwdriver to remove the four screws from bottom of the hard disk drive cage. Save the screws. 9 Use the metal handle on the hard-disk drive cage to slide the cage in the direction indicated by the arrow on the cage. 12 Slide the hard - HP TouchSmart 310-1000 | Upgrading and Servicing - Page 12
manufacturers or models. Hewlett-Packard always provides quality parts that meet or exceed your original computer specifications. 1 Insert the new hard disk drive into the cage. Make sure that the hard disk drive is inserted with the label facing up. NOTE: The four screws that secure the hard disk - HP TouchSmart 310-1000 | Upgrading and Servicing - Page 13
computer. 8 Place the computer in an upright position. 11 Press the power button to turn on the computer. 628371-001 - Removing and Replacing a Hard Disk Drive 11 - HP TouchSmart 310-1000 | Upgrading and Servicing - Page 14
hard disk drive was shipped without an operating system installed, you will need to reinstall it using the system recovery discs. To install the operating system, refer to the instructions included with your system recovery discs, or available from the HP support site (www.hp.com/support). After the - HP TouchSmart 310-1000 | Upgrading and Servicing - Page 15
Upgrading or replacing Memory HP TouchSmart310 Computer features may vary by model. Before You Begin Observe the following requirements before removing and replacing memory. IMPORTANT: A memory card is extremely sensitive - HP TouchSmart 310-1000 | Upgrading and Servicing - Page 16
Upgrading or Replacing Memory 10 - 15 minutes Removing the Memory 1 Remove items such as CDs, DVDs, and USB storage devices from the computer. 2 Close all open programs and shut down your operating system. 3 Unplug the computer by disconnecting the power cord - HP TouchSmart 310-1000 | Upgrading and Servicing - Page 17
of the computer, using a flathead or Torx screwdriver. 10 Insert a large paper clip into the hole on the CD/DVD drive cover to release the CD/DVD drive tray. 11 Pull the CD/DVD drive tray out slightly and use a #1 Phillips screwdriver to loosen the two captive screws. 628371-001 - Upgrading or - HP TouchSmart 310-1000 | Upgrading and Servicing - Page 18
the computer. 15 Insert your fingers into the CD/DVD Drive slot to lift the back cover off the computer. CAUTION: Be sure to push out the entire CD/DVD drive tray. Do not pull out the CD/ DVD drive so that it is exposed. Touching the CD/DVD drive could damage it. 16 Remove the back cover - HP TouchSmart 310-1000 | Upgrading and Servicing - Page 19
17 Locate the memory cards on the back of the computer. 19 Holding the memory card by its edges, remove it from the compartment. IMPORTANT: If you are removing both cards, you must remove the upper one before removing the lower one. 18 Use your fingers to press outwards on the retaining clips at - HP TouchSmart 310-1000 | Upgrading and Servicing - Page 20
Installing a New Memory Card NOTE: The replacement memory card may not look exactly the same as the original drive due to different manufacturers or models. Hewlett-Packard always provides quality parts that meet or exceed your original computer specifications. IMPORTANT: If you are replacing - HP TouchSmart 310-1000 | Upgrading and Servicing - Page 21
6 Replace the back cover, snapping it into place. Press all the way around the computer, making sure there are no gaps between the back cover and the computer. 8 When replacing the stand, insert the two small hooks on the stand into the slots at the back of the computer. 7 Replace the four screws - HP TouchSmart 310-1000 | Upgrading and Servicing - Page 22
cover to the back of the computer. 11 Use a flathead or Torx screwdriver to replace the four screws on the stand. 14 Slide the CD/DVD drive assembly partially into the computer. 12 Replace the stand cover on the stand at the back of the computer. 15 Insert a flathead screwdriver into the - HP TouchSmart 310-1000 | Upgrading and Servicing - Page 23
16 Tighten the two captive screws. 19 Reconnect all the cables. 17 Push the CD/DVD drive all the way in until the bezel on the tray is flush with the side of the computer. 20 Plug in the power cord. 18 - HP TouchSmart 310-1000 | Upgrading and Servicing - Page 24
Troubleshooting If the computer displays a memory error after you have turned it back on, turn the computer off and unplug the power cord, then open up - HP TouchSmart 310-1000 | Upgrading and Servicing - Page 25
Removing and replacing a Computer Stand HP TouchSmart310 Computer features may vary by model. Before You Begin Observe the following requirements before removing and replacing the stand. WARNING: Never open the cover - HP TouchSmart 310-1000 | Upgrading and Servicing - Page 26
Removing and Replacing a Computer Stand 5-10 minutes 1 Removing the Stand 1 Remove items such as CDs, DVDs, and USB storage devices from the computer. 2 Close all open programs and shut down your operating system. 3 Unplug the computer by disconnecting the power cord - HP TouchSmart 310-1000 | Upgrading and Servicing - Page 27
7 Lift the edges of the stand cover to remove it from the stand. Installing a New Stand 1 When replacing the stand, insert the two small hooks on the stand into the slots at the back of the computer. 8 Use a flathead or Torx screwdriver to remove the four screws that attach the stand to the back - HP TouchSmart 310-1000 | Upgrading and Servicing - Page 28
3 Replace the stand. 6 Tighten the screw that secures the stand cover to the back of the computer. 4 Use a flathead or Torx screwdriver to replace the four screws on the stand. 7 Place the computer in an upright position. 5 Replace the stand cover on the stand at the back of the computer. 8 - HP TouchSmart 310-1000 | Upgrading and Servicing - Page 29
9 Plug in the power cord. 10 Press the power button to turn on the computer. Copyright © 2010 Hewlett-Packard Development Company, L.P. The information contained herein is subject to change without notice. Part Number: 628371-001
-
 1
1 -
 2
2 -
 3
3 -
 4
4 -
 5
5 -
 6
6 -
 7
7 -
8
-
9
-
10
-
11
-
12
-
13
-
14
-
15
-
16
-
17
-
18
-
19
-
20
-
21
-
22
-
23
-
24
-
25
-
26
-
27
-
28
-
29
 |
 |
Removing and Replacing a CD/DVD Drive
........
2
Removing the CD/DVD Drive
................................
2
Installing a New CD/DVD Drive
............................
4
Removing and Replacing a Hard Disk Drive
.....
8
Removing the Hard Disk Drive
...............................
8
Installing a New Hard Disk Drive
........................
10
Upgrading or Replacing Memory
...................
14
Removing the Memory
.......................................
14
Installing a New Memory Card
...........................
18
Troubleshooting
.................................................
22
Removing and Replacing a Computer Stand ..24
Removing the Stand
...........................................
24
Installing a New Stand
.......................................
25
UPGRADING AND SERVICING GUIDE
Computer features may vary by model.
HP TouchSmart
310