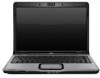
HP V6110US Drives - Windows XP
HP V6110US - Compaq Presario Media Center Manual
 |
UPC - 882780849006
View all HP V6110US manuals
Add to My Manuals
Save this manual to your list of manuals |
HP V6110US manual content summary:
- HP V6110US | Drives - Windows XP - Page 1
Drives User Guide - HP V6110US | Drives - Windows XP - Page 2
in the express warranty statements accompanying such products and services. Nothing herein should be construed as constituting an additional warranty. HP shall not be liable for technical or editorial errors or omissions contained herein. First Edition: July 2006 Document Part Number: 416614-001 - HP V6110US | Drives - Windows XP - Page 3
Drive care 2 Drive light 3 Hard drives Replacing the primary hard drive ...5 Using a secondary hard drive (select models only 7 4 Optical drives Inserting an optical disc ...10 Removing an optical disc (with power 11 Removing an optical disc (without power 12 Avoiding standby or hibernation ...13 - HP V6110US | Drives - Windows XP - Page 4
iv ENWW - HP V6110US | Drives - Windows XP - Page 5
operating system. Do not use excessive force when inserting a drive into a drive bay. Do not type on the keyboard or move the computer while the optical drive is writing to a disc. The write process is sensitive to vibration. When the battery is the only source of power, ensure that the battery is - HP V6110US | Drives - Windows XP - Page 6
2 Chapter 1 Drive care ENWW - HP V6110US | Drives - Windows XP - Page 7
2 Drive light The drive light blinks when either the primary hard drive or an optical drive is being accessed. ENWW 3 - HP V6110US | Drives - Windows XP - Page 8
4 Chapter 2 Drive light ENWW - HP V6110US | Drives - Windows XP - Page 9
the power button. Then shut down the computer through the operating system. power cord from the AC outlet. 5. Turn the computer upside down on a flat surface. 6. Remove the battery from the computer. 7. With the hard drive bay toward you, loosen the 2 hard drive cover screws (1). ENWW Replacing - HP V6110US | Drives - Windows XP - Page 10
8. Lift the hard drive cover away from the computer (2). NOTE Select models have a second hard drive bay for a secondary hard drive. The primary hard drive is marked with a "1" and the secondary hard drive is marked with a "2." 9. Pull the hard drive tab up, and then lift the hard drive away from - HP V6110US | Drives - Windows XP - Page 11
Do not install a secondary hard drive unless the computer is configured to support a secondary hard drive. A secondary hard drive is designed to store (drive D), the optical drive becomes drive E. The next drive added to the system, such as a new USB or digital device, will be assigned the next - HP V6110US | Drives - Windows XP - Page 12
8 Chapter 3 Hard drives ENWW - HP V6110US | Drives - Windows XP - Page 13
4 Optical drives An optical drive, such as a DVD-ROM drive, supports optical discs (CDs and DVDs). These discs are used to store or transport information and LightScribe DVD±RW Double Yes Yes Yes Layer The types of optical drives supported vary by model. Write to DVD+R DL No Yes Yes ENWW 9 - HP V6110US | Drives - Windows XP - Page 14
Inserting an optical disc 1. Turn on the computer. 2. Press the release button (1) on the drive bezel to release the media tray. 3. Pull out the tray (2). 4. Hold the CD or DVD by the edges to avoid touching the flat surfaces and position the disc over the tray spindle, with the label side up. NOTE - HP V6110US | Drives - Windows XP - Page 15
) If the computer is running on external or battery power: 1. Turn on the computer. 2. Press the release button (1) on the drive bezel to release the media tray, and then gently remove it. 4. Close the media tray and place the disc in a protective case. ENWW Removing an optical disc (with power) 11 - HP V6110US | Drives - Windows XP - Page 16
Removing an optical disc (without power) If external or battery power is unavailable: 1. Insert the end of a paper clip (1) into the release access in the front bezel of the drive. 2. Press in gently on the paper - HP V6110US | Drives - Windows XP - Page 17
Avoiding standby or hibernation CAUTION To prevent possible audio and video degradation, or loss of audio or video playback functionality, do not initiate standby or hibernation while reading or writing to a CD or DVD. To prevent loss of information, do not initiate standby - HP V6110US | Drives - Windows XP - Page 18
14 Chapter 4 Optical drives ENWW - HP V6110US | Drives - Windows XP - Page 19
12 DVD drive 9 O optical disc inserting 10 removing, with power 11 removing, without power 12 optical drive 9 S secondary hard drive 7 standby 13 H hard disk drive installing 6 removing 5 replacing 5 hard drive installing 6 removing 5 replacing 5 hibernation 13 L light, drive 3 ENWW Index 15 - HP V6110US | Drives - Windows XP - Page 20
16 Index ENWW - HP V6110US | Drives - Windows XP - Page 21
- HP V6110US | Drives - Windows XP - Page 22
-
 1
1 -
 2
2 -
 3
3 -
 4
4 -
 5
5 -
 6
6 -
 7
7 -
8
-
9
-
10
-
11
-
12
-
13
-
14
-
15
-
16
-
17
-
18
-
19
-
20
-
21
-
22
 |
 |

Drives
User Guide