HP W1907 HP w19 LCD Monitor User's Guide
HP W1907 - 19" LCD Monitor Manual
 |
UPC - 882780774636
View all HP W1907 manuals
Add to My Manuals
Save this manual to your list of manuals |
HP W1907 manual content summary:
- HP W1907 | HP w19 LCD Monitor User's Guide - Page 1
HP w19 LCD Monitor User's Guide • Preface • Safety and Maintenance Guidelines • Setup • Using the Monitor • Drivers and Auto-Adjustment • Technical Support FAQ • Specifications • LCD Monitor Quality and Pixel Policy • Agency Regulatory Notices The only warranties for HP products and services are set - HP W1907 | HP w19 LCD Monitor User's Guide - Page 2
guide is intended for anyone who uses the HP w19 LCD Monitor. It describes the monitor's features, setup, and operation. The sections are as follows: • Safety and Maintenance Guidelines • Setup • Using the Monitor • Drivers and Auto-Adjustment • Technical Support FAQ • Specifications • LCD Monitor - HP W1907 | HP w19 LCD Monitor User's Guide - Page 3
Precautions • Avoid applying pressure to the LCD screen; doing so can cause damage. • Use only a power source and connection compatible with this monitor, as indicated on the label/back plate of the monitor. • Be sure the total ampere rating of the products connected to the outlet does not exceed - HP W1907 | HP w19 LCD Monitor User's Guide - Page 4
or service provider. • Adjust only those controls that are described in the operating instructions. • Turn your monitor off when not in use. You can substantially increase the life expectancy of your monitor by using a screen saver and turning off the monitor when not in use. • Keep your monitor in - HP W1907 | HP w19 LCD Monitor User's Guide - Page 5
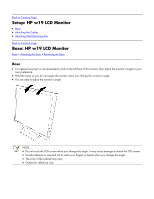
Setup: HP w19 LCD Monitor • Base • Attaching the Cables • Attaching Wall Mounting Arm Back to Contents Page Base: HP w19 LCD Monitor Base • Attaching the Base • Removing the Base Base • For optimal viewing it is recommended to look at the full face of the monitor, then adjust the monitor's angle - HP W1907 | HP w19 LCD Monitor User's Guide - Page 6
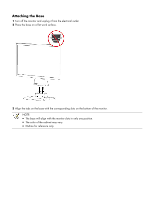
the electrical outlet. 2 Place the base on a flat work surface. 3 Align the tabs on the base with the corresponding slots on the bottom of the monitor. NOTE: • The base will align with the monitor slots in only one position. • The color of the cabinet may vary. • Outline for reference only. - HP W1907 | HP w19 LCD Monitor User's Guide - Page 7
-down on a stable, flat work surface. 2 Push release latch on the bottom of the rear cabinet, and push the base toward the back of the monitor at the same time and lift up to remove the base. NOTE: • The color of the cabinet may vary. • Outline for reference only. CAUTION: Be - HP W1907 | HP w19 LCD Monitor User's Guide - Page 8
Back to Contents Page Attaching the Cables: HP w19 LCD Monitor Cable Connections On Back of Monitor and Computer Turn off your computer before performing the procedure below. 1 Connect the power adapter DC cable to the DC-In port on the back of the monitor. 2 Connect one end of the 15-pin D-Sub (VGA - HP W1907 | HP w19 LCD Monitor User's Guide - Page 9
. Disconnect power before this procedure. Follow these steps: 1 Set the monitor screen down on a flat, soft, protected surface. 2 Support the base and remove the screws. 3 Remove the base. 4 Follow the manufacturer's instructions to assemble the wall mounting arm. See Installing an Optional Wall - HP W1907 | HP w19 LCD Monitor User's Guide - Page 10
arm onto the back of the monitor. Line up the holes of the arm with the holes in the back of the monitor. 3 Insert the 4 screws into the holes and tighten. 4 Reconnect the cables. Refer to the user's manual that came with the optional wall mounting arm for instructions on attaching it to the wall - HP W1907 | HP w19 LCD Monitor User's Guide - Page 11
resolution, follow the steps below. 1 Click START. 2 Click SETTINGS. 3 Click CONTROL PANEL. 4 Double click DISPLAY. 5 Click SETTINGS. 6 Set the resolution SLIDE-BAR to 1440 by 900. NOTE: If 1440 by 900 is not shown, download the monitor driver from the Web. See Using the Monitor for instructions - HP W1907 | HP w19 LCD Monitor User's Guide - Page 12
Back to Contents Page Controls: HP w19 LCD Monitor Operating Instructions • External Controls • OSD Lock Function • How to Adjust a Setting • Adjusting the Picture • LED Indicators Operating Instructions Press the power button (E) to turn the monitor on or off. The other control knobs are located at - HP W1907 | HP w19 LCD Monitor User's Guide - Page 13
Yes No N/A N/A N/A N/A N/A Show the resolution, H/V frequency and input port of current input timing Clear each old status of auto-configuration Do not execute reset, return to main menu Exit OSD See Specifications for the horizontal and vertical scan ranges addressable by this monitor. - HP W1907 | HP w19 LCD Monitor User's Guide - Page 14
.hp.com/support 2 Select your country/region. 3 Select Download Drivers and Software. 4 Enter the model number for your monitor to go to the software download pages for your monitor. 5 Download and install the INF and ICM files using the instructions in the download pages. Using the Auto-Adjustment - HP W1907 | HP w19 LCD Monitor User's Guide - Page 15
(HP monitor drivers are available at: http://www.hp.com/support). • Adjust the contrast and brightness controls. • Make sure you are not using an extension cable or switch box. We recommend plugging the monitor directly to the video card output connector on the back of your computer. • Move - HP W1907 | HP w19 LCD Monitor User's Guide - Page 16
Back to Contents Page Specifications: HP w19 LCD Monitor General • LCD Panel (19") • Resolution • Preset Display Modes • resolution Highest preset resolution Highest addressable resolution 1440 x 900 at 60 Hz 1440 x 900 at 60 Hz 1440 x 900 at 60 Hz Plug & Play Input Connector Input Video Signal - HP W1907 | HP w19 LCD Monitor User's Guide - Page 17
XGA XGA SXGA SXGA WXGA+ Resolution 720 x 400 640 x 480 640 x 480 800 x 600 800 x 600 1024 x 768 1024 x 768 1024 x 768 1280 x 1024 1280 x 1024 1440 x 900 Physical Characteristics Connector Type Signal Cable Type Dimensions & Weight: Height (with base) Width Depth Weight (monitor only) Weight (with - HP W1907 | HP w19 LCD Monitor User's Guide - Page 18
monitor to operate on input voltages between 100-120V or 200-240V . The power cord set (flexible cord or wall plug) received with the monitor , contact your HP-authorized service provider. A power product. Pin Assignments Pin Number 1 2 3 4 5 6 7 8 9 10 11 12 13 14 15 15-Pin Side of the Signal Cable - HP W1907 | HP w19 LCD Monitor User's Guide - Page 19
standards, to help guarantee trouble-free performance. Nevertheless, the display may have cosmetic imperfections that appear as small bright or dark spots. This is common to all LCD displays used in products supplied by all vendors and is not specific to the HP LCD Monitor. These imperfections are - HP W1907 | HP w19 LCD Monitor User's Guide - Page 20
HP w19 LCD Monitor Hewlett-Packard Company may void the user's authority to operate the equipment. Cables Connections to this device must be made with shielded cables with metallic RFI/EMI connector hoods to maintain compliance with FCC rules and regulations. Declaration of Conformity for Products - HP W1907 | HP w19 LCD Monitor User's Guide - Page 21
of Conformity issued by Hewlett-Packard for this product or product family. This compliance is products and EU harmonized Telecom products (e.g., Bluetooth). xxxx* This marking is valid for EU non-harmonized Telecom products. *Notified body number (used only if applicable - refer to the product - HP W1907 | HP w19 LCD Monitor User's Guide - Page 22
Japanese Power Cord Notice Korean Notice Materials Disposal This HP product contains the following materials that require special handling at end-of-life: • Mercury in the fluorescent lamp in the display LCD. • Lead in the solder and some component leads. Disposal of this material can be regulated
-
 1
1 -
 2
2 -
 3
3 -
 4
4 -
 5
5 -
 6
6 -
 7
7 -
8
-
9
-
10
-
11
-
12
-
13
-
14
-
15
-
16
-
17
-
18
-
19
-
20
-
21
-
22
 |
 |

HP w19 LCD Monitor User's Guide
•
Preface
•
Safety and Maintenance Guidelines
•
Setup
•
Using the Monitor
•
Drivers and Auto-Adjustment
•
Technical Support FAQ
•
Specifications
•
LCD Monitor Quality and Pixel Policy
•
Agency Regulatory Notices
The only warranties for HP products and services are set forth in the express warranty statements accompanying such products and services.
Nothing herein should be construed as constituting an additional warranty. HP shall not be liable for technical or editorial errors or omissions
contained herein.
HP assumes no responsibility for the use or reliability of its software on equipment that is not furnished by HP.
This document contains proprietary information that is protected by copyright. No part of this document may be photocopied, reproduced, or
translated to another language without the prior written consent of HP.
Hewlett-Packard Company
P.O. Box 4010
Cupertino, CA 95015-4010
USA
Copyright © 2006 Hewlett-Packard Development Company, L.P.
Microsoft and Windows are U.S. registered trademarks of Microsoft Corporation.
Adobe and Acrobat are trademarks of Adobe Systems Incorporated.
Bluetooth is a trademark owned by its proprietor and used by Hewlett-Packard Company under license.
HP supports lawful use of technology and does not endorse or encourage the use of its products for purposes other than those permitted by copyright
law.
The information in this document is subject to change without notice.
Part number: 431053-002