HP W2338h HP w185,w1858, w2338h LCD Monitor - User Guide - Page 35
Power-Saver Feature, Ambient Light Sensor (Select Models - factory settings
 |
UPC - 884420172529
View all HP W2338h manuals
Add to My Manuals
Save this manual to your list of manuals |
Page 35 highlights
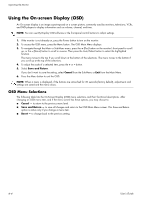
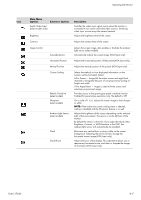
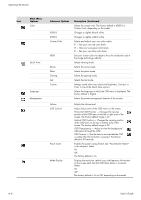
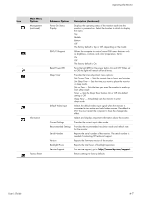
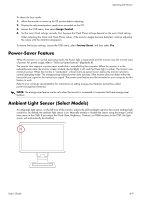
Operating the Monitor To obtain the best results: 1. Allow the monitor to warm up for 20 minutes before adjusting. 2. Display the adjustment-pattern application provided on the CD. 3. Access the OSD menu, then select Image Control. 4. Set the main Clock settings correctly first, because the Clock Phase settings depend on the main Clock setting. When adjusting the Clock and Clock Phase values, if the monitor images become distorted, continue adjusting the values until the distortion disappears. To restore the factory settings, access the OSD menu, select Factory Reset, and then select Yes. Power-Saver Feature When the monitor is in normal operating mode, the Power light is aqua-white and the monitor uses the normal watts of power. For power usage, refer to "Technical Specifications" (Appendix B). The monitor also supports a power-saver mode that is controlled by the computer. When the monitor is in the reduced-power state, the monitor screen is blank, the backlight is off, and the Power light is amber. The monitor uses minimum power. When the monitor is "awakened," a brief warm-up period occurs before the monitor returns to normal operating mode. The energy-saving reduced power state activates if the monitor does not detect either the horizontal sync signal or the vertical sync signal. The power-saver feature must be activated on your computer for this feature to work. Refer to your computer documentation for instructions on setting energy-saver features (sometimes called power-management features). NOTE: The energy-saver feature works only when the monitor is connected to computers that have energy-saver features. Ambient Light Sensor (Select Models) An integrated light sensor, on the left front of the monitor, adjusts the LCD backlight output to the current ambient light conditions. By default, the ambient light sensor is on. Manually enable or disable the sensor using the Image Control main menu in the OSD. If you adjust the Quick View, Brightness, Contrast, or sRGB functions in the OSD, the light sensor will automatically be disabled. User's Guide 4-9
-
 1
1 -
2
-
3
-
4
-
5
-
6
-
7
-
8
-
9
-
10
-
11
-
12
-
13
-
14
-
15
-
16
-
17
-
18
-
19
-
20
-
21
-
22
-
23
-
24
-
25
-
26
-
27
-
28
-
29
-
 30
30 -
 31
31 -
 32
32 -
 33
33 -
 34
34 -
 35
35 -
 36
36 -
 37
37 -
 38
38 -
 39
39 -
 40
40 -
41
-
42
-
43
-
44
-
45
-
46
-
47
-
48
-
49
-
50
-
51
-
52
-
53
-
54
-
55
-
56
-
57
-
58
-
59
-
60
-
61
-
62
-
63
-
64
-
65
-
66
-
67
-
68
 |
 |