HP Workstation xw4100 Optical Drive Installation for HP Workstations
HP Workstation xw4100 Manual
 |
View all HP Workstation xw4100 manuals
Add to My Manuals
Save this manual to your list of manuals |
HP Workstation xw4100 manual content summary:
- HP Workstation xw4100 | Optical Drive Installation for HP Workstations - Page 1
HP Workstation. Electrostatic Discharge A discharge of static electricity from a finger or other conductor may damage system boards or other static-sensitive devices. This type grounding, have an authorized dealer, reseller, or service provider install the part. NOTE: For additional information - HP Workstation xw4100 | Optical Drive Installation for HP Workstations - Page 2
of the chassis under the front bezel or on the diskette drive bracket under the access panel. HP-supplied metric screws are black. On other workstations, the optical drives do not require these guide screws. Instead, the drive cage is equipped with a latching mechanism to secure the optical drive in - HP Workstation xw4100 | Optical Drive Installation for HP Workstations - Page 3
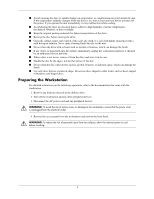
. Preparing the Workstation For detailed instructions on the following operations, refer to the documentation that came with the workstation. 1. Remove any diskettes inserted in the diskette drive. 2. Turn off the workstation and any other peripheral devices. 3. Disconnect the AC power cord and any - HP Workstation xw4100 | Optical Drive Installation for HP Workstations - Page 4
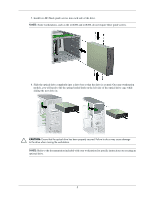
serious injury or damage to the workstation, ensure that the power cord is unplugged from the exposed metal on the option board/chip or on the workstation's circuit boards. Refer to the . 4. If your optical drive requires guide screws, remove four M3 guide screws from the chassis behind the bezel - HP Workstation xw4100 | Optical Drive Installation for HP Workstations - Page 5
drive in. Ä CAUTION: Ensure that the optical drive has been properly secured. Failure to do so may cause damage to the drive when moving the workstation. NOTE: Refer to the documentation included with your workstation for specific instructions on securing an optional drive. 5 - HP Workstation xw4100 | Optical Drive Installation for HP Workstations - Page 6
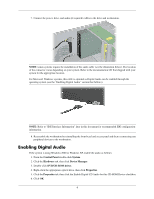
Connect the power, drive, and audio (if required) cables to the drive and workstation. NOTE: Linux systems require the installation of the audio cable peripheral devices to the workstation. Enabling Digital Audio If the system is using Windows 2000 or Windows XP, enable the audio as follows: 1. From - HP Workstation xw4100 | Optical Drive Installation for HP Workstations - Page 7
Light 2 Manual Eject Button 3 Disc Tray 4 Load/Unload Button Functions Turns on when the optical drive is reading information from the disc. Opens the disc tray manually (34.9 mm) in length into the manual eject hole and push firmly until the tray releases. NOTE: The drive bezel and drive controls - HP Workstation xw4100 | Optical Drive Installation for HP Workstations - Page 8
that came with your workstation for additional regulatory information governing this product. 365578-001 © 2004 Hewlett-Packard Development Company, L.P. The HP Invent logo is a registered trademark of Hewlett-Packard Development Company, L.P. Microsoft and Windows are U.S. registered trademarks - HP Workstation xw4100 | Optical Drive Installation for HP Workstations - Page 9
HP Workstation HP 1 1MΩ ± 10 HP HP 9 - HP Workstation xw4100 | Optical Drive Installation for HP Workstations - Page 10
5.25 1/2 IDE M3 4 T-15 M3 HP 注意事項 CD CD CD CD CD CD CD CD 10 - HP Workstation xw4100 | Optical Drive Installation for HP Workstations - Page 11
CD 1 CD AC HP CD CD CD CD 1 2 3. AC 4 11 - HP Workstation xw4100 | Optical Drive Installation for HP Workstations - Page 12
1 2 Ä 2 3. EMI 4 M3 4 12 - HP Workstation xw4100 | Optical Drive Installation for HP Workstations - Page 13
5 M3 2 xw6200 や xw8200 6 13 - HP Workstation xw4100 | Optical Drive Installation for HP Workstations - Page 14
7 注記 : Linux CD Microsoft Windows IDE IDE 8 Windows 2000 ま たは Windows XP 1 2 3. [DVD/CD-ROM 14 - HP Workstation xw4100 | Optical Drive Installation for HP Workstations - Page 15
4 CD-ROM 5 CD-ROM CD 6. [OK 15 - HP Workstation xw4100 | Optical Drive Installation for HP Workstations - Page 16
項目 名称 1 2 3 CD 4 機能 CD CD CD CD CD 1 1.6 34.9 2 3 16 - HP Workstation xw4100 | Optical Drive Installation for HP Workstations - Page 17
IDE IDE ATA 0 1 IDE 項目 機能 1 0 2 1 3 VCCI B CD 365578-001 © 2004 Hewlett-Packard Development Company, L.P. The HP Invent logo is a registered trademark of Hewlett-Packard Development Company, L.P. Microsoft Windows Microsoft Corporation Linux Linus Torvalds 17 - HP Workstation xw4100 | Optical Drive Installation for HP Workstations - Page 18
18
-
 1
1 -
 2
2 -
 3
3 -
 4
4 -
 5
5 -
 6
6 -
 7
7 -
8
-
9
-
10
-
11
-
12
-
13
-
14
-
15
-
16
-
17
-
18
 |
 |

1
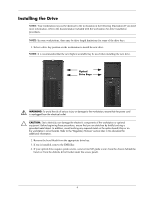
Optical Drive Installation
for HP Workstations
This document describes how to install an optical drive on an HP Workstation.
Electrostatic Discharge
A discharge of static electricity from a finger or other conductor may damage system boards or other
static-sensitive devices. This type of damage may reduce the life expectancy of the device.
Preventing Electrostatic Damage
To prevent electrostatic damage, observe the following precautions:
■
Avoid hand contact by transporting and storing parts in static-safe containers.
■
Keep electrostatic-sensitive parts in their containers until they arrive at static-free workstations.
■
Place parts on a grounded surface before removing them from their container.
■
Avoid touching pins, leads, or circuitry.
■
Always be properly grounded when touching an electrostatic-sensitive component or assembly.
Grounding Methods
There are several methods for grounding. Use one or more of the following measures when handling or
installing electrostatic- sensitive parts:
■
Use a wrist strap connected by a ground cord to a grounded workstation chassis. Wrist straps are
flexible straps with a minimum of 1 meg. ohm +/- 10 percent resistance in the ground cords. To
provide a proper ground, wear the strap snug against the skin.
■
Use heelstraps, toestraps, or bootstraps at standing workstations. Wear the straps on both feet when
standing on conductive floors or dissipating floor mats.
■
Use conductive field service tools.
■
Use a portable field service kit with a folding static-dissipating work mat.
If you do not have any of the suggested equipment for proper grounding, have an authorized dealer,
reseller, or service provider install the part.
NOTE:
For additional information on static electricity or for assistance with the installation of this
product, contact an authorized dealer, reseller, or service provider.