HP Xb3000 HP xb3000 Notebook Expansion Base - Maintenance and Service Guide - Page 53
Disassembly Sequence Chart, 5.3 Preparing the Expansion Base for Disassembly
 |
UPC - 882780374928
View all HP Xb3000 manuals
Add to My Manuals
Save this manual to your list of manuals |
Page 53 highlights
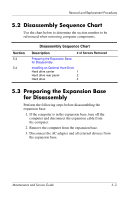
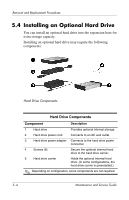
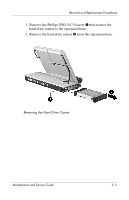
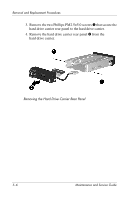
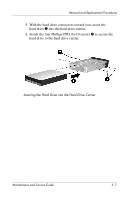
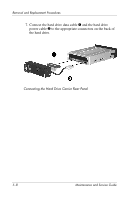
Removal and Replacement Procedures 5.2 Disassembly Sequence Chart Use the chart below to determine the section number to be referenced when removing computer components. Section 5.3 5.4 Disassembly Sequence Chart Description # of Screws Removed Preparing the Expansion Base for Disassembly Installing an Optional Hard Drive Hard drive carrier 1 Hard drive rear panel 2 Hard drive 4 5.3 Preparing the Expansion Base for Disassembly Perform the following steps before disassembling the expansion base: 1. If the computer is in the expansion base, turn off the computer and disconnect the expansion cable from the computer. 2. Remove the computer from the expansion base. 3. Disconnect the AC adapter and all external devices from the expansion base. Maintenance and Service Guide 5-3
-
 1
1 -
2
-
3
-
4
-
5
-
6
-
7
-
8
-
9
-
10
-
11
-
12
-
13
-
14
-
15
-
16
-
17
-
18
-
19
-
20
-
21
-
22
-
23
-
24
-
25
-
26
-
27
-
28
-
29
-
30
-
31
-
32
-
33
-
34
-
35
-
36
-
37
-
38
-
39
-
40
-
41
-
42
-
43
-
44
-
45
-
46
-
47
-
 48
48 -
 49
49 -
 50
50 -
 51
51 -
 52
52 -
 53
53 -
 54
54 -
 55
55 -
 56
56 -
 57
57 -
 58
58 -
59
-
60
-
61
-
62
-
63
-
64
-
65
-
66
-
67
-
68
-
69
-
70
-
71
-
72
-
73
-
74
-
75
-
76
-
77
-
78
-
79
 |
 |