HP Xw4600 HP xw and Z Series Workstations - HP SATA/SAS Hard Drive and Solid S
HP Xw4600 - Workstation - 2 GB RAM Manual
 |
UPC - 883585516483
View all HP Xw4600 manuals
Add to My Manuals
Save this manual to your list of manuals |
HP Xw4600 manual content summary:
- HP Xw4600 | HP xw and Z Series Workstations - HP SATA/SAS Hard Drive and Solid S - Page 1
orientation combinations) ● SAS-to-SATA interface adapter (included with SAS hard drives) ● Four 6-32 guide screws (for HP xw4000 Workstation series) ● SAS/SATA hard drive installation instructions (this document) ● Warranty information Tools required The following may be required to install the - HP Xw4600 | HP xw and Z Series Workstations - HP SATA/SAS Hard Drive and Solid S - Page 2
risk of serious injury, read the Safety & Comfort Guide. It describes proper computer setup, posture, health, and work habits for computer users, and provides important electrical and mechanical safety information. This guide is located at http://www.hp.com/ergo and on the documentation CD (if one - HP Xw4600 | HP xw and Z Series Workstations - HP SATA/SAS Hard Drive and Solid S - Page 3
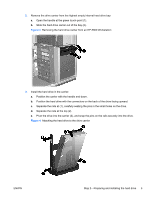
the cabinet, immediately unplug the computer and have it checked by an authorized service provider. HP Z200 and Z400 Workstations and HP xw4000 series Workstations 1. If a card support interferes with access to the system board connectors, remove it. 2. Install four guide screws into the holes near - HP Xw4600 | HP xw and Z Series Workstations - HP SATA/SAS Hard Drive and Solid S - Page 4
4. Push the drive into the bay until it snaps into place. 5. Continue to Step 3-Configuring the cabling on page 6 HP Z600 and Z800 Workstations 1. If a card support interferes with access to the system board connectors, remove it. 4 HP SATA/SAS hard drive and Solid State Drive installation ENWW - HP Xw4600 | HP xw and Z Series Workstations - HP SATA/SAS Hard Drive and Solid S - Page 5
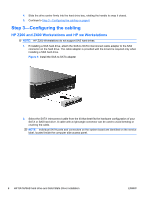
handle at the green touch-point (1). b. Slide the hard drive carrier out of the bay (2). Figure 3 Removing the hard drive carrier from an HP Z800 Workstation 3. Install the hard drive in the carrier: a. Position the carrier with the handle end down. b. Position the hard drive with the connectors on - HP Xw4600 | HP xw and Z Series Workstations - HP SATA/SAS Hard Drive and Solid S - Page 6
cable with a right-angle connector can be used to avoid bending or crushing the cable. NOTE: Individual SATA ports and connectors on the system board are identified on the service label, located inside the computer side access panel. 6 HP SATA/SAS hard drive and Solid State Drive installation ENWW - HP Xw4600 | HP xw and Z Series Workstations - HP SATA/SAS Hard Drive and Solid S - Page 7
drive bays on HP Z600 and HP Z800 Workstations have pre-installed power and data connectors at the back of the bay and do not require SAS-to-SATA adapters or additional power and data connections. ● The blind-mate data cables might require adjustment at the system board, based on the computer drive - HP Xw4600 | HP xw and Z Series Workstations - HP SATA/SAS Hard Drive and Solid S - Page 8
is available online at http://www.hp.com/support. You can also call HP for technical support. For support telephone numbers, refer to the documentation supplied with the computer. Japanese 日本語 This document is available in Japanese. See http://www.hp.com/support/manuals, then select your product and
-
 1
1 -
 2
2 -
 3
3 -
 4
4 -
 5
5 -
 6
6 -
 7
7 -
8
 |
 |

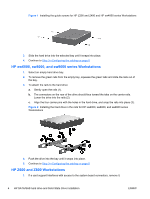
HP SATA/SAS hard drive and Solid State
Drive installation
This document describes how to install Serial ATA (SATA) and Serial Attached SCSI (SAS) hard
drives or Solid State Drives (SSD) in the internal hard drive bay of HP Z or xw series Workstations.
Throughout this document, all references to hard drives include solid state drives.
Kit contents
●
A SATA or SAS hard drive or Solid State Drive (SSD)
●
Multiple SATA interface cables (each of a different length and with different connector orientation
combinations)
●
SAS-to-SATA interface adapter (included with SAS hard drives)
●
Four 6-32 guide screws (for HP xw4000 Workstation series)
●
SAS/SATA hard drive installation instructions (this document)
●
Warranty information
Tools required
The following may be required to install the hard drive:
●
T-15 Torx screwdriver or flat-bladed screwdriver
Before you begin
To view
QuickSpecs
and determine the compatibility of this product with your HP computer, see
go/productbulletin
.
Numerous installation scenarios exist for hard drives. This document describes hard drive installation
in internal hard drive bays.
●
If installing the hard drive in an optical bay converter, follow the instructions that shipped with the
converter for the hardware installation.
●
If connecting the hard drive to a Redundant Array of Independent Disks (RAID) controller, follow
the instructions that shipped with the RAID controller.
© 2006–2010 Hewlett-Packard Development Company, L.P. Microsoft,
Windows, XP , and Windows Vista are U.S. registered trademarks of
Microsoft Corporation. Printed in the U.S.
ENWW
Kit contents
1