HP Xw8200 Rack Kit - HP Sliding Rack Mount Kit Installation - xw8200/9300 Work
HP Xw8200 - Workstation - 1 GB RAM Manual
 |
UPC - 882780210455
View all HP Xw8200 manuals
Add to My Manuals
Save this manual to your list of manuals |
HP Xw8200 manual content summary:
- HP Xw8200 | Rack Kit - HP Sliding Rack Mount Kit Installation - xw8200/9300 Work - Page 1
on an HP Workstation xw8200 in a round hole, square hole, threaded hole, and earlier HP racks. The following list describes all of the included parts. Not all parts are used with every installation. ■ Slide assembly (x2) (adjustable from 24-30 inches) ■ Left and right mounting flanges ■ M5 hardware - HP Xw8200 | Rack Kit - HP Sliding Rack Mount Kit Installation - xw8200/9300 Work - Page 2
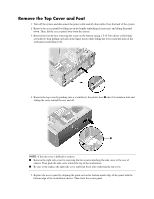
system and disconnect the power cable and all other cables Torx driver or flat blade screwdriver) then pulling outward on the finger notch while sliding the foot toward the front of the workstation and push the side cover toward the top of the workstation. ■ Be sure to the replace the right side cover - HP Xw8200 | Rack Kit - HP Sliding Rack Mount Kit Installation - xw8200/9300 Work - Page 3
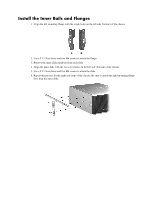
the Inner Rails and Flanges 1. Align the left mounting flange with the screw holes on the left side (bottom) of the chassis. L R 2. Use a T-15 Torx driver and two M4 screws to attach the flange. 3. Remove the inner slide members from each slide. 4. Align the inner slide with the two screw holes - HP Xw8200 | Rack Kit - HP Sliding Rack Mount Kit Installation - xw8200/9300 Work - Page 4
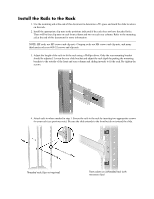
the mounting aid at the end of this document for more information. NOTE: HP racks use M5 screws and clip nuts. Compaq racks use M6 screws and 3. Adjust the length of the rails to fit the rack using a Phillips driver. Only the rear mounting bracket should be adjusted. Loosen the rear slide bracket - HP Xw8200 | Rack Kit - HP Sliding Rack Mount Kit Installation - xw8200/9300 Work - Page 5
5. Slide the workstation into the rack by engaging the inner slides with the outer slide mechanism. CAUTION: This step requires two people. 6. Slide the workstation into the rack until it stops. Then, fully extend the slides, press the release button, and slide the unit all the way back into the - HP Xw8200 | Rack Kit - HP Sliding Rack Mount Kit Installation - xw8200/9300 Work - Page 6
7. Secure the workstation to the rack using four of the same screws that were used to attach the with the rack holes to determine a 5U space. 3. The 5U space will be the top of the workstation after it is installed. 4. Mark the two spaces below the 3U line. This will be the center line of the slides. - HP Xw8200 | Rack Kit - HP Sliding Rack Mount Kit Installation - xw8200/9300 Work - Page 7
- HP Xw8200 | Rack Kit - HP Sliding Rack Mount Kit Installation - xw8200/9300 Work - Page 8
364601-001 © 2004 Hewlett-Packard Development Company, L.P. The HP Invent logo is a registered trademark of Hewlett-Packard Development Company, L.P. - HP Xw8200 | Rack Kit - HP Sliding Rack Mount Kit Installation - xw8200/9300 Work - Page 9
HP Workstation xw8200 HP xw8200 HP、 Compaq 61 ~ 76 24 ~ 30 HP HP Workstation xw8200 x2) (61 ~ 76 24 ~ 30 M5 M5 ネジ (x12) と M5 x12) ■ M6 M6 ネジ (x12) と M6 x12) ■ 10-32 10-32 ネジ (x12) と 10-32 x12) ■ T-15 T-25 - HP Xw8200 | Rack Kit - HP Sliding Rack Mount Kit Installation - xw8200/9300 Work - Page 10
1 2 3 T-15 4 1 1 2 - HP Xw8200 | Rack Kit - HP Sliding Rack Mount Kit Installation - xw8200/9300 Work - Page 11
5 1 L R 2. T-15 2 本の M4 3 4 2 5. T-15 2 本の M4 6 - HP Xw8200 | Rack Kit - HP Sliding Rack Mount Kit Installation - xw8200/9300 Work - Page 12
1 5U 2 2 注記 : HP M5 Compaq M6 10-32 3 4. 手順 1 2 - HP Xw8200 | Rack Kit - HP Sliding Rack Mount Kit Installation - xw8200/9300 Work - Page 13
5 - HP Xw8200 | Rack Kit - HP Sliding Rack Mount Kit Installation - xw8200/9300 Work - Page 14
6 7 4 2 1 2 5U 3. 5U 4. 3U 2 - HP Xw8200 | Rack Kit - HP Sliding Rack Mount Kit Installation - xw8200/9300 Work - Page 15
- HP Xw8200 | Rack Kit - HP Sliding Rack Mount Kit Installation - xw8200/9300 Work - Page 16
364601-001 © 2004 Hewlett-Packard Development Company, L.P. The HP Invent logo is a registered trademark of Hewlett-Packard Development Company, L.P.
-
 1
1 -
 2
2 -
 3
3 -
 4
4 -
 5
5 -
 6
6 -
 7
7 -
8
-
9
-
10
-
11
-
12
-
13
-
14
-
15
-
16
 |
 |

Sliding Rack Mount Kit Installation
HP Workstation xw8200
This document describes how to install the sliding rack mount kit on an HP Workstation xw8200 and how
to install the unit into a rack. This sliding rack mount kit works with HP, Compaq, and some third-party
racks. The rack mount slides can fit racks 24–30 inches deep.
Kit Contents
This product is shipped with the necessary supplies for installing the Sliding Rack Mount Kit on an HP
Workstation xw8200 in a round hole, square hole, threaded hole, and earlier HP racks. The following list
describes all of the included parts. Not all parts are used with every installation.
■
Slide assembly (x2) (adjustable from 24–30 inches)
■
Left and right mounting flanges
■
M5 hardware packet—M5 screws (x12) and M5 clip nuts (x12)
■
M6 hardware packet—M6 screws (x12) and M6 clip nuts (x12)
■
10-32 hardware packet—10-32 screws (x12) and 10-32 clip nuts (x12)
Tools Required
■
T-15 Torx driver
■
T-25 Torx driver
■
Phillips driver
■
Flathead driver (possibly for third-party racks)