HP Z24q Maintenance and Service Guide
HP Z24q Manual
 |
View all HP Z24q manuals
Add to My Manuals
Save this manual to your list of manuals |
HP Z24q manual content summary:
- HP Z24q | Maintenance and Service Guide - Page 1
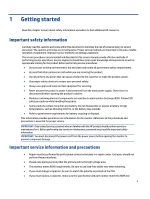
Maintenance and Service Guide Z24q G3 model SUMMARY This guide provides information about spare parts, removal and replacement of parts, diagnostic tests, problem troubleshooting, and more. - HP Z24q | Maintenance and Service Guide - Page 2
contained herein is subject to change without notice. The only warranties for HP products and services are set forth in the express warranty statements accompanying such products and services. Nothing herein should be construed as constituting an additional warranty. HP shall not be liable - HP Z24q | Maintenance and Service Guide - Page 3
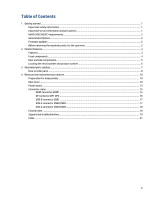
Table of Contents 1 Getting started ...1 Important safety information ...1 Important service information and precautions ...1 RoHS (2002/95/EC) requirements...2 General descriptions USB2/USB3 ...17 USB-A connector USB4/USB5 ...18 Function test ...18 Support and troubleshooting ...19 Index...21 iii - HP Z24q | Maintenance and Service Guide - Page 4
to the safe, reliable operation of equipment. Improper service methods can damage equipment. The service procedures recommended and described in this service manual provide effective methods of performing service operations. Service engineers should have prior repair knowledge and experience as - HP Z24q | Maintenance and Service Guide - Page 5
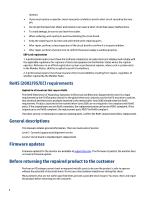
replacement. General descriptions This manual contains general information. There are two levels of service: Level 1: Cosmetic/appearance/alignment service Level 2: Circuit board or standard parts replacement Firmware updates Firmware updates for the monitor are available at support.hp.com. If no - HP Z24q | Maintenance and Service Guide - Page 6
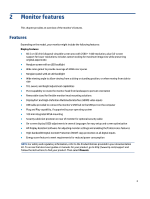
for reduced power consumption NOTE: For safety and regulatory information, refer to the Product Notices provided in your documentation kit. To access the latest user guides or manuals for your product, go to http://www.hp.com/support and follow the instructions to find your product. Then select - HP Z24q | Maintenance and Service Guide - Page 7
Front components To identify the components on the front of the monitor, use this illustration and table. 4 - HP Z24q | Maintenance and Service Guide - Page 8
, such as a keyboard, mouse, or USB harddrive. Connects a USB cable to a peripheral device, such as a keyboard, mouse, or USB harddrive and supports battery charging 1.2. Connects a USB cable to a peripheral device, such as a keyboard, mouse, or USB harddrive. Connects a USB cable to a peripheral - HP Z24q | Maintenance and Service Guide - Page 9
Locating the serial number and product number The serial number and product number are located on the rear of the monitor. You may need these numbers when contacting HP about the monitor model. For worldwide models(including India): Barcode label & Spec label 6 - HP Z24q | Maintenance and Service Guide - Page 10
3 Illustrated parts catalog To identify the monitor major components, use this illustration and table. Table 3-1: Monitor major components and their descriptions Item Description Part number 1 # ASSY Panel Z24q G3 2 #ASSY Main Chassis Z24q G3 3 #Power Board Z24q G3 4 #Interface Board - HP Z24q | Maintenance and Service Guide - Page 11
8 #Screw Tapping Wafer M3*8 White Ni 2 9 #Screw MAC PRU M3*0.5*L3.0 Ni 4 10 #IO Cover Z24q G3 1 11 #Screw MAC Wafer M3*0.5*L4 Ni 3 12 #BEZEL_BOTTOM_Z24Q 1 13 #Power Lens Z24q G3 1 14 #Power Key Z24q G3 1 15 #Power Key Board Z24q G3 1 16 #Screw Tapping without Taper M2*2.4 2 - HP Z24q | Maintenance and Service Guide - Page 12
improves and changes product parts. For complete and current information about supported parts for your computer, go to http://partsurfer.com, select your country or region, and then follow the on-screen instructions. Internal and External Power Supplies are available for purchase from the - HP Z24q | Maintenance and Service Guide - Page 13
prepare to disassemble and reassemble the monitor. 1) Read the "Important safety information" and "Important service information and precautions" sections in the "Getting started" chapter of this guide. 2) Clean the room for disassembly. 3) Identify the disassembly area. 4) Check the position that - HP Z24q | Maintenance and Service Guide - Page 14
2) Remove Rear Cover From Display Head: Use the tool to remove the hinge cover, then Release the four screws from back bracket and remove the hinge, then Loose all the hooks by hand for pulling the rear cover 3) Remove USB BD Screws to remove USB BD: Remove the EMI gasket, then loose the two hooks - HP Z24q | Maintenance and Service Guide - Page 15
4) Release OSD key BD from rear cover 5) Remove IO cover from display head(Remove three screws and loose three hooks by hand) 6) Remove Bracket Assembly From Display Head(remove 4pcs screws and remove three cable connectors) 7) Remove bezel bottom ASSY from display head(Remove 5pcs screws) 12 - HP Z24q | Maintenance and Service Guide - Page 16
8) Remove Power Key Board from Bezel bottom assy.(Remove two screws) 9) Disassemble Bracket Assembly: remove black Mylar, then release the 2pcs AC screws from bracket, Release the 5pcs screws for releasing the power board and interface board. Power board The power board part number is 755.08002.0001 - HP Z24q | Maintenance and Service Guide - Page 17
2) Locate the part number location on the board. 3) Pin solder with soldering iron and absorber. 14 - HP Z24q | Maintenance and Service Guide - Page 18
NA 4) Lift the connector up and away from the PCB. No Connector repair This procedure includes HDMI, Display Port, USB-B and USB-A connectors. The connectors are on the main board (board part number 7ZB.08001.0007). The connector identifiers are as follows: Connector HDMI DP USB-B USB-A USB-A - HP Z24q | Maintenance and Service Guide - Page 19
2) Use a hot air gun to melt the solder on the pins. 3) Lift the HDMI connector from the PCB. 4) Place the new component on the PCB. Be sure that it matches the PCB footprint. 5) Solder the new component. DP connector DP1 DP2 Repair the DP connector: 1) Use a soldering iron and a de-soldering pump - HP Z24q | Maintenance and Service Guide - Page 20
3) Lift the DP connector from the PCB. 4) Place the new component on the PCB. Be sure that it matches the PCB footprint. 5) Solder the new component. USB-B connector USB1 Repair the USB-B connector: 1) Use a soldering iron and a de-soldering pump to remove as much solder as possible from the pin. 2) - HP Z24q | Maintenance and Service Guide - Page 21
2) Lift the USB-A connector from the PCB. 3) Place the new component on the PCB. Be sure that it matches the PCB footprint. 4) Solder the new component. USB-A connector USB4/USB5 Repair the USB-A connector: 1) Use a soldering iron and a de-soldering pump to remove as much solder as possible from the - HP Z24q | Maintenance and Service Guide - Page 22
Support and troubleshooting The following table lists possible problems, the possible cause or each problem, and the recommended solutions. Table 4-2: Solving common problems Problem the Input menu. Set Auto-Switch Input to Off and manually select the input. or Replace the video card or connect - HP Z24q | Maintenance and Service Guide - Page 23
displayed on screen. The monitor does not enter into a low-power sleep state. "OSD Lockout" is displayed. The monitor's power saving control is disabled. The monitor's OSD lock function is enabled. "Power Button Lockout" is displayed. The monitor's power button is locked. Open the OSD menu and - HP Z24q | Maintenance and Service Guide - Page 24
components, 5 removal power board, 13 RC, 10 removal and replacement procedures, 10 returning to customer, 2 RoHS (2002/95/EC) requirements, 2 safety information, 1 serial number location, 6 service information, 1 spare parts, 7 support and troubleshooting, 19 troubleshooting, 19 21
-
 1
1 -
 2
2 -
 3
3 -
 4
4 -
 5
5 -
 6
6 -
 7
7 -
8
-
9
-
10
-
11
-
12
-
13
-
14
-
15
-
16
-
17
-
18
-
19
-
20
-
21
-
22
-
23
-
24
 |
 |

Maintenance and Service Guide
Z24q G3 model
SUMMARY
This guide provides information about spare parts, removal and replacement of parts, diagnostic tests, problem
troubleshooting, and more.