HP Z400 HP SATA/SAS Hard Drive and Solid State Drive Installation
HP Z400 - Workstation Manual
 |
UPC - 890552660926
View all HP Z400 manuals
Add to My Manuals
Save this manual to your list of manuals |
HP Z400 manual content summary:
- HP Z400 | HP SATA/SAS Hard Drive and Solid State Drive Installation - Page 1
adapter (included with SAS hard drives) ● Four 6-32 guide screws ● Installation instructions (this document) ● Warranty computer or workstation, view QuickSpecs at http://www.hp.com/go/productbulletin. © 2006-2010 Hewlett-Packard Development Company, L.P. Microsoft, Windows, XP , and Windows - HP Z400 | HP SATA/SAS Hard Drive and Solid State Drive Installation - Page 2
enable working on by connecting the static-free mat, static strap, and peripheral units to that piece of equipment. NOTE: HP accessories are for use in HP computer products. They have been extensively tested for reliability and are manufactured to high quality standards. 2 HP SATA/SAS hard drive - HP Z400 | HP SATA/SAS Hard Drive and Solid State Drive Installation - Page 3
in the service guide for your computer at http://www.hp.com/support/ manuals. 2. Power down the computer, and then disconnect the power cord. 3. Power down all external devices, and then disconnect them from the computer. 4. Remove the side access panel. Precautions for handling the drive ● Do not - HP Z400 | HP SATA/SAS Hard Drive and Solid State Drive Installation - Page 4
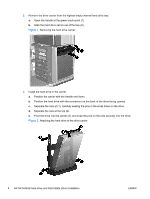
empty internal hard drive bay: a. Open the handle at the green touch-point (1). b. Slide the hard drive carrier out of the bay (2). Figure 1 Removing the hard drive carrier 3. Install the hard drive in the carrier: a. Position the carrier with the handle end down. b. Position the hard drive with the - HP Z400 | HP SATA/SAS Hard Drive and Solid State Drive Installation - Page 5
at the system board, based on the computer drive configuration. Verify that the blind-mate cable from the applicable hard drive bay is connected to an appropriate connector in the system board. NOTE: The pre-installed blind-mate data cables for workstations with both SATA and SAS connectors on the - HP Z400 | HP SATA/SAS Hard Drive and Solid State Drive Installation - Page 6
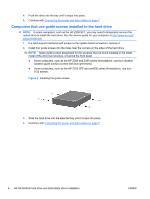
that use guide screws installed in the hard drive NOTE: In some computers, such as the HP Z200 SFF, you may need to temporarily remove the optical drive to install the hard drive. See the service guide for your computer at http://www.hp.com/ support/manuals. 1. If a card support interferes with - HP Z400 | HP SATA/SAS Hard Drive and Solid State Drive Installation - Page 7
interconnect cable from the kit that best fits the hardware configuration of your SATA or SAS hard drive. A cable with a right-angle connector can be used on the service label, located inside the computer side access panel. 3. Connect the power cable (1) and data cable (2) to the hard drive. CAUTION - HP Z400 | HP SATA/SAS Hard Drive and Solid State Drive Installation - Page 8
the card support, if applicable. 2. Reinstall the side access panel. 3. Reconnect power to the computer and all external devices. 4. Restore power to the computer and all external devices. Step 5-Configuring the computer When powering up the computer after installation, a new hard drive identifies
-
 1
1 -
 2
2 -
 3
3 -
 4
4 -
 5
5 -
 6
6 -
 7
7 -
8
 |
 |

HP SATA/SAS hard drive and Solid State
Drive installation
This document describes how to install Serial ATA (SATA) and Serial Attached SCSI (SAS) hard
drives or Solid State Drives (SSD) in an internal hard drive bay. Throughout this document, all
references to hard drives include solid state drives.
Kit contents
●
A SATA or SAS hard drive or Solid State Drive (SSD)
●
Multiple SATA interface cables (each of a different length and with different connector orientation
combinations)
●
SAS-to-SATA interface adapter (included with SAS hard drives)
●
Four 6-32 guide screws
●
Installation instructions (this document)
●
Warranty information
Tools required
The following may be required to install the hard drive:
●
T-15 Torx screwdriver or flat-bladed screwdriver
Your responsibilities
You are responsible for determining whether the product is appropriate for your use and will interface
with other equipment without malfunction or damage. You are also responsible for backing up data
before installing any product and for regularly backing up data after installing the product. HP is not
liable for any damage to equipment or data loss resulting from the use of any product. To determine
the compatibility of this product with your computer or workstation, view
QuickSpecs
at
go/productbulletin
.
© 2006–2010 Hewlett-Packard Development Company, L.P. Microsoft,
Windows, XP , and Windows Vista are U.S. registered trademarks of Microsoft
Corporation. Printed in the U.S.
ENWW
Kit contents
1