HP dx2358 Hardware Reference Guide: HP Compaq Business Desktops dx2358 Microto
HP dx2358 - Microtower PC Manual
 |
View all HP dx2358 manuals
Add to My Manuals
Save this manual to your list of manuals |
HP dx2358 manual content summary:
- HP dx2358 | Hardware Reference Guide: HP Compaq Business Desktops dx2358 Microto - Page 1
Hardware Reference Guide HP Compaq Business Desktops dx2358 Microtower Models Document Part Number: 481135-001 February 2008 This guide provides basic information for upgrading this computer model. - HP dx2358 | Hardware Reference Guide: HP Compaq Business Desktops dx2358 Microto - Page 2
HP products and services are set forth in the express warranty statements accompanying such products and services. Nothing herein should be construed as constituting an additional warranty. HP information. Hardware Reference Guide HP Compaq Business Desktops dx2358 Microtower Models First Edition (February - HP dx2358 | Hardware Reference Guide: HP Compaq Business Desktops dx2358 Microto - Page 3
1-5 Special Mouse Functions 1-5 Serial Number Location 1-6 2 Hardware Upgrades Serviceability Features 2-1 Warnings and Cautions 2-1 Removing the Computer Access Panel 2-2 Removing or Installing an Expansion Card 2-23 Reassembling the Computer 2-29 Hardware Reference Guide www.hp.com iii - HP dx2358 | Hardware Reference Guide: HP Compaq Business Desktops dx2358 Microto - Page 4
Methods D-1 E Computer Operating Guidelines, Routine Care and Shipping Preparation Computer Operating Guidelines and Routine Care E-1 Optical Drive Precautions E-2 Operation E-2 Cleaning E-2 Safety E-2 Shipping Preparation E-3 Hardware Reference Guide www.hp.com iv - HP dx2358 | Hardware Reference Guide: HP Compaq Business Desktops dx2358 Microto - Page 5
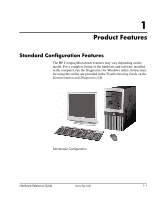
Configuration Features The HP Compaq Microtower features may vary depending on the model. For a complete listing of the hardware and software installed in the computer, run the Diagnostics for Windows utility. Instructions for using this utility are provided in the Troubleshooting Guide on the - HP dx2358 | Hardware Reference Guide: HP Compaq Business Desktops dx2358 Microto - Page 6
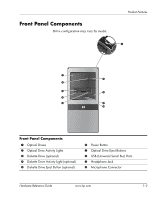
Activity Light (optional) 5 Diskette Drive Eject Button (optional) 6 Power Button 7 Optical Drive Eject Buttons 8 USB (Universal Serial Bus) Ports 9 Headphone Jack - Microphone Connector Hardware Reference Guide www.hp.com 1-2 - HP dx2358 | Hardware Reference Guide: HP Compaq Business Desktops dx2358 Microto - Page 7
Connector 5 o Universal Serial Bus (USB) q j Audio/Line-In Connector 6 m Serial Port Connector w g Microphone Connector ✎ Arrangement and number of connectors may vary by model. Hardware Reference Guide www.hp.com 1-3 - HP dx2358 | Hardware Reference Guide: HP Compaq Business Desktops dx2358 Microto - Page 8
Keys Used in combination with another key; its effect depends on the application software you are using. *Keys available in select geographic regions. Hardware Reference Guide www.hp.com 1-4 - HP dx2358 | Hardware Reference Guide: HP Compaq Business Desktops dx2358 Microto - Page 9
domain. Launches the Run dialog box. Launches the Utility Manager. Activates the next Taskbar button. Special Mouse Functions Most software applications support the use of a mouse. The functions assigned to each mouse button depend on the software applications you are using. Hardware Reference - HP dx2358 | Hardware Reference Guide: HP Compaq Business Desktops dx2358 Microto - Page 10
serial number and a product ID number that are located on the top cover of the computer. Keep these numbers available for use when contacting customer service for assistance. Serial Number and Product ID Location Hardware Reference Guide www.hp.com 1-6 - HP dx2358 | Hardware Reference Guide: HP Compaq Business Desktops dx2358 Microto - Page 11
service. A Torx T-15 screwdriver is needed for many of the installation procedures described in this chapter. Warnings and Cautions Before performing upgrades be sure to carefully read all of the applicable instructions, cautions, and warnings in this guide Hardware Reference Guide www.hp.com 2-1 - HP dx2358 | Hardware Reference Guide: HP Compaq Business Desktops dx2358 Microto - Page 12
want to lay the computer on its side to install internal parts. Be sure the side with the access panel is facing up. Hardware Reference Guide www.hp.com 2-2 - HP dx2358 | Hardware Reference Guide: HP Compaq Business Desktops dx2358 Microto - Page 13
AC outlet. You must disconnect the power cord to avoid damage to the internal components of the computer. 5. Remove the computer access panel. Hardware Reference Guide www.hp.com 2-3 - HP dx2358 | Hardware Reference Guide: HP Compaq Business Desktops dx2358 Microto - Page 14
Hardware Upgrades 6. Press outward on the three latches on the right side of the bezel 1, then rotate the right side of the bezel off the chassis 2 followed by the left side. Removing the Front Bezel Hardware Reference Guide www.hp.com 2-4 - HP dx2358 | Hardware Reference Guide: HP Compaq Business Desktops dx2358 Microto - Page 15
DIMM. To achieve the maximum memory support, you can populate the system board with SDRAM DIMMs For proper system operation, if the computer supports DDR2-SDRAM DIMMs, the DIMMs must be: ■ mandatory JEDEC SPD information In addition, the computer supports: ■ 512Mbit, 1Gbit and 2Gbit non-ECC - HP dx2358 | Hardware Reference Guide: HP Compaq Business Desktops dx2358 Microto - Page 16
, the system will operate in Interleaved mode. ■ In any mode, the maximm operational speed is determined by the slowest DIMM in the system. Hardware Reference Guide www.hp.com 2-6 - HP dx2358 | Hardware Reference Guide: HP Compaq Business Desktops dx2358 Microto - Page 17
1 2 3 4 Description DIMM socket XMM1, Channel A DIMM socket XMM2, Channel B DIMM socket XMM3, Channel A DIMM socket XMM4, Channel B Socket Color White White Black Black Hardware Reference Guide www.hp.com 2-7 - HP dx2358 | Hardware Reference Guide: HP Compaq Business Desktops dx2358 Microto - Page 18
on the system board. Å WARNING: To reduce risk of personal injury from hot surfaces, allow the internal system components to cool before touching. Hardware Reference Guide www.hp.com 2-8 - HP dx2358 | Hardware Reference Guide: HP Compaq Business Desktops dx2358 Microto - Page 19
any additional modules. 8. Replace the access panel. The computer should automatically recognize the additional memory the next time you turn on the computer. Hardware Reference Guide www.hp.com 2-9 - HP dx2358 | Hardware Reference Guide: HP Compaq Business Desktops dx2358 Microto - Page 20
into the two retainer slots on the left side of the front bezel then snap the right side of the blank into place. Hardware Reference Guide www.hp.com 2-10 - HP dx2358 | Hardware Reference Guide: HP Compaq Business Desktops dx2358 Microto - Page 21
supports up to five drives that may be installed in various configurations. This section describes the procedure for replacing or upgrading the storage drives. A Torx screwdriver is needed to remove and install the guide load the HP factory-installed files. Hardware Reference Guide www.hp.com 2-11 - HP dx2358 | Hardware Reference Guide: HP Compaq Business Desktops dx2358 Microto - Page 22
optional drives Second 5.25-inch, half-height bays for optional drives 2 One standard 3.5-inch, one-third height bays (1.44-MB diskette drive shown) Hardware Reference Guide www.hp.com 2-12 - HP dx2358 | Hardware Reference Guide: HP Compaq Business Desktops dx2358 Microto - Page 23
sure you have created a Recovery Disc Set to restore the operating system, software drivers, and any software applications that were preinstalled on the computer. If you do not have this CD set, of the computer. 5. Remove the computer access panel. Hardware Reference Guide www.hp.com 2-13 - HP dx2358 | Hardware Reference Guide: HP Compaq Business Desktops dx2358 Microto - Page 24
Hardware Upgrades 6. Remove the two screws that secure the hard disk drive cage to the chassis. Removing the Hard Drive Cage Screws Hardware Reference Guide www.hp.com 2-14 - HP dx2358 | Hardware Reference Guide: HP Compaq Business Desktops dx2358 Microto - Page 25
Hardware Upgrades 7. Push down the latch on the side of the hard disk drive cage 1, then slide the hard disk drive cage away from the bottom of the chassis 2 as shown below. Releasing the Hard Drive Cage Hardware Reference Guide www.hp.com 2-15 - HP dx2358 | Hardware Reference Guide: HP Compaq Business Desktops dx2358 Microto - Page 26
Hardware Upgrades 8. Lift the hard disk drive cage out of the chassis. Removing the Hard Drive Cage Hardware Reference Guide www.hp.com 2-16 - HP dx2358 | Hardware Reference Guide: HP Compaq Business Desktops dx2358 Microto - Page 27
Hardware Upgrades 9. Disconnect the power cable 1 and data cable 2 from the back of the hard drive. 1 2 Disconnecting the Hard Drive Cables Hardware Reference Guide www.hp.com 2-17 - HP dx2358 | Hardware Reference Guide: HP Compaq Business Desktops dx2358 Microto - Page 28
Hardware Upgrades 10. Remove the four screws that secure the hard disk drive to the hard disk drive cage 1, then slide the hard disk drive out of the hard disk drive cage 2. Removing the Hard Drive Hardware Reference Guide www.hp.com 2-18 - HP dx2358 | Hardware Reference Guide: HP Compaq Business Desktops dx2358 Microto - Page 29
drive, use the four retainer screws from the old drive to install the new drive. Installing the Hard Drive in the Drive Cage Hardware Reference Guide www.hp.com 2-19 - HP dx2358 | Hardware Reference Guide: HP Compaq Business Desktops dx2358 Microto - Page 30
Cables Ä CAUTION: Never crease or bend a SATA data cable tighter than a 30 mm (1.18 in) radius. A sharp bend can break the internal wires. Hardware Reference Guide www.hp.com 2-20 - HP dx2358 | Hardware Reference Guide: HP Compaq Business Desktops dx2358 Microto - Page 31
Hardware Upgrades 4. Place the hard disk drive cage into the chassis 1, then slide it down toward the bottom of the chassis until it locks into place 2. Installing the Hard Drive Cage Hardware Reference Guide www.hp.com 2-21 - HP dx2358 | Hardware Reference Guide: HP Compaq Business Desktops dx2358 Microto - Page 32
cable to the dark blue connector labeled SATA0 to avoid any hard drive performance problems. If you are adding a second hard drive, connect the data cable to system, software drivers, and any software applications that were preinstalled on the computer. Hardware Reference Guide www.hp.com 2-22 - HP dx2358 | Hardware Reference Guide: HP Compaq Business Desktops dx2358 Microto - Page 33
expansion slot. Expansion Slot Locations Item 1 2 3 4 Description PCI Express x16 expansion slot PCI Express x1 expansion slot PCI expansion slot PCI expansion slot Hardware Reference Guide www.hp.com 2-23 - HP dx2358 | Hardware Reference Guide: HP Compaq Business Desktops dx2358 Microto - Page 34
in place 1 and slide the slot cover lock away from the slots to remove it from the computer 2. Releasing the Slot Cover Lock Hardware Reference Guide www.hp.com 2-24 - HP dx2358 | Hardware Reference Guide: HP Compaq Business Desktops dx2358 Microto - Page 35
chassis. Pull the slot cover straight up from the socket then away from the inside of the chassis. Removing an Expansion Slot Cover Hardware Reference Guide www.hp.com 2-25 - HP dx2358 | Hardware Reference Guide: HP Compaq Business Desktops dx2358 Microto - Page 36
chassis 2 to release it from the chassis frame. Be sure not to scrape the card against the other components. Removing an Expansion Card Hardware Reference Guide www.hp.com 2-26 - HP dx2358 | Hardware Reference Guide: HP Compaq Business Desktops dx2358 Microto - Page 37
cable. ✎ When installing an expansion card, press firmly on the card so that the whole connector seats properly in the expansion card slot. Hardware Reference Guide www.hp.com 2-27 - HP dx2358 | Hardware Reference Guide: HP Compaq Business Desktops dx2358 Microto - Page 38
cover lock. Securing the Expansion Cards and Slot Covers 11. Complete the procedure described in the "Reassembling the Computer" section of this chapter. Hardware Reference Guide www.hp.com 2-28 - HP dx2358 | Hardware Reference Guide: HP Compaq Business Desktops dx2358 Microto - Page 39
Hardware Upgrades Reassembling the Computer 1. Insert the three hooks on the left side of the bezel into the slots on the chassis and rotate the bezel on from left to right 1 so that it snaps in place. Replacing the Front Bezel Hardware Reference Guide www.hp.com 2-29 - HP dx2358 | Hardware Reference Guide: HP Compaq Business Desktops dx2358 Microto - Page 40
, do not plug telecommunications or telephone connectors into the network interface controller (NIC) ports. 5. Turn on the computer by pressing the power button. Hardware Reference Guide www.hp.com 2-30 - HP dx2358 | Hardware Reference Guide: HP Compaq Business Desktops dx2358 Microto - Page 41
A Specifications HP Compaq Microtower Desktop Dimensions Height 14.76 inches 37.5 cm Width 6.98 inches 17.73 cm Depth 16.88 inches 42.87 rate of change is 7.5°C/Hr. The upper limit may be limited by the type and number of options installed. Hardware Reference Guide www.hp.com A-1 - HP dx2358 | Hardware Reference Guide: HP Compaq Business Desktops dx2358 Microto - Page 42
Specifications HP Compaq Microtower (Continued) Heat Dissipation Maximum 1575 BTU/hr 397 kg-cal/hr Typical (idle) 307 BTU/hr 77 range select switch. Power Output 300 W (PFC) 300 W (PFC) Rated Input Current (maximum) 8 A @ 115 VAC 4 A @ 230 VAC A-2 www.hp.com Hardware Reference Guide - HP dx2358 | Hardware Reference Guide: HP Compaq Business Desktops dx2358 Microto - Page 43
the battery only with the HP spare designated for this product. Ä CAUTION: Before replacing the battery, it is important to back up the computer CMOS settings. When the battery is removed or replaced, the CMOS settings will be cleared. Refer to the Troubleshooting Guide on the Documentation and - HP dx2358 | Hardware Reference Guide: HP Compaq Business Desktops dx2358 Microto - Page 44
system board. 4. Depending on the type of battery holder on the system board, complete the following instructions to replace the battery. a. To release the battery from its holder, squeeze the metal clamp that snaps over the other edge of the battery 2. Hardware Reference Guide www.hp.com B-2 - HP dx2358 | Hardware Reference Guide: HP Compaq Business Desktops dx2358 Microto - Page 45
to the computer. 7. Reset the date and time, your passwords, and any special system setups, using Computer Setup. Refer to the Computer Setup (F10) Utility Guide on the Documentation and Diagnostics CD. Hardware Reference - HP dx2358 | Hardware Reference Guide: HP Compaq Business Desktops dx2358 Microto - Page 46
below and on the following page can be used to secure the Microtower computer. ✎ A port security bracket (not shown) is also available. Go to www.hp.com for more information. Cable Lock Installing a Cable Lock Hardware Reference - HP dx2358 | Hardware Reference Guide: HP Compaq Business Desktops dx2358 Microto - Page 47
Padlock Installing a Padlock Hardware Reference Guide www.hp.com C-2 - HP dx2358 | Hardware Reference Guide: HP Compaq Business Desktops dx2358 Microto - Page 48
straps with a minimum of 1 megohm +/- 10 percent resistance in the ground cords. To provide proper ground, wear the strap snug against the skin. Hardware Reference Guide www.hp.com D-1 - HP dx2358 | Hardware Reference Guide: HP Compaq Business Desktops dx2358 Microto - Page 49
work mat. If you do not have any of the suggested equipment for proper grounding, contact an HP authorized dealer, reseller, or service provider. ✎ For more information on static electricity, contact an HP authorized dealer, reseller, or service provider. Hardware Reference Guide www.hp.com D-2 - HP dx2358 | Hardware Reference Guide: HP Compaq Business Desktops dx2358 Microto - Page 50
air vents on the front and back of the computer. Lint and other foreign matter can block the vents and limit the airflow. Hardware Reference Guide www.hp.com E-1 - HP dx2358 | Hardware Reference Guide: HP Compaq Business Desktops dx2358 Microto - Page 51
may damage the finish. Safety If any object or liquid falls into the drive, immediately unplug the computer and have it checked by an authorized HP service provider. Hardware Reference Guide www.hp.com E-2 - HP dx2358 | Hardware Reference Guide: HP Compaq Business Desktops dx2358 Microto - Page 52
computer. 7. Pack the system components and external devices in their original packing boxes or similar packaging with sufficient packing material to protect them. Hardware Reference Guide www.hp.com E-3
-
 1
1 -
 2
2 -
 3
3 -
 4
4 -
 5
5 -
 6
6 -
 7
7 -
8
-
9
-
10
-
11
-
12
-
13
-
14
-
15
-
16
-
17
-
18
-
19
-
20
-
21
-
22
-
23
-
24
-
25
-
26
-
27
-
28
-
29
-
30
-
31
-
32
-
33
-
34
-
35
-
36
-
37
-
38
-
39
-
40
-
41
-
42
-
43
-
44
-
45
-
46
-
47
-
48
-
49
-
50
-
51
-
52
 |
 |

Hardware Reference Guide
HP Compaq Business Desktops
dx2358 Microtower Models
Document Part Number: 481135-001
February 2008
This guide provides basic information for upgrading this computer
model.